
2024 OWNER’S MANUAL
TAB 400
nucamprv.com

WARNING
This User Manual contains important safety information and features
for the safe operation of this vehicle. Before loading or towing this
trailer, you must read this User Manual. Failure to comply could result
in serious injury or death.
DISCLAIMERS
This Manual. All information, illustrations, and specications contained in this manual are based on the
latest product information available at the time of publication approval. If new materials and production
techniques are developed that can improve the quality of its product, or material substitutions are
necessary due to availability, nuCamp reserves the right to make such changes. nuCamp further
reserves the right to make changes to the equipment, form, technical system, or layout of each camper
as it sees t to be innovative and benecial. Therefore, no legal claims may be led against nuCamp
based on the contents of this manual. nuCamp is not responsible for the observance or nonobservance
of this instruction manual. Any given specications may be subject to change without notice. Recorded
tongue weights, overall weights, fuel, liquid capacities, and dimensions may also be approximate.
Procedures. All operating procedures in this manual are designed as typical under normal conditions.
Safe operation and use of any nuCamp products is the sole responsibility of the owner. nuCamp will not
be liable for any injury or loss sustained from the observance or non-observance of any procedures or
safety warnings supplied in this manual or in any third-party manuals or guides supplied within the unit.
External Websites. Regarding third-party websites listed or referred to at any place in this manual,
nuCamp provides this information “as is” for consumer ease of use and troubleshooting. No liability
whatsoever shall be assumed by nuCamp in connection with these websites, be it information, external
links, third-party links, errors, omissions, inaccuracies, or any other content on the websites. These
websites are for use strictly at your own risk. Most of the information is meant to be of a general nature
and may not pertain to your circumstances. nuCamp has no control over third-party vendors and
supplier websites and therefore will assume no responsibility for any type of loss or injury sustained
from its actions, omissions, or negligence. It is not considered legal advice.
Endorsements. Any commercial products, processes, or services by trade name, trademark, or other
manufacturer referenced within third-party internet links do not imply in any way endorsement or
recommendation of nuCamp. Furthermore, nuCamp does not have control over any information found
at third-party links, assumes no responsibility over the availability or content of third-party sites, and
cannot offer warranties, guarantee or endorse any products, services, or information offered by such
links.
Optional Items. Optional items may be available on some or all oorplans and models. Additionally,
some optional items can only be included during the manufacturing phase and cannot be added later
to the trailer. The inclusion of optional items references or information in this manual does not imply or
suggest the availability, application suitability, or inclusion for any specic unit.
COPYRIGHT
All information of any type, including extracts, in this manual, is strictly forbidden to be reproduced,
copied or translated in any shape or form without the explicit approval of nuCamp. Any attempt to do
so may result in legal action and prosecution. All rights are reserved.

WELCOME
Thank you for purchasing the TAB 400 Teardrop Travel Trailer. We are excited to be able to contribute
to your enjoyment of recreation wherever you may go. You have joined an elite group of people,
and as you begin making great memories using your nuCamp trailer we wish you many exciting and
adventurous days of camping. To ensure maximum enjoyment, and a full understanding of your camper
and how it operates, please discuss questions or concerns with your dealer before using your camper
for the rst time.
BEGINNING YOUR JOURNEY
Please have a comfortable seat in your newly purchased camper and take some time to review this
owner’s manual. Because we are continuously innovating products and improving the technical
functions of our campers, even experienced nuCamp customers will nd new and exciting information
about the products and components included in this camper.
Pay very close attention to the boxed safety warnings, labeled “DANGER”, “WARNING”, “CAUTION”
and “NOTICE”, throughout this manual and on your camper. These labels contain vital information
pertaining to your safety and well-being. Lives depend on your understanding of this information to
ensure proper reactions to safety hazards arising from critical situations.
Please review the separate instruction manuals for the appliances, special equipment, and accessories
included in the owner packet supplied by nuCamp. These instruction manuals also include important
warranty registration information and procedures that you must follow to register products installed
on your camper. Please refer to the item-specic manuals for warnings and safety features of each
individual component and accessory.
OUR MISSION
At nuCamp we are rstly a group of men and women that care deeply for one another, honor one
another, are transparent, build relationships to change people’s lives, esteem one another higher than
our own selves, and thus live out servant leadership.
Secondly, we strive to build and distribute a product that are innovative, high-quality, and superb in
function, reecting integrity and honesty.
330-852-4811 • nucamprv.com •
INTRODUCTION
Disclaimers ............................................. 2
Copyright................................................2
INTRODUCTION
Welcome ................................................3
Beginning Your Journey ........................3
Our Mission ............................................ 3
FOREWORD
About This Manual .................................5
GETTING STARTED
Dealer Responsibility .............................6
Owner Responsibility ..........................6-7
Owner Packet .........................................7
Warranty Registration ............................ 7
Component Registrations ...................... 7
Fire Safety Plan ......................................7
Emergencies ....................................... 8-9
GENERAL SAFETY
Safety Certications .............................10
Safety Messages ..................................10
Fire Safety .......................................10-11
Fire Extinguisher ..................................11
Emergency Exit Window ................. 11-12
Smoke Alarm ........................................12
Carbon Monoxide ...........................12-13
CO & LP Gas Alarm ...............................13
TOWING & LEVELING
Speed ...................................................14
Rig Dynamics .......................................14
Driving Practices .............................14-15
Tow Vehicle ........................................... 15
Hitch & Coupler ............................... 15-16
Safety Chains........................................16
Breakaway Switch .................................16
Connector Plug ....................................17
Towing Hookup ....................................17
Basic Tire Safety ...................................18
Tire Maintenance ............................ 18-20
Spare Tire ....................................... 20-21
Tire Information ..............................21-23
Lug Nuts ...............................................23
Weight Denitions ......................... 23-24
Load Distribution .................................24
Carrying Cargo ............................... 24-26
Steps To Determine Correct Loads . 26-28
Leveling ................................................28
Stabilizing & Setup ............................... 28
Axle & Brake System ...................... 28-29
HEATING & COOLING
Alde® Heating System .........................30
Alde® Flow ............................................31
Air Conditioning ............................. 31-32
Fan Ventilation .....................................32
PLUMBING
Water System Information & Safety ...33-34
Monitor Panel.......................................34
Plumbing Control Panel.......................34
Freshwater Tank ..............................34-35
Water Pump .........................................35
Shower ...........................................35-36
Exterior Wash Station ...........................36
Hot Water & Mixing Valve ....................36
Wastewater Holding System ................37
Toilet .....................................................37
Winterizing/De-winterizing ........... 38-39
PROPANE GAS
LP Safety .............................................. 40
Filling LP Tanks ..................................... 41
Propane Regulator ...............................42
Propane System Maintenance ............42
Propane Usage .....................................42
ELECTRICAL
Electrical Safety & Information ............43
120V AC Shore Power ...........................43
12V DC System .................................... 44
Battery(ies) ....................................44-45
Battery Disconnect Switch ...................45
Power Distribution Center ...................45
Converter........................................45-46
Ground Fault Circuit Interrupter ......... 46
Receptacles ......................................... 46
Inverter ................................................ 46
nuCamp Control Panel ........................ 46
Safety Lights ......................................... 47
Interior Lights ....................................... 47
Entertainment System .........................47
Cable Satellite Connection ..................47
Solar …………………....................47-48
LITHIUM PACKAGE
Lithium package .................................. 49
Battle Born Batteres ............................49
WFCO Distribution Panel ....................49
Victron Multiplus .................................49
Victron SmartShunt ............................. 49
Bluetooth Capability ..................... 49-51
KITCHEN APPLIANCES
Range/Cooktop ....................................52
Microwave Oven (If Equipped) .............53
Refrigerator/Freezer .............................53
EQUIPMENT & HARDWARE
Storage Tongue Box .............................54
Hardware Adjustments………….........54
Windows/Blinds…………………..…..54
Bunk Conversion………………….54-57
INTERIOR ENVIRONMENT
Prolonged Occupancy ..........................58
Air Quality ............................................58
Condensation ................................. 58-59
Mold .....................................................59
Outgassing ...........................................60
Chemical Sensitivity.............................60
Formaldehyde ......................................60
Pets .......................................................60
MAINTENANCE
Cleaning Care ................................. 61-63
Storage Preparation .......................63-64
Camping Season Preparation ............. 64
Maintenance Schedule ........................65
Maintenance Record ............................66
TROUBLESHOOTING
Alde® System .......................................67
Plumbing System ................................. 67
Electrical System ..................................68
Propane Gas System ............................68
SERVICE & WARRANTY
nuCamp Warranty Information ...... 69-72
Replacement Parts ...............................72
Aftermarket Alterations ...................72-73
Dealer Service Center ........................... 73
nuCamp Service Center .......................73
Contacting Us .......................................74
REPORTING SAFETY
DEFECTS........................................75
GLOSSARY ..............................76-78

ABOUT THIS MANUAL
The Owner’s Manual for your new travel trailer is designed to answer the most frequently asked
questions regarding the operation, function, and care of the many systems that make modern camping
a pleasure.
For more complete instructions regarding safety, maintenance, and operation of the items included in
your camper, carefully read the booklets supplied by the component manufacturers. All information
contained in this manual may not relate to your specic model; however, booklets supplied by the
component manufacturers, and included in your owner’s packet, will provide any additional information
needed. You are responsible for the reading, understanding and following the instructions pertaining to
the tow vehicle as well as the instructions in this manual.
All information in this handbook should be considered a permanent part of the trailer and should be
transferred to the new owners if the trailer is ever sold.
This manual may have occasional tips to enhance your experience of the recreational and camping
lifestyle. While this may be helpful, this manual is not designed as a camping guide but rather as a
guide in how to operate your trailer for maximum enjoyment.
This manual does not in any way create a warranty, whether express or implied. The information in this
manual is not meant in any way to supplement, modify, or change the terms and conditions of your
trailer’s warranty, or any warranties offered on any component by its manufacturer.
At nuCamp we actively work to provide improved and better information about the use of our
products. If you have helpful information that you think may benet fellow nuCamp product owners,
you may submit it via e-mail to help@nucamprv.com with a subject of “Owner’s Manual” and your
submission will be considered for the next update.
FOREWORD

DEALER RESPONSIBILITY
When you purchase your camper, nuCamp expects the following of the dealer:
1. Perform a Pre-Delivery Inspection (PDI). The inspection must include the testing of all systems
and components installed in your new camper. Your camper must pass the PDI test before it
is eligible to be sold to you. nuCamp does not control dealer actions and is not responsible for
an incomplete PDI.
2. Give you a complete tour of your camper’s appliances and features and teach you how to
operate each of the systems.
3. Prepare your camper for your rst camping trip with all equipment in running order and ready to
be used.
4. Provide you, the owner, access to this Owner’s Manual.
5. Provide and explain to you the nuCamp One Year Limited Warranty, Three Year Limited Structure
Warranty, and the Warranty Claim Procedure.
6. Register your One Year Limited Warranty online at www.nucamprv.com. You should receive a
conrmation email when the warranty has been activated.
7. Provide you with two sets of keys and all remotes needed to operate select appliances and
components in your camper.
8. Provide you with the complete Owner Package which has all component user manuals and other
complimentary items from nuCamp. This is located within the trailer when shipped from nuCamp.
9. Assist you in locating the model and serial numbers of each installed component and walk you
through activating the manufacturer’s warranties.
10. Discuss and plan with you what to do in case of service needed on your camper, whether local or
abroad. This includes repairs not under warranty.
11. Service the full nuCamp lineup. From time to time an owner will have an emergency while in
transit. In such an event, every nuCamp dealer is strongly encouraged (and expected) to
accommodate such repairs. Please note: nuCamp dealers are independently owned and
operated and possess the ability to refuse service. Furthermore, a nuCamp dealer that
does not sell truck campers is not required, nor expected to, perform work on said product.
OWNER RESPONSIBILITY
Before, during, and after the purchasing process of your new camper, nuCamp expects the following of
you, the owner:
1. You fully inspected the entire camper for any kind of defects and have found it acceptable, clean,
and completely free of damage.
2. You acquired access to this Owner’s Manual.
3. You were shown how to operate each feature and function of your new camper and are fully
aware of the maintenance schedule required to keep your camper in excellent operating order.
4. You have agreed to be responsible for properly maintaining your new purchase and performing
any needed service in a timely manner.
5. You have read and understood all safety messages in various locations on the camper and
in this manual. You have agreed that nuCamp is not liable for any warranty coverage
or compensation for injury or loss sustained through the disregarding of safety messages,
regardless of your awareness. You are fully responsible.
6. With dealer assistance, you have registered all warranties of installed components. To avoid loss
of coverage it is crucial that you activate each warranty registration within the prescribed
time limit.
7. You had a chance to review, read and fully understand the nuCamp One Year Limited Warranty,
Three Year Limited Structure Warranty, and the Warranty Claim Procedure.
8. You received a copy the of One Year Limited Warranty before your purchase was completed. You
read and agreed by written signature to the terms and conditions contained therein.
GETTING STARTED

9. You had any and all questions answered by the dealer.
10. You have responsibly protected yourself and others by acquiring insurance coverage on your
camper. Consult your insurance agent for appropriate coverage before leaving the dealership
with your new camper.
OWNER’S PACKET
An owner’s packet is included in every camper manufactured by nuCamp. This packet includes all your
component user manuals and warranty cards. The Packet and its contents (except for complimentary
items from nuCamp) should be considered a working part of the camper equipment and must be
passed to new owners at any sale.
WARRANTY REGISTRATION
For the best warranty service please be sure that your warranty registration has been submitted to the
Warranty Department at nuCamp. While nuCamp expects your dealer to submit the registration, it will
ultimately be in your best interest to conrm that the warranty registration request has happened. If
you have not received conrmation of the completed warranty registration form, please contact the
nuCamp Warranty Department by phone at 844-823-9112 or email at warranty@nucamprv.com and
request conrmation. Have your camper’s Vehicle Identication Number (VIN) available when you
contact us.
COMPONENT REGISTRATIONS
Most installed appliances, features, and components included with your camper will have a warranty of
some type and some may be eligible for coverage under the nuCamp One Year Limited Warranty. Refer
to the included user manuals in your owner’s packet for any information the supplier has listed.
FIRE SAFETY PLAN
In case of re or weather emergencies, it is vital to have a Safety Plan developed for all occupants. The
plan should be rehearsed and frequently practiced. Review the safety warnings in the General Safety
portion of this manual for details. Pay attention to door and emergency exit window locations, re
safety, and how to operate safety equipment in your camper.
Educate all occupants on the following:
1. The meaning of each alarm equipped in the camper.
2. The designated outside meeting placeis a safe distance away from the camper where everyone
gathers in an emergency. This should be chosen at each stop after parking your camper.
3. The instructions for using the emergency exits. Practice nding the exit blindfolded. In case of a
real re, smoke may obstruct your vision.
4. The safety procedure in the event of a re, smoke, or gas: stay low to the oor, avoid breathing in
the fumes, and exit immediately.
5. The safety procedure in the event clothing catches re is: Stop, Drop, and Roll. STOP, don’t run,
DROP to the ground, and ROLL back and forth until the re is extinguished. Use your hands
to shield your face from the re. Running will only increase a re.
6. The location of emergency phone numbers and the conditions under which emergency services
should be called.
7. The contact information for a friend or relative who will serve as an emergency contact. Make
this information available to all your family members.
Consult your local re department for assistance in compiling a comprehensive Safety Plan for your
specic camper.

EMERGENCIES
Emergency Preparation. Keep an emergency rst aid kit in your camper. A separate kit with essential
tools and supplies should also be compiled. These may come in handy in some emergencies as well as
for any type of troubleshooting that may arise. The tools suitable for your needs may depend largely on
how much boondocking or cold-weather camping you do. Boondock camping may take you far away
from the nearest service station and so be prepared to do some of your own maintenance. A common
list of items needed for emergencies, troubleshooting, and maintenance is as follows:
Adjustable Wrench High Visibility Cones Socket/Ratchet Set
Allen Wrenches Ice Scraper Tape Measure
Car Jack (2-ton) Jumper Cables Thread Seal Tape
Cordless Drill Leather Gloves Tie Down Straps
Drill Bits & Tips Level Tire Pressure Gauge
Duct Tape Lug Wrench Tire Repair Kit
Emergency Blankets Multi-Bit Screwdriver Tow Rope (5-ton capacity)
Extra Batteries Multimeter Traction Aid (Sand)
Extra Fuses Pliers Utility Knife
Flashlight Raincoat Wheel Chocks
Hammer Road Flares Wire Cutters
Hand Cleaner Shop Rags Zip Ties
Weather Emergencies. When it comes to recreational activities, weather can be the number one factor
affecting your enjoyment of the great outdoors. Be prepared for any type of weather emergency when
traveling with your camper. The following may be helpful in addressing such emergencies:
• Develop a disaster plan for all occupants. Everyone should know what to do in severe weather.
Different types of weather will call for different responses to be familiar with each.
• Know if the campground has a designated shelter area in case of severe weather. When you
arrive at a campground, ask management what to do in case of a weather emergency and where
the designated shelter area is located. If the campground is unstaffed, there are probably
no weather emergency provisions made for that campground. Be prepared with your
own emergency weather plan.
• Find a local radio or TV station that broadcasts weather. In case of power loss, keep an
emergency-grade battery-operated radio with extra batteries available.
• Invest in a weather radio. A weather radio will give you access to 24-hour VHF weather
broadcasts from the US National Weather Service.
• Research and educate yourself on weather safety. Visit the US National Oceanic and Atmospheric
Administration website at www.noaa.gov to learn more.

Roadside Emergencies. Roadside emergencies can occur at any given time while traveling. The
following guidelines will help you resume travel faster in the case of a roadside emergency:
1. To obtain service, locate your nearest authorized nuCamp dealer using our “Find a Dealer”
feature on the website at www.nucamprv.com.
2. If you cannot nd an authorized dealer in close proximity to your location, you may try:
• Searching online for a service center near you.
• Asking campground staff for service centers nearby.
• Acquiring a local Yellow Pages phone book and checking for RV service centers.
• Contacting the dealer you bought your trailer from.
• Contacting nuCamp Customer Experience.
3. Upon locating a Service Center have the camper repaired. Unless you are still in the warranty
period of your camper you will be responsible for repair costs. If you believe you qualify for
warranty coverage, please have the repair center contact the nuCamp Warranty Department
by phone at 330 - 852- 4811 or email at warranty@nucamprv.com for pre-approval of
repair coverage.
4. If you have an emergency repair on a weekend, after business hours, or on a holiday when
nuCamp Warranty Department personnel are not available, take the initial steps and nd
your nearest dealer. Should the situation be dire in nature, where it materially affects your
ability to camp or operate your camper, please have it repaired and then contact the Warranty
Department during normal business hours to acquire coverage approval. (Note: nuCamp
does not guarantee any repairs are eligible for warranty coverage until approval is given through
the Warranty Department.)
Teardrop Campers • nucamprv.com10
GENERAL SAFETY
SAFETY CERTIFICATIONS
All nuCamp campers have been designed to conform with, or exceed,
the National Fire Protection Association (NFPA) 1192 standard, American
National Standards Institute (ANSI) 1192 standards, Canadian Standards
Association (CSA) Z-240 standard (for Canadian units), and ap¬plicable
federal motor vehicle standards. These standards establish the
requirements for electrical, plumbing, fuel systems and equipment, re
and life safety provisions and other requirements for quality and safety.
The Recreational Vehicle Industry Association (RVIA) and the Canadian
Recreational Vehicle Industry Association (CRVIA) routinely check
nuCamp product lines to ensure compliance with the above agencies and
organizations. RVIA considers nuCamp an active member in good standing
and compliance. At nuCamp our design team and Quality Standards
department take all RVIA standards into consideration when designing
new models and camper upgrades to ensure consumer safety.
SAFETY MESSAGES
Throughout your travel trailer you will nd many labels and data plates to
aid you in efcient, safe operation and servicing instructions. Tour your
trailer to read and understand these messages before operating for the
rst time. If any label or data plate has been removed, damaged, defaced
or painted over, replace it immediately. Following is a description of the
meaning of each different type of label conveying a safety message:
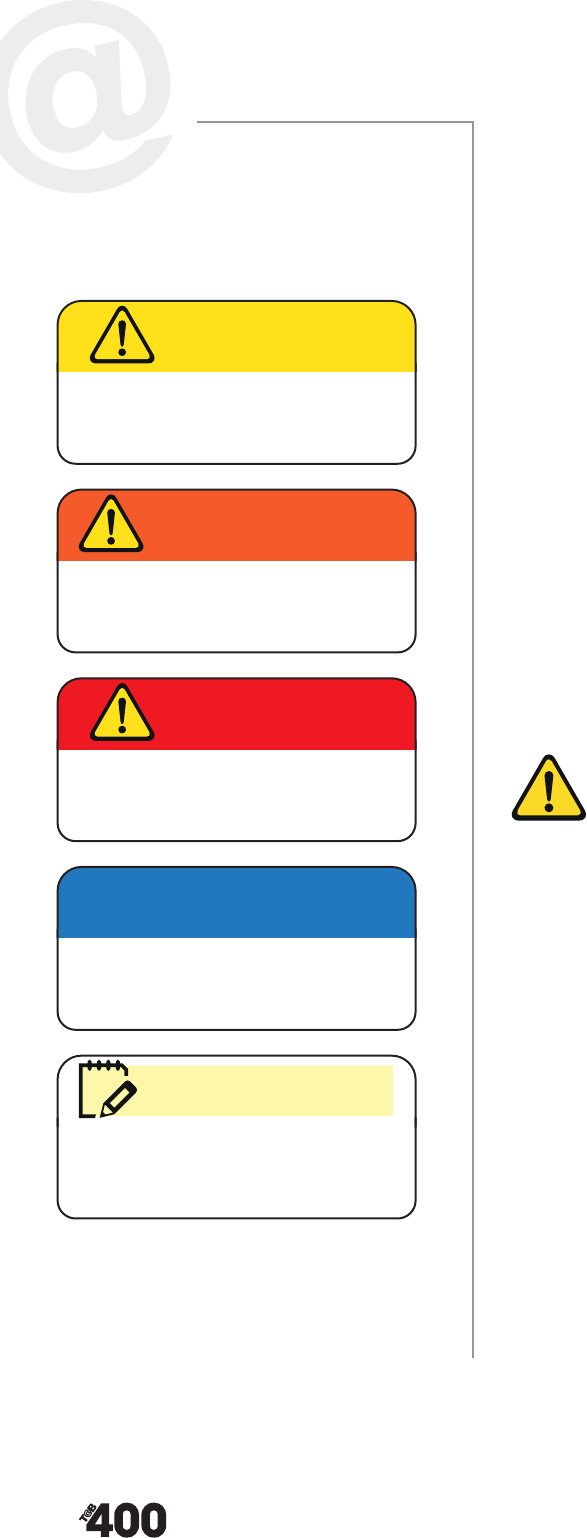
SAFETY ALERT SYMBOL
Recognize this symbol as an alert to important safety information
or a hazardous situation that can cause property damage, minor
or serious injury and in extreme cases, death to you or others.
Always read instructions included with this symbol.
FIRE SAFETY
These common causes are related to re safety hazards and should be
avoided at all costs:
• Smoking in bed
• Leaving children unattended
• Using ammable cleaning uids
• Leaving food unattended while cooking or baking
• Having faulty wiring
• Using damaged electrical devices
• Having propane or gasoline fuel leaks
• Being careless
In a re emergency:
• Evacuate the camper immediately. Safe escape is the most
importantpartofareemergency.
• Execute the Fire Safety Plan you developed. Refer to the GETTING
STARTED section of this manual.
• Understand the type of re you are dealing with. Using water in a
grease re may spread the re while using water for an electrical re
may result in electrocution.
• Call 911 from a safe distance away, regardless of the re size.
A potentially hazardous situation that
can result in moderate injury and/or
property damage.
CAUTION
A potentially hazardous situation that
can result in death, serious injury and/or
property damage.
WARNING
A potentially hazardous situation that,
if not avoided, will result in death or
serious injury.
DANGER
Attention is called to the observation
of a specic procedure to maintain a
specic condition.
NOTICE
The note symbol is to give you extra
information or a tip on the subject
presented.
SAFETY LABEL DESCRIPTIONS
GENERAL NOTES
nucamprv.com • Teardrop Campers 11
Cultivate these safety habits in recreation to minimize re safety
hazards:
• Teach all occupants Fire Safety Practices. Consult your
local Fire Department and the NFPA (www.nfpa.org) for
more information.
• DO NOT leave a burning re of any kind unattended.
• Always supervise children around campres, grills and,
stovetops, where there is an open ame.,
• Maintain a minimum three-foot area around campres, grills, and
tents that are free of dry grass, leaves, pine needles, wood, bushes,
trees, or combustible materials.
• Be ready in advance to quickly and completelyalways extinguish any
type of re.
• Teach everyone how to use the P.A.S.S. method with a re
extinguisher.
• DO NOT store ammable materials in closed areas or by a heat source
.
• When refueling motor vehicles rst turn off all pilot lights and
appliances in your camper.
FIRE EXTINGUISHER
A re extinguisher is located on or near the door of your camper. Read all
user instructions on the re extinguisher in its user manual, found in your
Owners Packet. The extinguisher is designed for Class B (ammable liquid,
oil, or grease) and Class C (energized electrical) res as these are the most
common in recreational vehicles.
After all occupants are evacuated from the camper and before you use the
extinguisher in a re emergency, determine the cause and severity of the re.
• If the re is large or fueled by an oil product or other ammable
liquid, stay clear of the camper and let the re department handle it.
• If the re is very small and can be managed, use the re
extinguisher.
• Keep your back to the door so you can evacuate quickly if the re
gets out of hand, or the room is too full of smoke.
• Remember that any oxygen supplied to a re may further fuel it.
When operating a re extinguisher, remember the acronym P.A.S.S.
P-ull the pin. Point the nozzle away from you.
A-im the nozzle at the base of the re.
S-queeze the lever gently and slowly.
S-weep the nozzle from side to side to extinguish the re.
EMERGENCY EXIT
The Emergency Exit Window in all nuCamp campers is recognized by the
“EXIT” label and its red handles. This exit serves as a secondary means of
escape if the main entry/exit door gets blocked during an emergency. The
EXIT window is made of the same acrylic material and operates the same
as all other windows in the camper.
Practice the following:
• Teach all occupants how to operate the EXIT window before
an emergency.
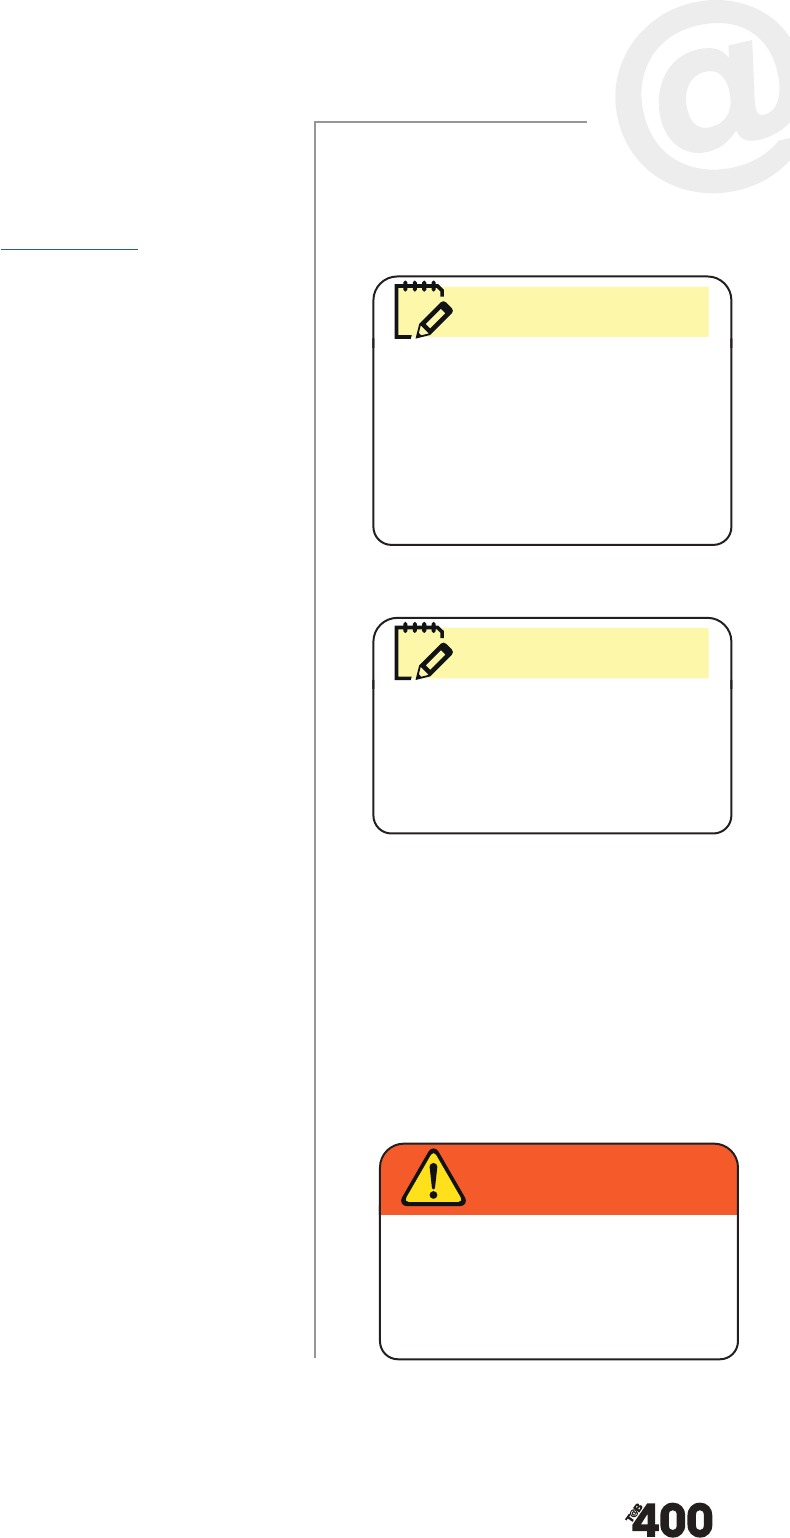
While many things can be construed as
safety related, the most important is your
common sense. If you are careless with
matches, cigarettes, ammable material,
or any other hazardous material, we can
only hope you realize that potential for
accidents is greatly increased.
COMMON SENSE
Various safety and information labels
are attached to surfaces both inside
and outside your RV. These labels are
permanent and should not be removed
or relocated for any reason.
WARNING LABELS
Replace the re extinguisher
immediately after using it. Contact the
local re department for instructions on
disposing of your used, non-rellable,
dry chemical re extinguisher.
WARNING

Teardrop Campers • nucamprv.com12
• In the Family Safety Plan decide in what order occupants will exit
the camper in an emergency.
• When parking the camper, check that the EXIT window is not
blocked by obstacles such as branches or trees. Have solid, level
ground below and outside the window with a clear path of escape.
• Have a blanket or heavy coat ready to serve as a cushion on the
window frame.
• The rst person to exit must be prepared to assist those going last.
• Open and close the Emergency Exit Window on each trip to keep
the window from potentially sticking to the seal.
• Lock the Emergency Exit window while traveling or moving the trailer.
SMOKE ALARM
Your camper is equipped with a smoke alarm. The alarm will only sound
when smoke reaches it. Read the user manual for the smoke alarm to nd
all the needed information regarding its operation.
Important Information:
• The alarm is powered by a standard 9-volt battery. When the
battery is connected a red LED light will blink.
• When the alarm is activated by smoke, it will beep repeatedly, and
the LED light will ash rapidly.
• Never disable the alarm for nuisance’s sake or false alarms. This
could be fatal if you forget to turn it back on. Ventilate the cabin
with fresh air instead.
• Test your smoke alarm with these steps:
1. Press and hold the test button until the alarm sounds.
2. The alarm will beep about four times.
3. If there is no sound replace the alarm or supply a new battery.
• The smoke alarm is designed to give you advance notice of the
presence of smoke which may lead to open ames.
• If the alarm sounds, evacuate the camper immediately and call 911.
• Replace the alarm when it reaches its expiration date.
CARBON MONOXIDE
Carbon Monoxide (CO) gas is a poisonous gas that is colorless, odorless,
and tasteless. It is incompletely burned fuel often from propane
appliances, diesel, or gas exhausts. In campers, it is often from propane-
powered appliances or exhausts blowing into windows from vehicles or
generators. Even low concentrations can be dangerous to your health and
life. Make sure all occupants understand and can recognize the symptoms
of carbon monoxide poisoning.
Carbon Monoxide Poisoning Symptoms:
Dizziness Vomiting
Drowsiness Shortness of breath
Weakness Confusion
Runny nose Blurred vision
Sore or watery eyes Unconsciousness
Dull headache Brain damage
Nausea Death
Test smoke alarm for proper function
after camper has been taken out of
storage, once per week and before each
trip. If the smoke alarm does not test
properly, replace it immediately.
WARNING
Never use open ame to test the smoke
alarm. This can set the smoke alarm and
your camper on re.
WARNING
If the CO alarm sounds GET OUT of the
camper immediately to fresh air. Open
doors and windows and turn on fans to
air out the camper. Determine the cause
of the CO before reoccupying the camper.
WARNING
nucamprv.com • Teardrop Campers 13
In most cases of CO poisoning, individuals become aware they are not
feeling well but become so disoriented they aren’t able to save themselves
by getting to fresh air or calling for help. This is especially dangerous for
people who are sleeping or intoxicated. Pets, babies, and small children
are usually the rst affected by CO poisoning.
It is very important to have exhaust fans running and an air inlet such
as a window open when operating fuel-burning appliances.
CO & LP GAS ALARM
Your camper is equipped with a CO/Propane Leak alarm near the oor
that will sound when Carbon Monoxide reaches dangerous levels or if a
propane leak occurs.
If the alarm signal sounds:
1. Move to fresh air immediately. Evacuate all persons from the
camper, leaving doors and windows open, and execute your Safety
Plan. Do not silence the alarm. If possible, shut off the gas supply at
the source and turn off all gas appliances.
2. Call Emergency Services. Do not re-enter the camper until
Emergency Service responders have arrived, the camper has been
aired out and your alarm returns to normal condition.
3. If the alarm re-activates after 24 hours, it may be evidence of a
propane leak or appliance malfunction. Repeat steps 1 and 2 and
then have a qualied technician investigate. If equipment needs
service, do so immediately. If a technician is not available, contact
the nearest re department for assistance.
How to test alarm for proper operation: (Unit must be powered on for
at least three minutes before testing)
1. Press the “TEST” button until the alarm sounds.
2. All LEDs will light up and alarm the will sound twice.
3. The LED ashes red and returns to normal operation displaying a
ashing green LED every 8 seconds.
4. If the alarm does not sound or light up, you may need to have a
service technician examine and/or repair it.
Important Information:
• The alarm is powered by the 12V DC system. Disconnect the battery
when not using the camper to keep the battery from being drained.
• The alarm will need to be replaced after 7 years.
• Read the user manual for the alarm found in your owner’s packet for
complete safety instructions and troubleshooting and incorporate
useful practices listed therein into your Safety Plan.
• The alarm sensor may detect other vapors such as gasoline,
acetone, alcohol, butane, and other fumes that can be found in
perfumes, alcoholic beverages, adhesives, kerosene, cleaning
agents, and aerosol cans.
• Read all safety-related messages in the propane gas section of this
manual. [See Page 38]
Test carbon monoxide alarm for proper
function after camper has been taken out
of storage, once per week and before each
trip. If the CO alarm malfunctions or does
not test properly, replace it immediately.
WARNING
Do not use open ame such as a cigarette
lighter to test the CO/Propane gas alarm.
Sensors may become damaged and alarm
may catch re.
WARNING
If a tow vehicle or generator is running
near your camper, CO emissions can
potentially lter through the air system
into your camper.
WARNING
Teardrop Campers • nucamprv.com14
TOWING & LEVELING
SPEED
In ideal road conditions, the maximum recommended speed for safely
towing a trailer is 65 mph. Your trailer is more likely to sway under higher
speeds, thus increasing the possibility of a loss of control. Your tires can
also overheat, increasing the possibility of a blowout.
RIG DYNAMICS
When towing a trailer, you will encounter:
• Increased Turning Radius. This means you must make wider turns
to keep from hitting curbs, vehicles, and anything else on your
inside corner.
• Increased Stopping Distances. To compensate for increased
stopping distances, while following another vehicle on the highway,
stay one rig length away from the vehicle in front of you for every
10 mph of your speed.
• Different Vehicle Handling Dynamics. Your trailer will be more
sensitive to steering in windy conditions. Larger vehicles passing will
have a greater effect on the control and handling of the vehicle.
• Slower Acceleration. You will need a longer distance to pass, due to
slower acceleration and increased length.
DRIVING PRACTICES
Safe driving practices and habits:
• Slippery conditions. Slippery road surfaces will be more dangerous
when driving a vehicle with a trailer, compared to driving without
a trailer.
• Rainy Weather. While rain may seem harmless, the dangers of
hydroplaning increase if you do not reduce your speed. Turn
on your emergency ashing lights to help others on the road to see
you better, especially in heavy rain where visibility is reduced.
• Black Ice. In rainy weather when temperatures drop to 32° or lower,
black ice is possible and will show up on bridges rst. Reduce your
speed to reduce the risk of losing control.
• Trailer Sway. This is caused by excessive steering, wind gusts,
roadway edges, the trailer’s reaction to the force created by passing
trucks and buses, or improper loading of cargo in the trailer—a
frequent problem. When encountering trailer sway under high
speeds, back off the accelerator and “ride it out” by steering
as little as possible to stay on the road. Use small “trim-like”
steering adjustments. Do not attempt to quickly steer out of the
sway. This is dangerous and can result in loss of control. If your
vehicle is equipped with hand control of the electric trailer brakes,
gently apply the trailer brakes alone to straighten out any sway. This
works because it puts pressure between the tow vehicle and the
trailer where the sway is happening.
• Check rearview mirrors every 2-3 seconds to observe trailer
behavior and accompanying trafc.
• Always check your rearview mirrors before changing lanes and
always use turn signals.
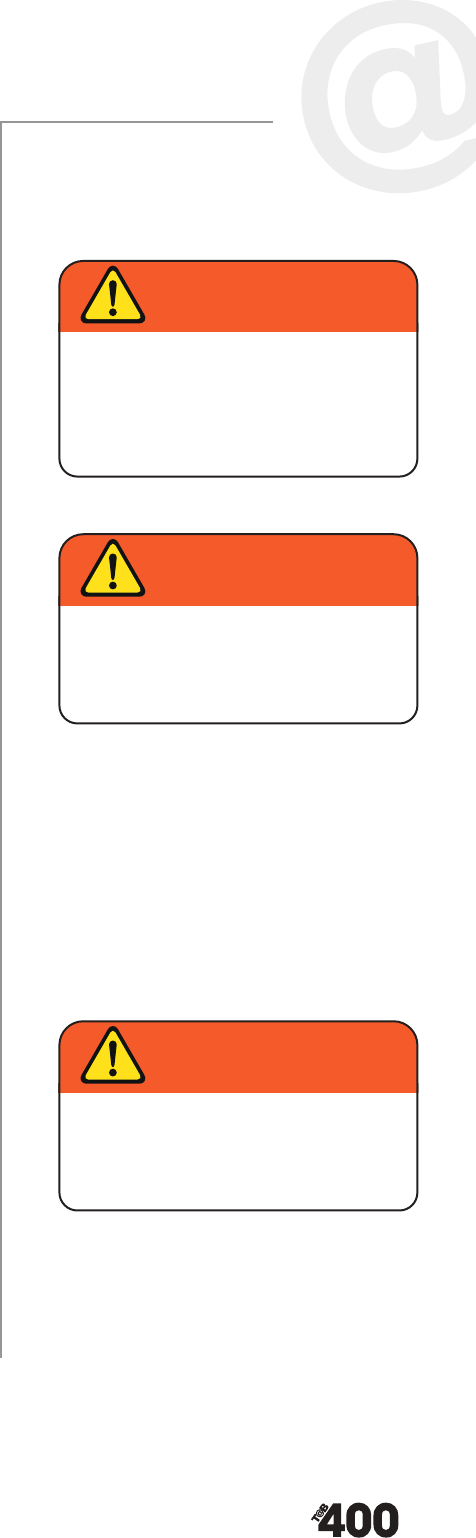
Excessive speed could result in tire
overheating and tire blowout. It is not
recommended to exceed 65 MPH in
normal road conditions.
CAUTION
Excessive speed in hazardous road
conditions could result in loss of control,
serious injury or death. Slow down in
hazardous road conditions or pull off the
road and wait for the weather to clear up.
Follow all weather safety directions.
WARNING
Never allow anyone to ride in the trailer
while traveling. Not only is it against
the law in many states, it may result in
serious injury or death.
WARNING
Never allow anyone to ride in the trailer
while traveling. Not only is it against
the law in many states, it may result in
serious injury or death.
WARNING

nucamprv.com • Teardrop Campers 15
• Use a lower gear when driving down steep or long grades. The
engine and transmission should not serve as a brake but rather
maintain a lower speed. Use brakes to gently reduce speed then
rely on your engine to maintain the speed. Do not ride your brakes,
as they may overheat and become ineffective.
• Always be aware of your trailer height, especially when approaching
bridges, roofed areas, and trees. It is helpful to know your exact
clearance height and check the height dimension on each bridge
before passing underneath.
• Obey all trafc rules. They are for your safety.
• Wear your seatbelt.
• Be alert and courteous to fellow drivers.
• Look out for motorcycles, bicycles, and pedestrians.
• Always use your running lights to increase your visibility to other trafc
.
• Never drive under the inuence of alcohol, drugs, or any kind of
medication that will affect your reexes, comprehension,
and alertness.
• Never drive when you are tired. If you begin to ght sleep, switch
drivers or, if you are alone, nd a place to sleep until you are
rested enough to go on. It is more important to arrive safely than
on time.
• Never use cruise control on wet, icy roads, winding roads, or when
traversing mountainous territory.
• Be aware of your travel trailer’s departure angle when entering
or exiting driveways, parking lots, campgrounds, or any other terrain
where you must cross a ramp angle. Refer to the nuCamp
website for specications on your trailer.
TOW VEHICLE
Using a tow vehicle with under-rated towing and loading capacities
to tow a trailer can cause serious stability problems. Additionally, the
strain put on the engine, structural frame, and drivetrain of the vehicle
may lead to serious maintenance problems. The maximum towing and
payload capacities of your towing vehicle must never be exceeded. Refer
to your tow vehicle’s Owner’s Manual for the towing capacity of your tow
vehicle, in terms of maximum Gross Trailer Weight (GTW), maximum Gross
Combined Weight Rating (GCWR) and Payload Capacity.
HITCH & COUPLER
For safety, it is extremely important for a trailer to be securely coupled to
the trailer hitch. Before you tow your trailer conrm that:
• The hitch on your tow vehicle is proper for your trailer with the
correct towing and load capacity.
• The ball on your hitch is the correct size and is not worn down,
corroded or cracked. Replace if needed. The ball size required for
your trailer, typically 2" or 2
5
/
16
", is specied on a label attached to
the tongue coupler.
• The ball is fastened tightly to the hitch.
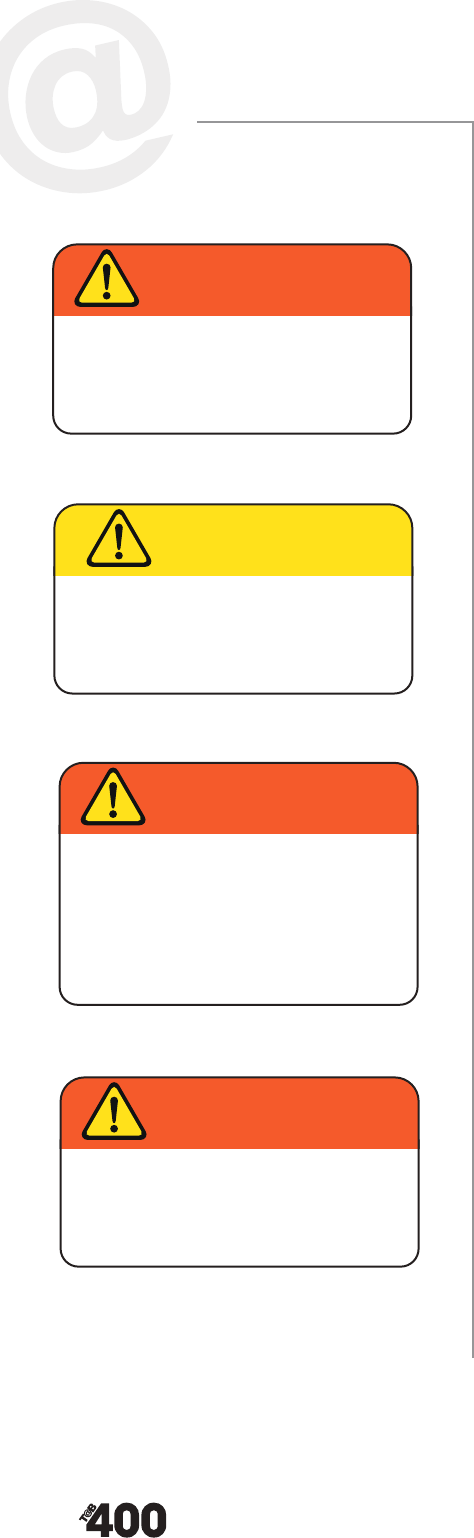
Using a tow vehicle with under-rated
capacities could result in loss of control,
serious injury or death and will void your
warranty. Pull a trailer with a tow vehicle
rated for the trailer’s weight.
WARNING
Using an under-rated or improper ball
hitch could result in uncoupling, loss of
control, serious injury or death and will
void your warranty. Couple your trailer
with the properly rated hitch and correct
ball size.
DANGER

Teardrop Campers • nucamprv.com16
When your hitch is mounted to your tow vehicle, your travel trailer must
be level. If necessary, purchase a hitch with adjustable height for your
tow vehicle so that your trailer is pulling level to the ground behind
your vehicle.
• A high hitch will accent weight behind the axle and may cause sway
or shtailing.
• A low hitch will add extra tongue weight and extra weight to the
front axle.
SAFETY CHAINS
To be effective, safety chains must:
• Be in good condition and properly connected to the tow vehicle.
• Be fastened to the frame of the tow vehicle. Do not fasten to ball
or hitch!
• Cross each other under the hitch and twisted for minimum slack to
allow for turns.
• Be able to hold tongue off the ground if the trailer should uncouple
for any reason.
Safety chains are provided on bumper pull trailers so that control of
the trailer can still be maintained if the trailer comes loose from the tow
vehicle. If the safety chains and emergency breakaway brake lanyard are
incorrectly attached, the result can be extensive trailer and tow vehicle
damage, serious injury, and even death.
BREAKAWAY SWITCH
Your trailer is equipped with a system that will apply the brakes in
emergencies where the trailer uncouples from the towing vehicle.
When hooking up the breakaway system:
• Connect the breakaway switch lanyard to a permanent part of the
tow vehicle.
• DO NOT connect the lanyard to the safety chains, hitch, or ball.
• Make sure the auxiliary battery, equipped on your trailer, is correctly
installed, fully charged, and in good working condition. Your system
will not work without the battery hooked up for power.
• Test the system before towing on the road.
• DO NOT tow your trailer on the road if the system is not working
properly. Have the system repaired before towing.
The breakaway switch is activated when the trailer moves a certain
distance away from your tow vehicle. The breakaway system is a way for
your trailer to keep tension on the safety chains and allow you to come to
a full stop with minimal trailer, vehicle damage or personal injury. Keep the
breakaway system, including the trailer battery, in good working condition
and properly rigged to be fully effective.
Incorrect attachment of safety chains can
result in serious tow vehicle and trailer
damage, loss of control, serious injury or
death. Attach safety chains according to
proper instructions.
WARNING
A dysfunctional breakaway system can
cause a runaway trailer which may result
in loss of control, serious injury or death.
Never tow a trailer with a malfunctioning
breakaway system.
WARNING
nucamprv.com • Teardrop Campers 17
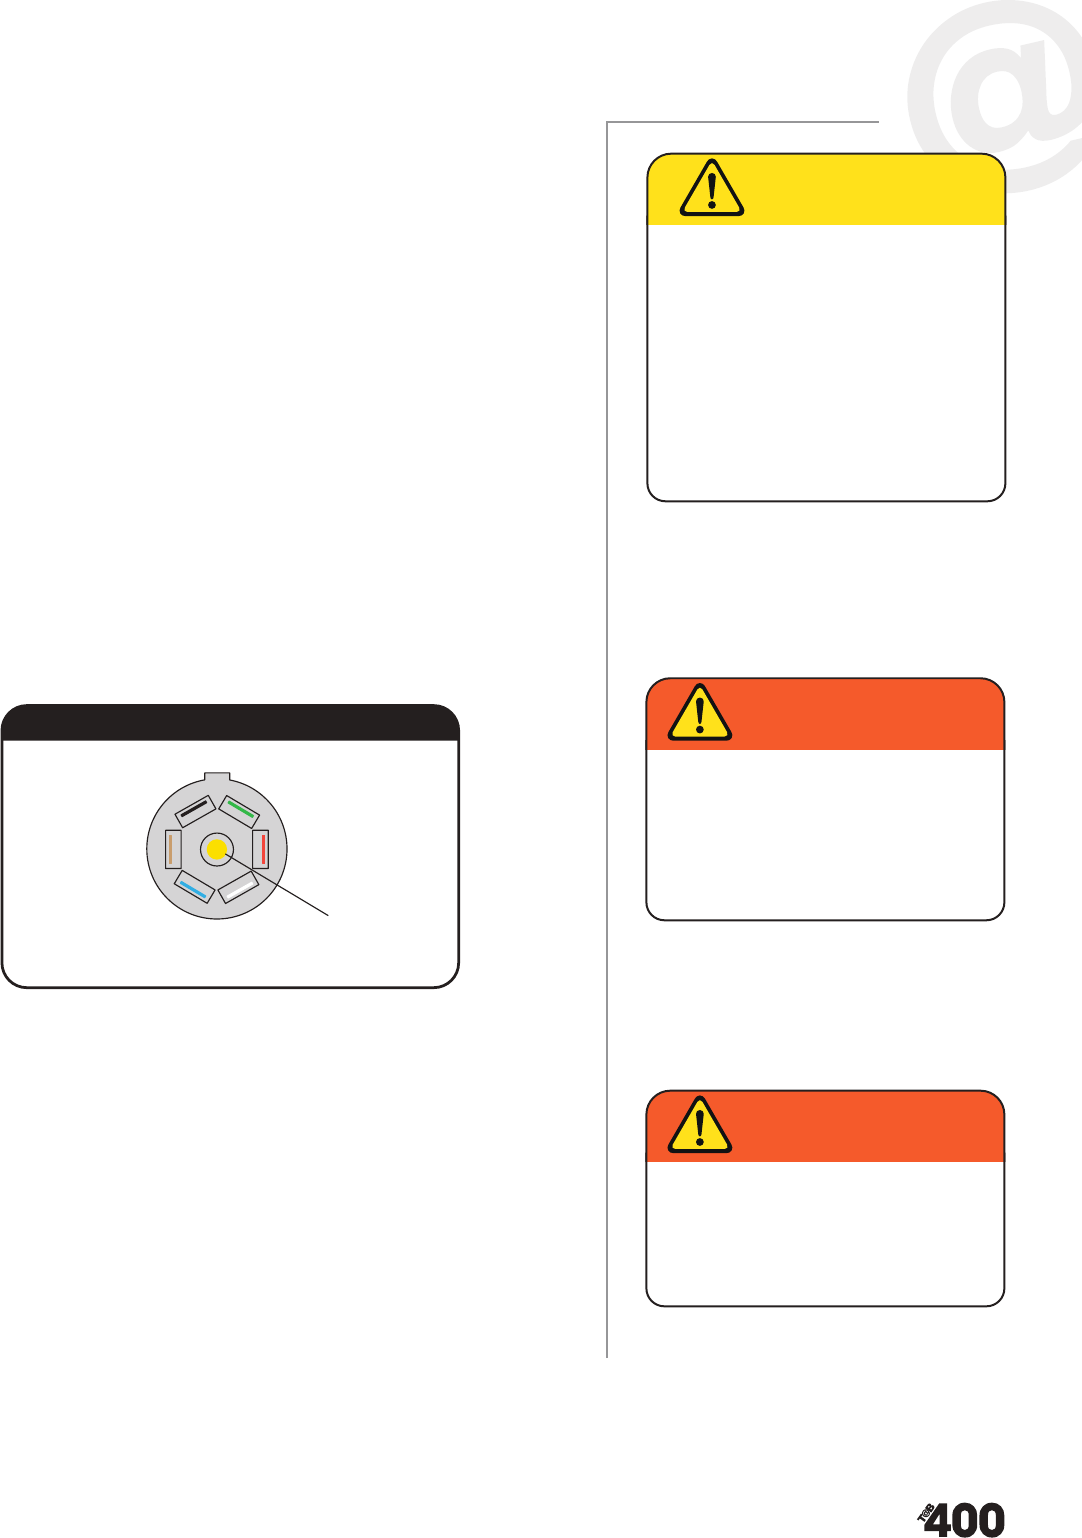
CONNECTOR PLUG
Before each trip:
1. Plug the 7-way connector plug into the tow vehicle socket and verify
that the driving lights on the side and rear of THE trailer light up.
2. Have someone stand behind the trailer and conrm lights are
working when you perform the next steps.
a. Step on the tow vehicle brakes. Brake lights should light up in
the rear.
b. Turn on right/left turn signals and verify that the appropriate
lights come on.
c. With your foot on the brake, put your vehicle in reverse and
verify that the backup lights (if equipped) come on.
3. If any of the lights do not function as expected, the system may
need to be serviced.
The 7-way connector plug, the wire harness by the tongue, supplies power
from the tow vehicle to brake, turn signal, driving, and backup lights (if
equipped), and on most tow vehicle makes/models may provide power to
your camper’s 12V electrical system. It may build up corrosion over time.
Clean the connector plug frequently to ensure good electrical contact.
TOWING HOOKUP
Before you move your trailer:
• Secure and lock the coupler mechanism.
• Secure the safety chains to the tow vehicle.
• Fully retract all tongue and stabilizer jacks.
• Remove chocks from trailer wheels.
• Connect the breakaway switch lanyard to the tow vehicle.
• Connect the 7-pin Connector plug to the tow vehicle power plug.
• Secure all cargo.
Before you tow your trailer on the road, check and ensure:
• Proper function of trailer brakes.
• Proper function of the breakaway switch and system.
• Loads and cargo are secured to the trailer.
• All driving, brake and backup lights are functioning properly.
• Verify all non-driving lights have been turned off
Right Turn/Stop
(BROWN)
Left Turn/Stop
(RED)
Charge
(BLACK)
Tail/Running Lights
(GREEN)
Brakes/Open
(BLUE)
Ground
(WHITE)
Backup Lights
(Yellow)
RV Industry Standard 7-Way Plug
Malfunctioning or dis-connected lights
on your trailer while driving is not only
illegal but may result in trafc accidents
due to the limited visibility of your trailer
by other vehicles. Loss of control, serious
injury or death can result.
WARNING
If your trailer is improperly connected
to your tow vehicle, chances for loss of
control and trafc accidents are majorly
increased and may result in serious
injury or death.
WARNING
While the trailer is connected via the
7-way connector plug, your camper may
draw power from the vehicle battery for
12V power functions unless 110V shore
power is connected. This can drain your
vehicle battery if unattended for an
extended period and if the vehicle is not
running during this time. Unplug the
7-way connector plug from your vehicle
when the vehicle engine is not running.
CAUTION

Teardrop Campers • nucamprv.com18
BASIC TIRE SAFETY
Everything in your trailer rides and weighs on the tires. This makes them
essential safety items to which you must pay close attention.
Common hazards and problems relating to tires are:
• Incorrect ination
• Overloading
• Tire imbalance
• Low tread
• Axle misalignment
• Mismatched tires
• Improper-sized tires to rim
• Road Hazard
Before each trip determines:
• Do tires have correct ination pressure? Check the tires with a high-
quality pressure gauge and correct pressure when tires are cold.
• Are there any cuts, cracks, bald spots, uneven tread wear, or
exposed reinforcement cords in my tires? If there are, have a
professional tire dealer inspect your tires for diagnosis and repair.
• Is the trailer overloaded? The Gross Vehicle (Trailer) Weight Rating
(GVWR) must never be exceeded. See STEPS TO DETERMINE
CORRECT LOADS on page 24.
• Are there foreign objects lodged in the tires? Remove any stones,
debris, or other foreign objects from the tires.
• Do tire valves all have caps? Keep a few extra caps on hand in case
you lose one.
TIRE MAINTENANCE
Thetwomostimportantthingstorememberaboutmaintainingtiresona
trailerarepressureandtreadwear.
Tire Pressure. The proper tire pressure for your trailer is listed on the
Federal Certication/VIN label on the tongue of your trailer. An example
label can be seen on page 22. You can also nd the proper tire pressure
on the tire itself. The tire pressure must be checked while the tire is “cold”
for accuracy.
1. If your tire pressure is higher than recommended, press the tire
valve stem inward for 5-10 second intervals until you have reached
the proper pressure.
2. If your tire pressure is low, add air pressure by inating for 5-10
second intervals until you reach the recommended max air pressure.
3. If you have been driving and your tire pressure is low, even though
the tire is hot, ll it to the recommended cold tire pressure. This is
atemporaryxonly. Recheck and correct pressure when you can
acquire a cold reading.
Improper tire pressure can cause trailer
instability. Tire blowout, loss of control,
serious injury or death can ensue. Always
check and correct tire pressures before
towing your trailer on the road.
WARNING
Tire pressures are only accurate when
tires are cold.
CAUTION

nucamprv.com • Teardrop Campers 19
More Tire Pressure Information:
• Improper tire pressures can overload your tires, causing heat
buildup. Too much heat buildup in a tire can cause reduced trailer
stability, tire blowout, loss of control, or worse. Always keep a tire
pressure gauge in your trailer and before each trip make a quick
check of all tire pressures. A tire left under-inated for even a short
period of time can suffer interior damage.
• Tires may lose pressure over time due to air molecules that are
highly pressurized working their way through the rubber of the tire
to the outside. Over a month’s time, a tire may lose as much as 1-3
PSI. When storing your trailer, inate tires to max capacity and top
off the pressure before towing again.
• You cannot determine proper tire pressure by visual inspection,
although extremely low tire pressures will be clearly visible. Only a
tire pressure gauge will accurately tell you what is going on.
• Tire pressures are recorded as PSI (pounds per square inch, in the
U.S.) and KPA (kilopascals, the metric, international measurement).
• Recommended tire pressures are normally recorded as “cold” tire
pressures. The cold ination pressure is when the tire has not been
in use for more than one mile or is subjected to heat from driving
within the last three hours. A “hot” tire’s pressure may be as
much as 6 PSI higher than a cold pressure reading.
• You can nd air compressors at most major service stations.
Alternatively, portable air compressors powered by 12V car charger
outlets or 110V electric are usually available from hardware,
automotive or building supply stores. The 12V portable air
compressors are generally not very high quality or very speedy but
may get the job done just ne.
• Keep a high-quality tire pressure gauge in your camper. Cheap
tire gauges are often more inaccurate. You can nd good ones
at auto parts stores or at professional tire dealer facilities. Ask
for recommendations.
Tread Wear. Good tire tread keeps your vehicle from slipping or sliding in
cold or rainy weather conditions when ice or hydroplaning hazards
are present.
• When tire tread is worn down to
1
/
16
" of tread, it is unsafe and
must be replaced. By most expert statistics, the average life of
a trailer tire under normal use and maintenance is ve years
regardless of how minimum the use has been.
• Even at three years with adequate tread left, replacing your tires
should be considered.
• Tires may look like they have plenty of tread left even though they
may be worn out. Have a qualied service technician inspect your
tires frequently and evaluate the life of the tire.
• Tires are warranted by the tire supplier. Refer to the yer enclosed
in your owner’s packet for Warranty Information
A tire with tread lower than
recommended will not have good
traction and is subject to tire blowout at
any time. Loss of control, serious injury
and/or death may result.
WARNING
Teardrop Campers • nucamprv.com20
There are two ways to check your tires’ tread wear:
1. Tread Wear Bars. These are the raised sections in the bottom or beside tire tread grooves.
When the tread has become even with the tread wear bars to the point that you cannot
distinguish the difference, you need new tires.
2. The Penny Test. Insert a penny into the tire tread grooves with the top of Lincoln’s head pointing
into the tire. If you can see the top of Lincoln’s head on the penny, tires must be
replaced immediately.
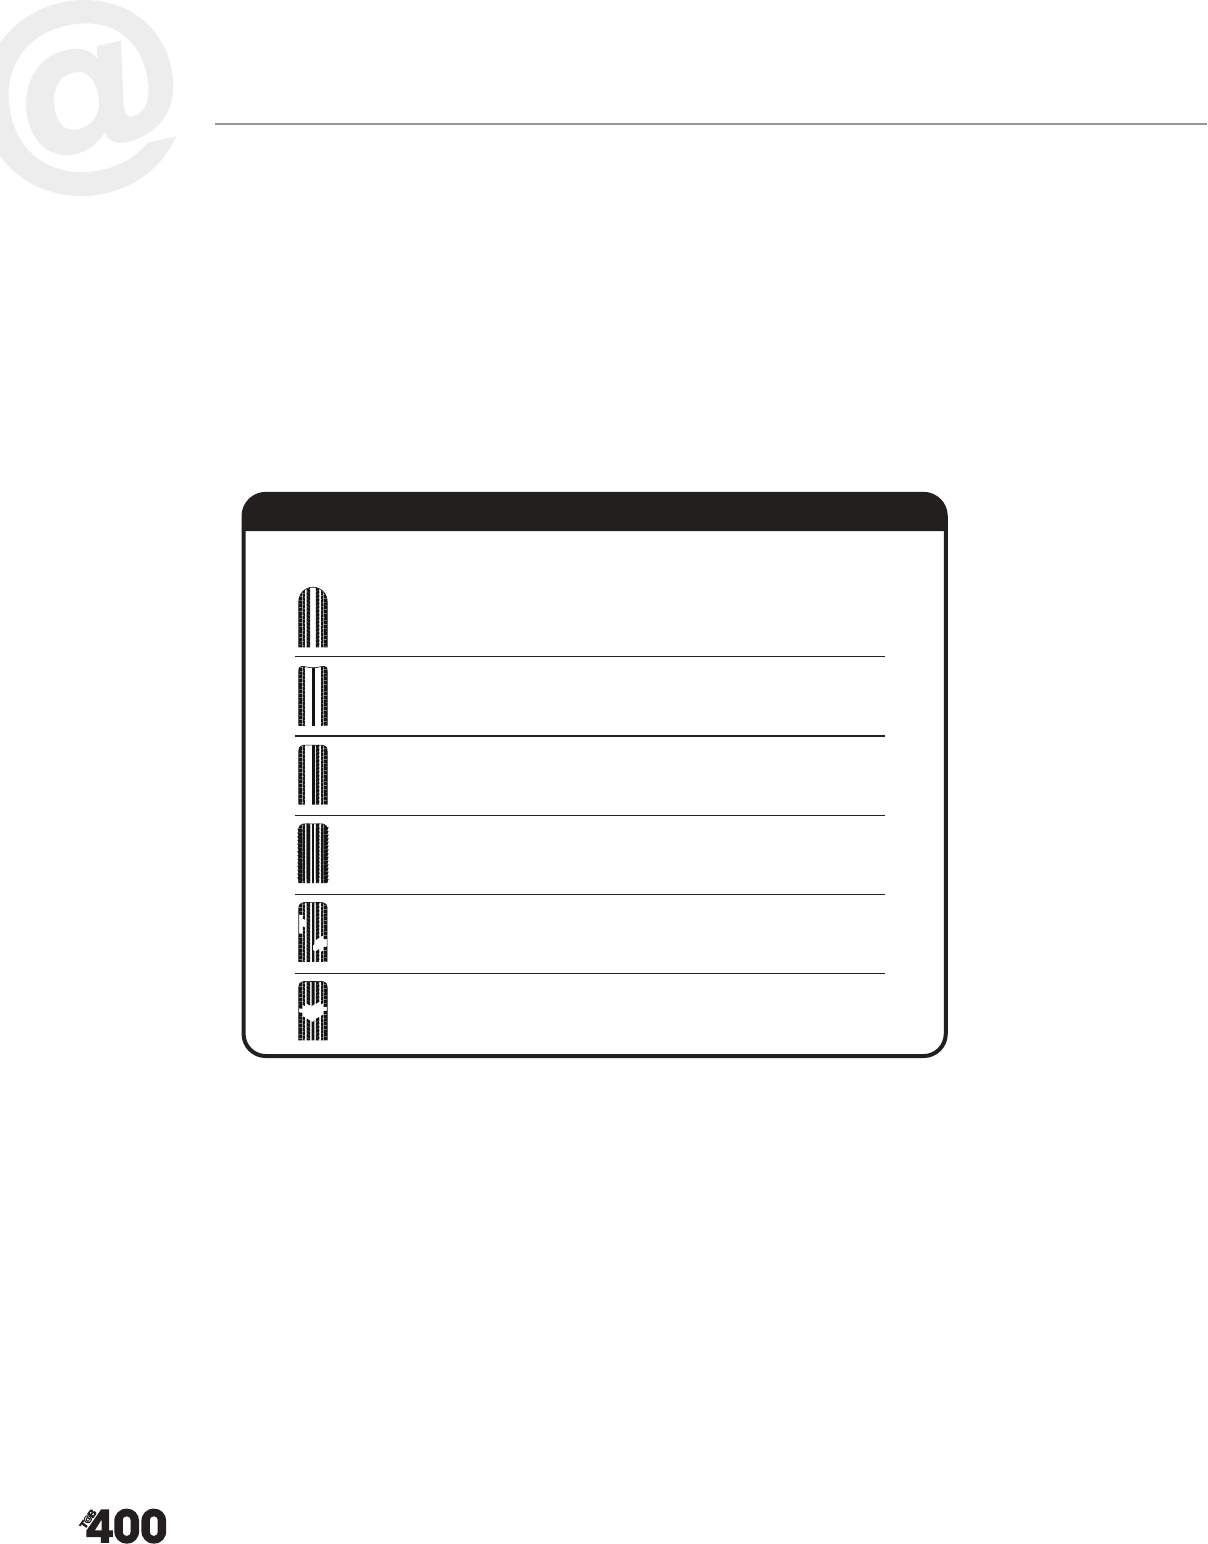
Abnormal or uneven treadwear are signs that your tires give to indicate how they are performing. Below
you will see the most common issues, reasons why, and how to correct them:
SPARE TIRE
Your trailer is equipped with a spare tire located in the A-frame tongue of the trailer under the storage
tongue box.
How to install the spare tire in an emergency:
1. Find a solid, level surface on which to jack up your trailer. If there is no solid surface available,
use the jack pads you use for leveling the trailer or place a heavy rubber mat under the jack.
Gravel or unsolid ground can be dangerous to place a jack on as it may give way and cause
serious injury if the trailer moves.
2. If you are beside the highway, place reective cones or road ares fty feet behind and in front
of your vehicle to alert trafc that you need space.
3. If possible, leave the trailer attached to the tow vehicle. Set the parking brake on your
tow vehicle.
CENTER WEAR
EDGE WEAR
SIDE WEAR
TOE WEAR
CUPPING
FLAT SPOTS
CAUSEWEAR PATTERN
Tire Wear Diagnostic Chart
ACTION
Adjust pressure to particular load.
Adjust pressure to particular load.
Make sure load doesn’t exceed axle
rating and perform alignment service.
Perform alignment service.
Check bearing adjustment and
balance tires.
Avoid sudden stops when possible
and adjust brakes.
Over Inflation
Under Inflation
Overloading or
loss of camber
Incorrect toe angle
Wheel lockup
and tire skidding
Tire out of balance
nucamprv.com • Teardrop Campers 21
4. If you have weight distribution bars equipped, remove them.
5. Check the wheel on the opposite side of the delinquent tire.
6. Remove the spare tire from its holder. Grab the jack, stand, and
3/4" tire iron.
7. Using your 3/4" deep socket lug wrench tire iron, loosen all lug nuts
by one 360° turn, or just enough to loosen slightly.
8. Now you are ready to jack up the trailer. Place the jack on the
chassis directly behind the wheel. Lift the trailer, being very
careful that the jack does not slip off. Keep all body parts away from
the area to avoid serious injury.
9. When both tires have cleared the ground, remove the lug nuts
on the failed tire. Immediately install the spare tire, start the lug
nuts by hand and tighten as much as possible. The wheel will spin
when you try to tighten the lug nuts. This is normal.
10. Carefully drop the trailer back down, remove the jack and tighten
lug nuts according to the instructions shown on page 23.
11. Stow the failed tire. Reinstall weight distribution bars, stow all tools,
and remove chocks, road are, and reective cones, in that order.
12. Proceed to the nearest tire service center. Have the failed tire
repaired or replaced and remounted.
13. Remember to properly re-torque the lug nuts at 10, 25, and 50 miles.
Of all tire maintenance, the spare tire is often the most forgotten. After all,
you only need it in a pinch. Properly maintain your spare tire. When the
time comes to use your spare tire, you will want it to perform as expected.
1. Check the spare tire pressure monthly.
2. Do not exceed 50 MPH speed or drive more than 100 miles with
your spare tire on your trailer.
3. A spare tire is generally only to be used when the normal tire is
damaged, at, or cannot hold air pressure. It should not be used for
long-term purposes. Use it for temporary and emergency purposes
only until you can reach the nearest tire service center.
TIRE INFORMATION
Other essential information concerning tire care:
• Statistically, it is better for a tire to be in use than idle. This is due
to lubricants benecial to tire life that release when the tire is under
pressure and being used.
• Frequent use of the trailer tires prevents “at spots” from forming
that are detrimental to the tire’s health.
• In hot climates, towing under high speeds signicantly degrades
trailer tires. The heat a tire operates under in these conditions may
be higher than the ideal conditions it is engineered for. The heat
buildup can cause internal tire structure failure. Use moderate
speeds in higher temperature climates.
Do not leave the spare tire equipped for
more than 100 miles. It is intended only
as an emergency measure until you can
reach the nearest service center.
CAUTION
TOOLS NEEDED TO CHANGE A SPARE TIRE:
Hydraulic Jack (Two-Ton Capacity)
3/4" Torque Socket Wrench
or Tire Iron
Wheel Chocks
Flat Jack Pads, Hard Rubber Mat,
or Steel Plate
High Visibility Reective Cones
and Road Flares
Spare Tire Tools
Do not attempt to jack up your trailer
with the equipped stabilizer jacks.
Stabilizer jacks are not engineered to
lift the trailer. Serious injury or death
could ensue.
DANGER
Teardrop Campers • nucamprv.com22
• Specialized Trailer (ST) tires are greatly different from passenger (P) car or light truck (LT) tires
Passenger car and light truck tires are designed for traction in driving conditions such as
stopping, pulling, swerving, or turning. They require tires with more exible sidewalls.
Trailers do not have applied driving torque to their axles, but they carry heavy loads and have a
higher center of gravity. Trailer tire sidewalls are engineered to reduce sway and handle heavier
loads. Use recommended tires with the ST rating for your travel trailer.
• Tire industry standards restrict speeds of “ST” tires to 65 MPH under normal ination and loads,
unless noted differently on the sidewall of the tire.
• Store your trailer in a cool, dry place indoors to minimize the harsh effects of the sun on your
tires. If stored outdoors, tire covers will serve the same purpose.
• When replacing tires, you must purchase tires that are the same size as the trailer’s factory-
installed original tires or another manufacturer-recommended size. To determine the correct
size, check the Tire and Loading Information label as shown on page 25 or on the sidewall of the
tire you are replacing. Consult your tire dealer for assistance.
nucamprv.com • Teardrop Campers 23
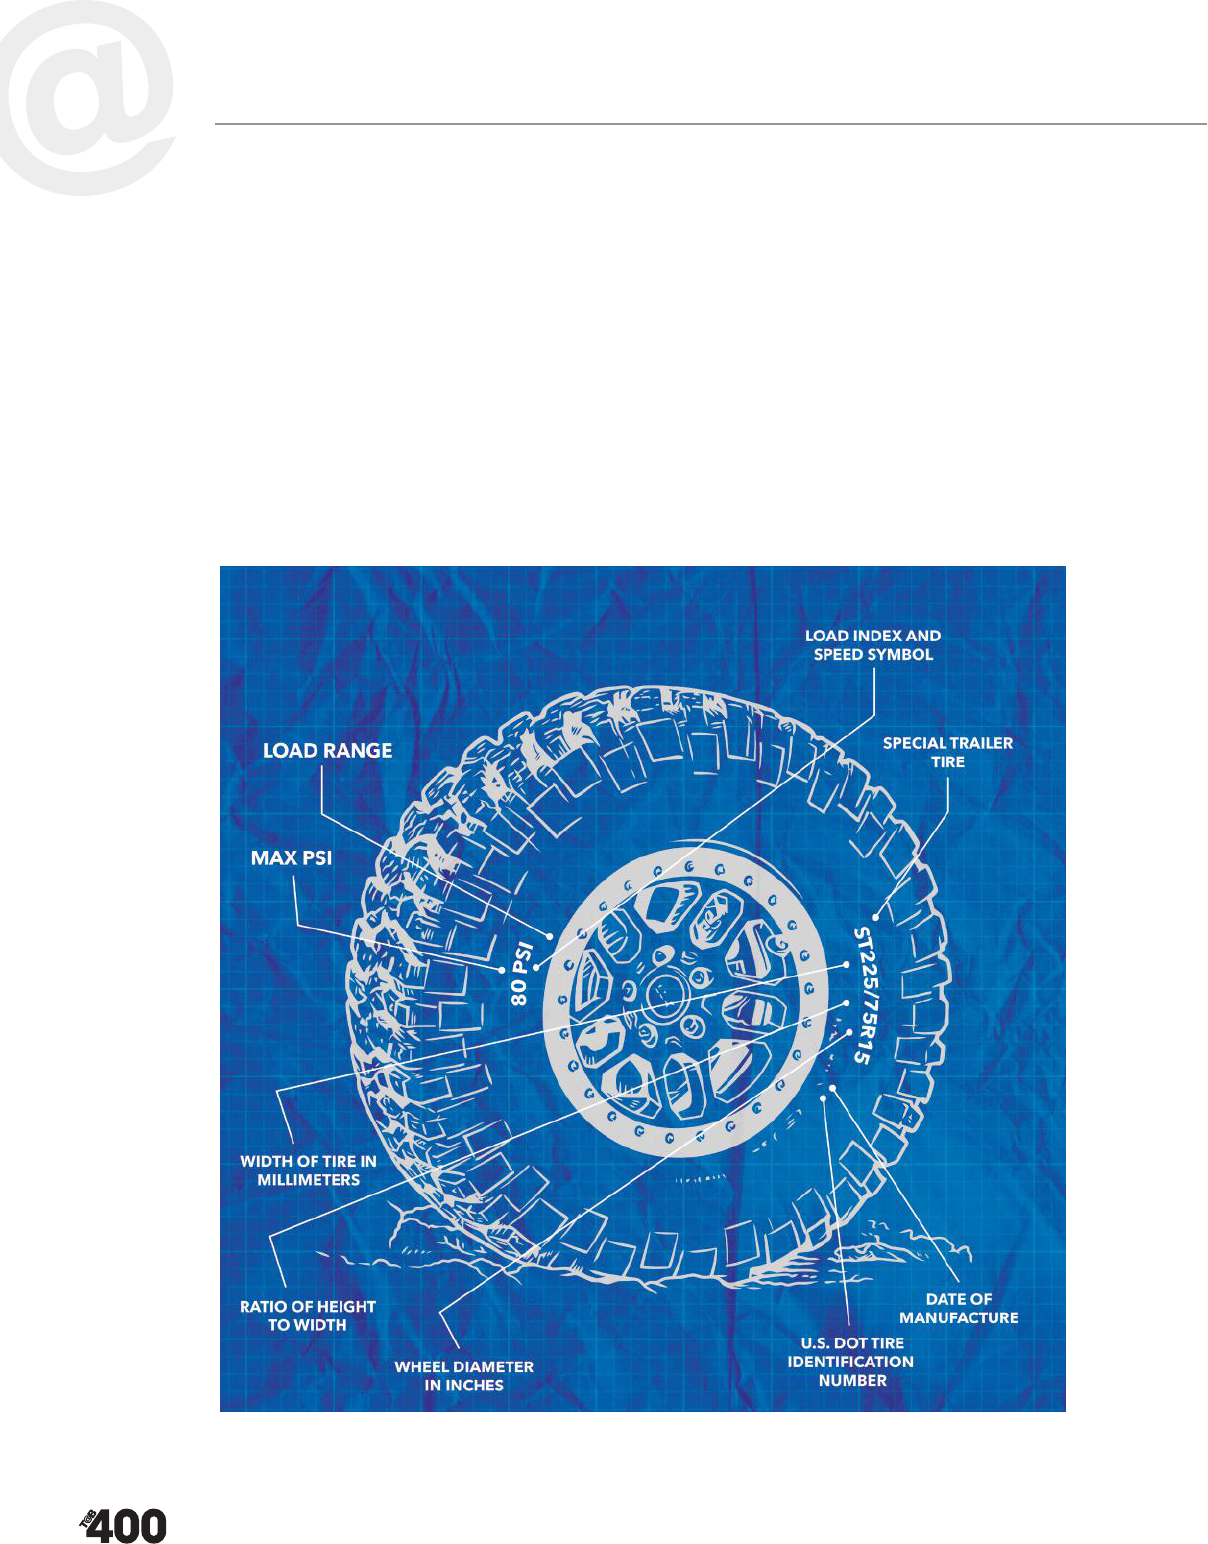
Federal Law requires standardized information on the sidewalls of all
tires to identify and describe the characteristics of the tire. This also
helps provide a tire identication number in case of recalls and for
safety standard certications. The image on page 22 is intended as a
demonstration only concerning standardized information on a tire. It is not
the actual tire that your trailer is equipped with.
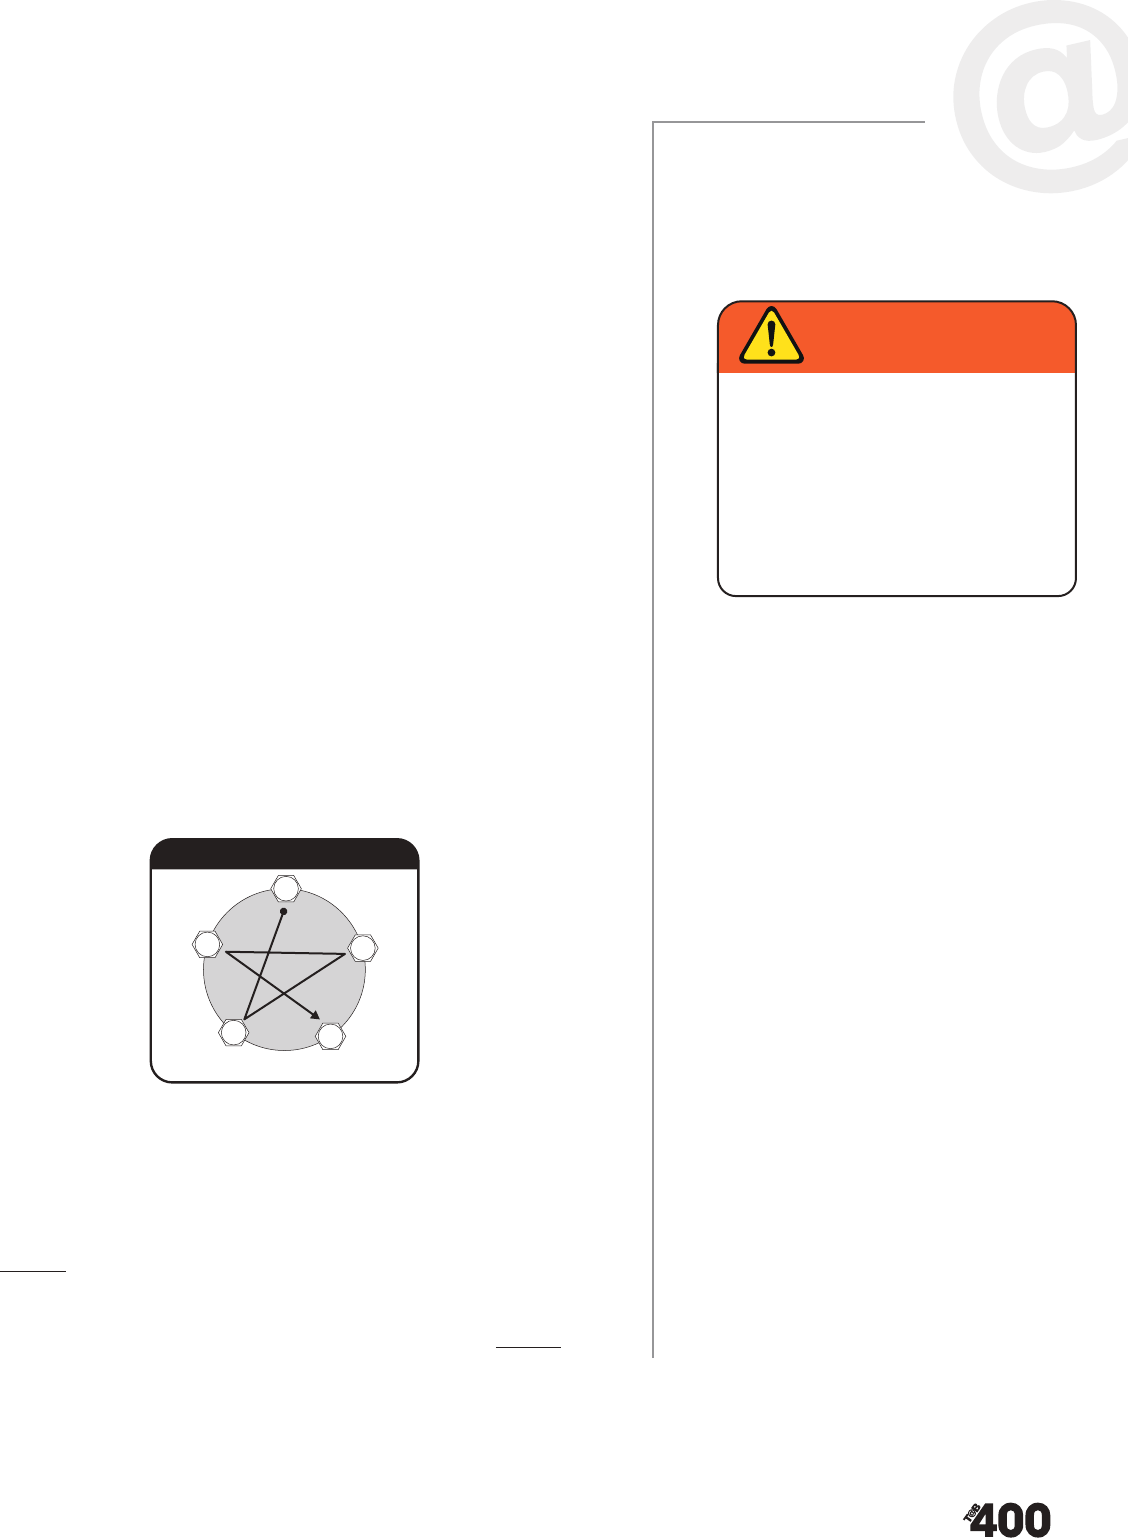
LUG NUTS
To keep wheels properly attached to the hub, lug nuts must be properly
tightened. Lug nuts often loosen slightly after rst being assembled. Most
manufacturers recommend following these basic instructions for tightening
lug nuts:
1. To prevent cross-threading, start the lug nut onto the bolt by
hand.
2. Tighten in two stages:
a. First, snugly tighten the lug nuts in the proper sequence
following the lug nut tightening diagram.
b. Second, again following the diagram sequence, tighten
each lug nut to 110 ft. lbs. using a calibrated torque
wrench.
3. After you purchase your trailer (and after remounting wheels at
any time) you must tighten the lug nuts at 10 miles, 25 miles,
50 miles, and before each trip you take.
WEIGHT DEFINITIONS
It is very important to stay within the weight ratings of your trailer and tow
vehicle. Learning these denitions will help you safely manage your trailer’s
weight and balance. Towing vehicle and trailer weight numbers typically
fall into these two categories:
• Ratings are maximum limits that under no circumstance should
be exceeded. These limits are established by nuCamp and our part
manufacturers in the design of the trailer.
• Weight and Load are generally interchangeable terms. Weight is
measured by putting a vehicle, trailer, cargo, or other components
on a scale. Vehicles and cargo have weight or mass, which creates
loads on tires, axles, and hitches Common Denitions:
Metal creep - inadequate torque
and loosening lug nuts after factory
installation will cause a rim to loosen
or wheel to part from a trailer. Loss of
control, serious injury and death may
result. Tighten lug nuts after the rst 10,
25, and 50 miles after wheel mounting
and before every trip.
WARNING
1
2
LUG NUT TIGHTEN ORDER
4
5
3

Teardrop Campers • nucamprv.com24
GAWR (Gross Axle Weight Rating): The maximum weight each axle is
designed for and rated to carry.
GVWR (Gross Vehicle Weight Rating, also called GTWR or Maximum
Loaded Trailer Weight Rating): The maximum operating weight of a trailer
as specied by the manufacturer including the vehicle’s chassis, body, fuel,
accessories, and any cargo.
GVW (Gross Vehicle Weight, also called GTW for Gross Trailer Weight):
The total actual weight of your trailer or tow vehicle plus cargo, as
measured on a scale.
TONGUE WEIGHT (or Hitch Weight): The amount of weight that presses
down on the hitch when your trailer is connected to a vehicle. On a tow
vehicle, the tongue/hitch weight is considered cargo and must be less than
the Payload Capacity of the tow vehicle so as not to cause steering safety
hazards of the tow vehicle.
CURB WEIGHT: The actual weight of a trailer with standard equipment,
including the maximum capacity of LP gas and uids, battery(ies), and the
factory-mounted spare tire. This includes tongue weight on a trailer.
CCC (Cargo Carrying Capacity, also known as Payload Capacity): The
maximum weight that persons plus cargo should never exceed. Payload is
derived by subtracting Curb Weight from GVWR.
• United States: CCC is equal to GVWR minus Curb Weight. Water is
considered cargo weight.
• Canada: CCC is equal to GVWR minus the Curb Weight and a full
tank of fresh (or potable) water.
LOAD DISTRIBUTION
The balance of a trailer is a key factor in how a trailer handles when it is
being towed. Cargo must be distributed evenly from side to side and
front to back. Generally, the way to determine this is to weigh your trailer
on a public scale. The weight bearing on either side should be equal or
within 200 lbs. difference. More importantly, load the trailer so the tongue
weight falls between 10-15% of your gross trailer weight. Instructions on
how to determine these weights can be found in STEPS TO DETERMINE
CORRECT LOADS on pages 26-27.
CARRYING CARGO
The load on your trailer must never exceed:
1. GVWR (Gross Vehicle/Trailer Weight Rating)
2. GAWR (Gross Axle Weight Rating)
3. Maximum Load Rating of tires
4. Cargo Carrying Capacity
The GVWR and GAWR can be found on the VIN (Vehicle Identication
An imbalanced trailer can cause excessive
sway or adverse tow vehicle handling.
This can result in loss of control, serious
injury or death.
WARNING
Do not exceed the GAWR (Gross Axle
Weight Rating) of your trailer. If you have
exceeded the GAWR you must remove or
rearrange cargo until you are within the
proper load.
DANGER
An overloaded trailer can result in serious
injury or death. Never exceed weight
ratings of a trailer by over-loading with
cargo. If you exceed load ratings, your
warranty will be voided, and you could
be liable for any accidents that may
happen due to negligence.
WARNING
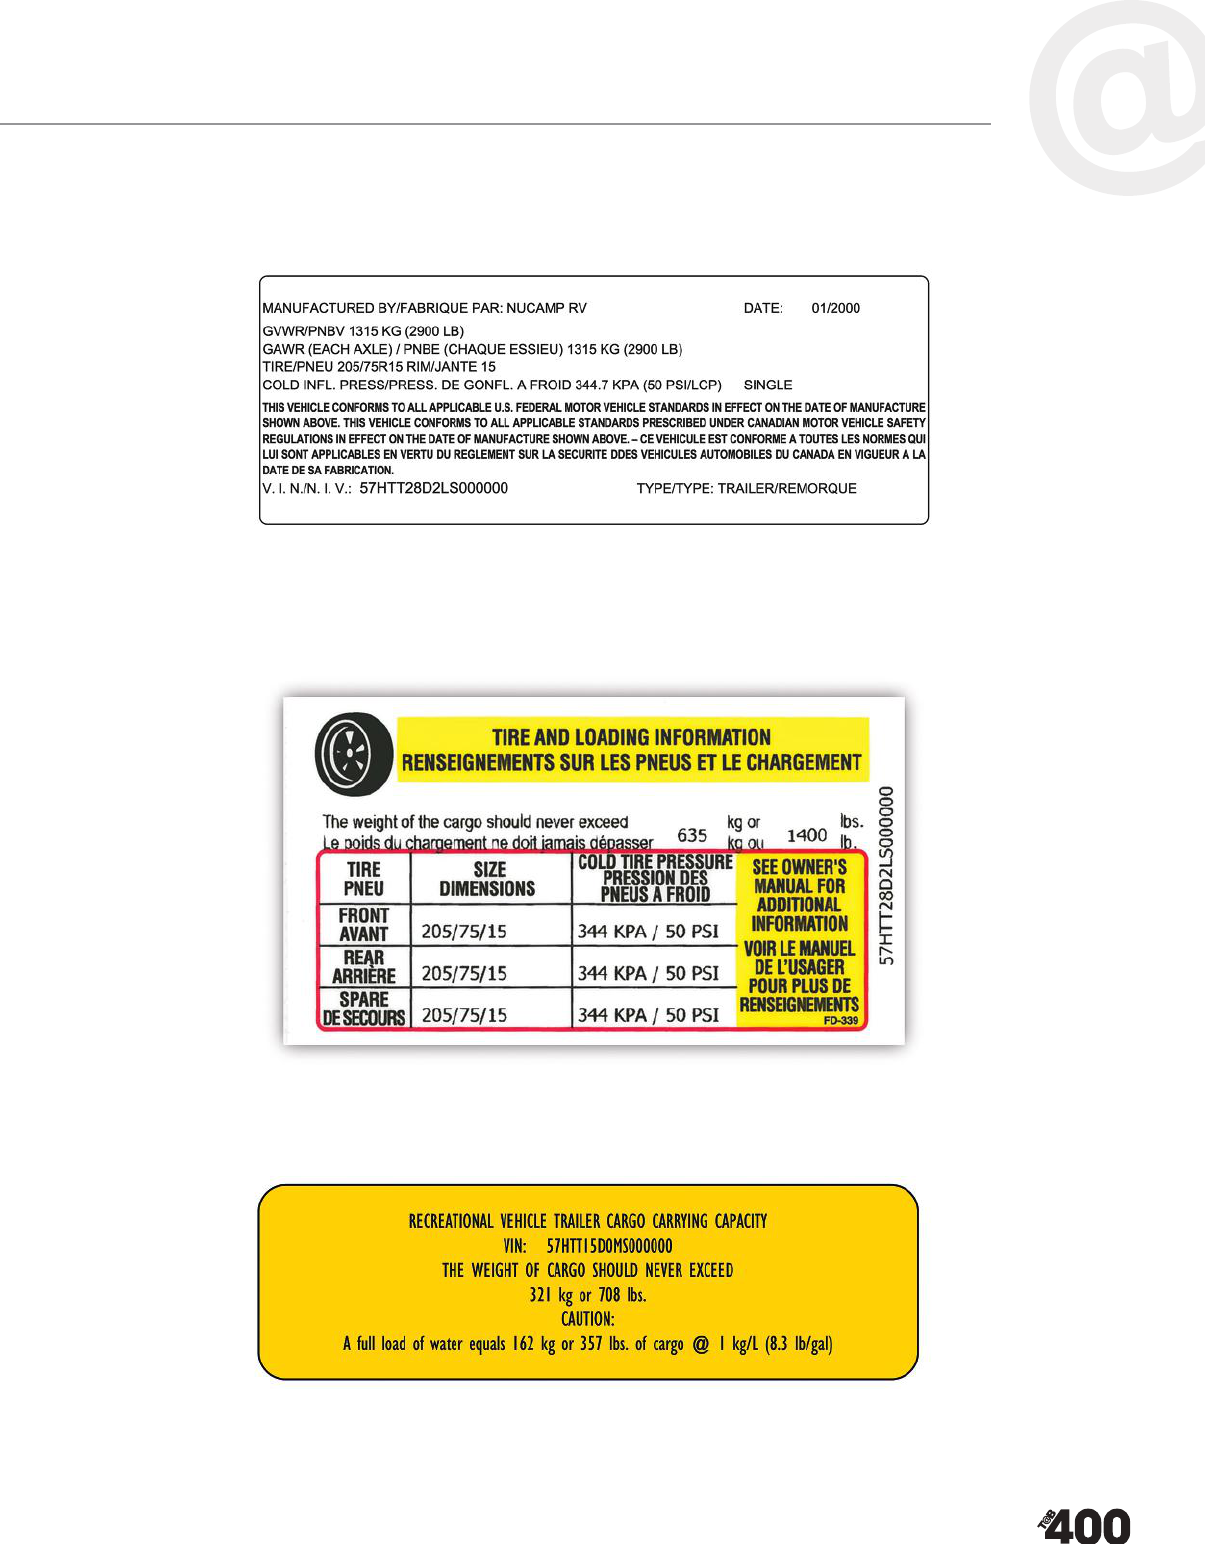
Teardrop Campers • nucamprv.com 25
Number) label located on the front of your chassis near the tongue jack.
Example (not specic to your trailer):
The TIRE AND LOADING INFORMATION LABEL provides the customer with individual trailer cargo
weight limits, tire size, and recommended pressure. The label is located on the exterior front passenger
side of the trailer body. Example (not specic to your trailer):
The Cargo Carrying Capacity label provides cargo loading information and is located on the interior of
the entry door. Example:

Teardrop Campers • nucamprv.com26
Labels located in various places have
weight specications recorded for your
convenience. Examples are provided
in this manual but ultimately the
numbers recorded on your unique
trailer are what you need to go by.
Because of continuous improvement
and innovation of the manufacturing
process and available products, each
trailer may have unique weights. Each
trailer is weighed individually when it
rolls off the assembly line and the Cargo
Carrying Capacity is determined by
that weight. Should any of these labels
be de-faced, painted over or missing,
contact your dealer or nuCamp Customer
Service for replacements.
Weight Specs
When loading your trailer:
• Determine where cargo should be placed to ensure a balanced
trailer and document it for future reference.
• Approximately 60% of the total cargo weight should be forward of
the axles.
• Heavy items should be kept near the oor over the axle to keep
center of gravity down on the trailer.
• Don’t place heavy items in the upper cabinets to avoid shifting and
falling during travel.
• Secure all cargo to keep it from shifting during travel.
• Emergency items should be stored in a waterproof container. Place
in an easily accessible compartment.
STEPS TO DETERMINE CORRECT LOADS
To accurately determine the correct loads on your trailer, stow all cargo
that you will be taking on your camping trip and follow these steps to
determine what your trailer’s weights are:
Step 1. Locate a public scale. Ensure that the scale reects accurate weights.
All cargo and passengers in the tow vehicle and trailer must be consistent
when capturing weights. Always keep the rig level when weighing.
Step 2. With the trailer attached, pull your tow vehicle onto the scales so
that all your tow vehicle wheels are on the scale and the trailer wheels are
off. Record this weight as the Gross Tow Vehicle Weight + Tongue/Hitch
Weight:
_____________________
Step 3. Pull your entire rig onto the scales so that all wheels are on the
scales. Record this weight as the Gross Weight of the Rig:
_____________________
Step 4. To nd the weight of your tow vehicle without the trailer’s added
hitch weight unhook your trailer from your tow vehicle and weigh just your
tow vehicle. Record this weight as the Gross Tow Vehicle Weight:
_____________________

nucamprv.com • Teardrop Campers 27
Step 5. The hitch weight is considered cargo for your tow vehicle and is
not loaded on your trailer tires. To nd the weight load on your tires and
axles and determine if you are within the trailer’s GVWR and Maximum
Load Limits on tires, subtract the weight captured in Step 2 from the
weight captured in Step 3 and record the result as the Gross Trailer Weight
– Tongue/Hitch Weight:
_____________________
a. If the result is less than the GVWR + Tongue/Hitch Weight recorded
on the VIN Label, and less than the Maximum Load Limits on one
tire multiplied by 4 (tires) you are within acceptable load range.
b. If the result is more than the GVWR + Tongue/Hitch Weight, or
more than the Maximum Load Limits on one tire multiplied by 4
(tires), you must remove cargo and lighten your trailer.
_____________________
Step 6. The tongue weight of your trailer and the hitch weight bearing on
your tow vehicle are one and the same. To determine tongue/hitch weight,
subtract the weight captured in Step 4 from the weight captured in Step 2.
Record the result as Tongue/Hitch Weight:
_____________________
Step 7. To nd the gross weight of your trailer, add the results of Steps 5
and 6 and record it as the GVWR:
_____________________
Step 8. To express the tongue weight as a percentage and determine if
the tongue weight is within the safe operating margin of 10-15% of gross
trailer weight, divide the result of Step 6 by the result of Step 7. Record it
as Tongue Weight Percentage:
_____________________
a. If the Tongue Weight Percentage is under 10%, move trailer cargo
to the front of the trailer. Repeat Steps 2-8 to reweigh.
b. If the Tongue Weight Percentage is over 15%, move trailer cargo to
the rear of the trailer. Repeat Steps 2-8 to reweigh.
Step 9. To determine whether your trailer is balanced side to side you will
need to pull your trailer on the scale so that only the two wheels on the
same side of the trailer are on the scale. Record this weight as Gross Load
on One Side:
_____________________
Now subtract this weight from the result of Step 5 and record it as Gross
Load on Opposite Side:
_____________________
Total: __________________
Your electric trailer brakes are
engineered to work in synchronization
with your tow vehicle brake system and
a brake controller. Relying on your tow
vehicle or trailer brakes alone to stop the
rig may result in loss of control, serious
injury or death.
WARNING
Always level your trailer when in use.
Failure to level can cause water leaks,
refrigerator failure or other damage.
CAUTION

Teardrop Campers • nucamprv.com28
Compare the two numbers. The difference between the two numbers will tell you how much more
weight is on one side versus the other. Move cargo to the side with less weight to balance side to
side and repeat this step.
LEVELING
It is important to stabilize and level your trailer when using it because:
• The refrigerator performs best when leveled.
• The shower, sink, and water systems can drain and
function properly.
• Walking is easier inside when the trailer is stable and level.
• It is easier to prepare food and perform various activities.
STABILIZING & SET UP
Your travel trailer is equipped with a stabilizing system that serves to keep the trailer from bouncing
while in use. Follow these procedures when setting up and stabilizing your travel trailer:
1. Pull into a campsite that is level and free of protruding branches and obstacles. Your trailer
should be as level as possible.
2. Set your tow vehicle park brake.
3. Block the trailer wheels with wheel chocks.
4. If equipped, remove the weight distribution bars and stow.
5. Remove the pin from the coupler and pull it back to release the ball hitch.
6. Extend the tongue jack to lift the tongue off the hitch.
7. Remove the safety chains, breakaway lanyard, and 7-pin connector plug. Neatly lay them over
the front of the chassis.
8. If you have jack pads, place them under the four stabilizer jacks.
9. Place a level on the oor of the camper to determine whether it is level. Adjust the tongue
jack and use leveling blocks to level the unit.
10. Once the unit is level, lower the stabilizer jacks using the supplied hand crank. Please note
that the stabilizer jacks are not to be used for leveling.
11. At this point, you are ready to connect 110V power, turn on the propane gas for cooking and
start enjoying your outdoor experience.
AXLE & BRAKE SYSTEM
Your travel trailer is equipped with an electrically actuated brake system comprised of the following
elements:
• Tow vehicle battery
• Brake controller (on tow vehicle)
• 7-pin connector plug
• Trailer battery
• Breakaway switch
• Electric drum brakes
Important Information about your brakes:
• Trailer brakes are designed to work with tow vehicle brakes to maintain proper performance.

Teardrop Campers • nucamprv.com 29
• Using either tow vehicle or trailer brakes as separate systems will increase wear and tear and may
void warranties. Use them together.
• Brake shoes need to be adjusted after 1,000 miles or after 40 medium-hard brake stops. This
process is called “burnishing” and ts or “seats” the brake shoes to the drum. After this break-in
period, scheduled for service with your dealer or another qualied technician to have the brakes
adjusted for proper performance and durability.
• Brakes must be adjusted every 12,000 miles or as routine maintenance requires.
• If you experience brake lock-up, shuddering, or uneven braking, it is quite often due to the
lack of synchronization between your vehicle and trailer brake systems, too high threshold
voltage, or improperly adjusted brakes. If the problem persists, contact your dealer or another
qualied technician for diagnosis and repair.
• The primary source of power for your trailer’s braking system is your tow vehicle battery. Always
keep your tow vehicle battery and its charging system properly maintained and serviced.
• If you are installing an after-market brake controller, it must be installed according to
manufacturer recommendations for proper tow vehicle and trailer brake synchronization. Contact
your tow vehicle dealer for assistance in installation.
• Brakes can be manually adjusted at the brake controller in your vehicle to provide the correct
braking capability for varying road and load conditions. Depending on load and driving
conditions, you will have to make frequent small adjustments to accommodate.
• Your axle and brake system are supplied by Dexter Axle. All information relating to the brakes
and axles can be found in the Operation, Maintenance and Service Manual included in your
owner’s packet. Make sure to read and understand the Manual before you operate the
trailer. If you cannot locate a copy of the Manual, it is available on Dexter’s website here:
https://www.dexteraxle.com/resources/manuals/-in-tags/tags/Light-Duty.
Teardrop Campers • nucamprv.com30
HEATING & COOLING
ALDE
®
HEATING SYSTEM
Most nuCamp campers are equipped with the
Alde
®
Hydronic Heating System. This system is
designed to provide warmth and comfort in all
weather conditions.
Advantages of the Alde
®
System:
• The much quieter, gradual radiant heat spreads through the
camper, as opposed to loud blasts of air from regular RV furnaces.
• The Alde
®
System serves a dual purpose, not only heating the space
but providing on-demand hot water.
• Both propane gas (with 12V for the control panel) and 120V shore
power can be used to fuel the Alde
®
System.
It may take a little practice to learn how to operate the Alde
®
System. But
once you do, you will appreciate its performance and dependability.
Some basic information about the Alde
®
System setup in your
nuCamp camper:
• The Alde
®
Hydronic Heating System is simple but elegant, with a
design that dates to the early 18th century in Sweden. The Alde
system was specially designed for RV use in the cold north and the
company has had many years of experience in this. This makes Alde
ideal for use in nuCamp campers.
• Glycol uid is heated in a boiler, pumped around pipes to heat
emitters, and then radiates heat naturally into the air. The hot water
supply is heated in the same way.
• The heating uid is propylene glycol antifreeze, and as it is heated,
it exchanges heat through a stainless-steel jacket with the domestic
hot water cylinder/tank. As a result, the water is heated at the same
time the Glycol is heated. This makes the Alde
®
system very efcient.
• The Alde
®
System’s computerized electronics (such as the control
panel) use 12V Power, and the heating will run off 120V and/or
propane. Whether you have the unit on Propane or 120V, it
will always require a small amount of 12V power (.6amps/hour).
• The Alde
®
3020 Compact Boiler is located underneath the bed
area, near the Nautilus plumbing panel. To access, remove the bed
cushions and the supporting lids.
• The typical warm-up time for the
Alde
®
System from cold to a
comfortable temperature in the camper is about one hour in normal
conditions, or 2-3 hours in extreme conditions. Take this into
consideration when using the heating system. If you do not see a
temperature increase, have your dealer troubleshoot the system
.
When using the Alde
®
System for the rst time:
1. Make sure your Alde
®
bypass valve is turned to “Normal” Operation.
2. Conrm there is no RV antifreeze in the Alde
®
Domestic Water Tank.
This can occur if the unit has been winterized.
3. Check your Alde
®
expansion tank. The glycol uid level must be at
least one inch above the minimum line. This may need to be topped
off after the rst use.
Hot water at temperatures above 120°F
(49°C) can cause serious scalding injuries
and in extreme cases, death. Always test
water temperature before showering.
WARNING

Teardrop Campers • nucamprv.com 31
4. Make sure you have a shore power connection or a full propane tank and charged 12V
battery. The Alde
®
will run off 120V shore power alone, or off propane and 12V.
5. If you have checked all the above, you are ready for operation. Power on the Alde
®
monitor
mounted in the nuCamp control panel, select a power source, adjust to your desired
temperature and enjoy the warmth and comfort of the Alde
®
Heating System.
Most of this information was obtained from the Alde
®
3020 Compact Manual. For complete details
on operating the Alde
®
Heating System, please see the included operator’s manual in your owner’s
packet.
ALDE FLOW
Basic information about the Alde Flow function:
1. The Alde
®
Flow is designed as an assistance to the Alde
®
3020 Compact boiler. About the
size of a shoe box, you will nd it installed beside the boiler if your camper is equipped
with it.
2. The Flow is not a hot water reserve tank but rather serves as a heat exchanger assistance to
the boiler.
3. There are no electric heating elements or combustion chambers inside the Flow.
4. The boiler pumps hot glycol into the Flow where it warms the cold water coming from
the freshwater tank by convection, taking the chill off the cold water. The warmed water is
then pumped into the boiler and further heated.
5. The Flow lightens the load on the boiler and increases the amount of hot water available for
showers. The boiler can provide more hot water with extra assistance.
6. With the Alde
®
ow equipped, there is an extra safety relief valve that needs to be drained
when winterizing the plumbing system.
7. Controls for the Alde
®
Flow are all built into the Alde
®
System. Operate the Alde
®
system as
normal. The Flow does not have separate controls.
Consult the Alde
®
Flow operator manual for detailed instructions on operation. A copy is included in
the Owner’s Packet.
AIR CONDITIONING
Important information about operating air conditioners in your camper:
• Starting an air conditioner early in the day will not only lower temperatures, but it will
remove excess humidity and help the camper stay cool when the day gets hot.
• The air conditioner assists in ventilating the camper and promoting a healthy air ow by
recycling stale air and bringing in fresh air.
• The air conditioner is the largest single load on the electrical system.
• The air conditioner only operates on shore power. When camping without shore power
you will need to use an appropriately sized generator to run the air conditioner. Use 30-amp
Shore Power only. Running the system on a 15-amp circuit can overload the circuit.
• DO NOT use the microwave and air conditioner at the same time. It will likely be trip
breakers.
• Generally, RV air conditioners are only designed to cool the inside air approximately 20°F
lower than the outside air. This is not a defect. In temperatures of 100°F or higher, such as in
the southwest United States, this should be taken into consideration.
• Keep windows and other vents closed when operating the air conditioner.
• Hot air rises and cool air drops. The air conditioner gathers air via the intake slots cut into
the dinette cabinetry, cools it (creating condensation and discharging water through its
vents), and then ejects the air through ducts and vents higher up where it circulates
away from the intake.

Teardrop Campers • nucamprv.com32
• Never close or obstruct the air intake. This will cause the air conditioner to malfunction and slow
down cooling.
When camping in hot weather, especially during the day, the camper will absorb heat from the sun and
the surrounding atmosphere. This is known as heat gain. If you can reduce this, especially in extremely hot
weather, you have won half the cooling battle.
To reduce heat gain and increase air conditioner cooling in high temperature weather:
• Seek shaded areas to park your camper, such as beneath trees.
• Close all windows, shades, and curtains. For an extra heat shield, insert an automotive windshield
sunshade, cut to size, into each of the windows. Some shades may have a reective coating on the
exterior side already.
• Keep heat-emitting appliances such as the Alde
®
System, stovetop and microwave turned off.
• Extend any equipped awnings. This will shade the sides of the camper from sun exposure.
• Start the air conditioner early in the morning to give it a head start on the day.
• Turn the air conditioner to its highest setting.
Refer to the air conditioner’s operator manual for detailed operating instructions. This is included in your
owner’s packet.
FAN VENTILATION
The fan vent(s) installed in the roof creates fresh air circulation and removes stale air from the camper. It is
powered by 12V or shore power and may be equipped with either manual or remote controls.
• Always ventilate the camper while sleeping.
• The fan will not ventilate well if an air inow source such as a window is not opened. For best
ventilating results, open a window the farthest distance from the fan so air can ow through the
entire camper.
• See the operating instructions for the fan vent included in the owner’s packet.

nucamprv.com • Teardrop Campers 33
PLUMBING & WINTERIZATION
WATER SYSTEM INFORMATION & SAFETY
Your camper is equipped with a two-part plumbing system – freshwater
and wastewater.
The freshwater system includes:
• Fill Level Monitor Screen
• Nautilus Plumbing Control Panel
• Freshwater Holding Tank
• Water Pump & Filter
• Alde
®
Boiler (heats the water)
• Sink Faucets
• Shower Head
• Exterior Wash Station (included in Nautilus panel)
• Water Fill Inlet (included in Nautilus panel)
• Piping & Connections
The wastewater system includes:
• Fill Level Monitor Screen
• Gray (waste) Water Holding Tank
• Drains
• Toilet
• Piping & Connections
Safety Information:
Before using the freshwater system for the rst time and when de-winterizing,
the water system must be sanitized. During cold months the camper may have
been winterized at the factory or dealer lot.
• The water system is safe enough to drink from only if it is properly
sanitized. Most camping enthusiasts nd it safer and easier
to supply their own bottled drinking water. Your best option may
be supplying your own safe drinking water rather than relying on
the water system in the camper to be pure and sanitary.
• Due to the smaller plumbing system in most recreational vehicles,
the pump can only supply a limited amount of pressure at a given
time. Use only one water outlet at a time. While showering
especially, do not open other faucets. Scalding and serious burns
may occur to the person in the shower.
• Always drain holding tanks when they are not in use. This will
eliminate contaminants from stale water and prevent freezing
in winter.
• Traveling with full tanks can reduce the amount of available cargo
capacity in the trailer and increase trailer sway. Depending on which
tank is holding water a full tank will reduce or increase
tongue weight.
Do not drink unsanitary water. If water
quality is unknown, do not drink.
Serious injury or in extreme cases death,
can occur.
WARNING
Teardrop Campers • nucamprv.com34
General Care:
• Road vibrations, excessive pressure from city water sources and
improper winterization are the main physical causes of water system
damage. Inspect all visible plumbing joints and ttings often for
cracks and leaks. An unchecked water leak at a plumbing joint can
cause considerable water damage and costly repairs which may not
qualify for warranty coverage.
• It is possible for an electrical problem to cause water system
problems due to equipment like the water pump requiring
electrical connections.
• Be sure to read the literature supplied with plumbing appliances for
troubleshooting tips.
• If a leak or other problem persists after troubleshooting, consult
your dealer for further inspection and repair.
MONITOR PANEL
The monitor panel, containing controls for lighting and other equipment,
located near the entry door, includes controls to monitor tank ll levels and
a switch for the water pump. To see the various tank and battery ll levels,
tap the screen of the panel. Switches mounted onto this panel control the
lights and water pump as well.
NOTE: If a lithium battery is equipped, you must use the VictronConnect
app to monitor the battery level. The monitor panel will not reect the
battery state of lithium batteries.
PLUMBING CONTROL PANEL
The plumbing control panel feature is designed to simplify the use of the
plumbing systems onboard. Three-way switches in the nüCamp monitor
panel and a switch on the plumbing control panel offer dual controls for
the water pump. There are ve plumbing settings on the Nautilus P3
panel. Following is a brief explanation of each:
Sanitize – For sanitizing the tanks and plumbing system
Winterize – Used when preparing your trailer for cold weather.
Dry Camp – Used when depending on water in onboard tanks due
to no hookups.
Tank Fill – Used when lling your tank in preparation for
dry camping.
City Water – Used when a continuous external city water supply
is available.
More information for the equipped Nautilus panel can be found on the
manufacturer’s website at: http://www.bandbmolders.com/index.php/
nautilus/
FRESHWATER TANK
An equipped freshwater holding tank stores water for you to use when dry
camping. It is important to note that the tank’s water holding capacity may
be higher than the amount of water that can be pumped out of the tank
and used. This is normal due to the slight expansions of the tank when
water is inside it and the limitations of where the low point drain exits the
Use potable water only in the freshwater
system. Sanitize, ush, and drain water
tank before using. Failure to maintain
tank can result in death or serious injury.
WARNING
Water holding tanks should always be
completely drained when camper is not
in use. Damage or unsanitary conditions
may occur when water becomes stale or
freezes.
CAUTION

nucamprv.com • Teardrop Campers 35
freshwater tank. A few gallons may be trapped inside at any time. This can
sometimes be remedied by dropping the side, front, or rear of the camper
so as much water as possible ows into the low point drain.
WATER PUMP
There are two 3-way switches for the water pump. One is located on the
main control panel and the other is on the Nautilus plumbing control
panel. Either one can be used to control the pump. When the pump is
turned on it will run until the line is pressurized to about 45 PSI. The water
pump can be accessed under the bed/wardrobe close to the plumbing
control panel. Refer to the water pump owner’s manual for detailed
operating instructions.
Initial Start-up process and normal operation:
1. Make sure the freshwater tank is lled or has some water in it.
2. Turn the water pump switch to ON. You should hear the pump running.
3. Open all water outlets, both hot and cold, one by one until the
water ow is steady then shut it off. When the last faucet is turned
off, the pump should turn off as well.
4. The system is now pressurized and ready for normal operation
and use.
5. During normal operation, the pump will cycle on whenever a water
outlet source is turned on or when the pressure drops in the line. A
check valve in the pump will keep water from owing backward.
6. If the pump cycles frequently while there are no water outlets open,
you may have one of three common issues:
a. Debris accumulation in the lter. Remove and clean.
b. Leak in the line between the tank and pump. Have your
dealer repair the system.
c. The pump needs priming. This is sometimes due to a weak
pump, which will need to be replaced by your dealer.
SHOWER
The shower head may be equipped with a water ow control device to
conserve water usage. This helps conserve water when dry camping.
Showering Instructions:
1. Check the water level in tanks via the monitor screen. You don’t
want to run out of water in the middle of a shower.
2. If dry camping, make sure the 12V system and water pump are
turned on.
3. Turn the Alde
®
system to hot water boost mode. Follow the
instructions in the Alde
®
manual.
4. Turn on the ceiling exhaust fan to actively remove moisture vapor.
5. Enter the shower and close the door securely.
Never run the water pump dry. Damage
may occur and your pump may be
ruined. Follow all supplied manufacturer
instructions to properly operate pump.
CAUTION

Teardrop Campers • nucamprv.com36
6. Pull the shower curtain around so it securely covers all exposed
wood areas.
7. Remove the shower head, turn on the valves, and adjust the hot
and cold valves to the desired temperature. Spray directly into the
drain to avoid unpleasant temperatures.
8. Water may be cold until hot water makes its way through the pipes
from the Alde
®
boiler. If it is continuously cold, you may need to
adjust the hot water mixing valve underneath the bed.
9. To save water while showering; rinse, turn the water off while
applying soap and then thoroughly rinse again.
10. Turn the water off at the hot/cold knob, letting excess water drain
from the shower head. It is normal for the shower head to drip
slightly after being turned off.
11. Wipe down the shower with a dry rag to keep water stains to a
minimum and remove moisture.
12. You can keep the shower door cracked just a little and keep the
exhaust fan running to draw air movement through to dry loosely
hung towels and clear the air of moisture. The less time the shower
is wet, the better it will hold up in the long term.
EXTERIOR WASH STATION
The wash station is intended for uses such as washing up before entering the
camper. A sprayer, resembling a shower, serves as the outlet and is connected
to the freshwater system in the Nautilus Plumbing Control Panel.
1. Before using the sprayer make sure the freshwater system is turned
on and working properly.
2. Attach the water hose and sprayer head to the Nautilus plumbing
control panel.
3. Adjust water temperature and pressure by adjusting the hot and
cold valves.
4. When nished washing, turn the water off and drain the excess
water from the hose and sprayer head.
5. Unhook the water hose and sprayer from the Nautilus plumbing
control panel and close the compartment.
HOT WATER & MIXING VALVE
Hot water for the camper is supplied through the Alde
®
radiant heating
system. The equipped Alde
®
Flow system increases the amount of hot
water available for use. Refer to the Alde
®
Owner’s Manuals for specic
operating instructions. The adjustable hot water mixing valve mixes hot
water exiting from the Alde
®
boiler with cold water. The factory sets the
hot water mixing valve at its coldest setting to avoid scalding accidents.
When operating your hot water system for the rst time, adjust the mixing
valve to your desired temperature. Instructions on how to adjust the
mixing valve are included in your owner’s packet.
The number one issue the nuCamp
Customer Service Team is asked concerns
the issue of no hot water. This is typically
a simple x and is only a matter of
adjusting the hot water mixing valve
to the (+) symbol located near the Alde
boiler. Follow manufacturer instructions
for proper valve adjustment.
NO HOT WATER?

nucamprv.com • Teardrop Campers 37
WASTEWATER HOLDING SYSTEM
The wastewater system has two holding areas. The gray tank stores
wastewater from the shower and sinks while the black tank stores solid
wastes from the toilet.
• Smells from the black tank can be unpleasant. The use of an RV
holding tank deodorizer will reduce the smell and aid in breaking
down solids. Make sure to follow manufacturer instructions when
operating and maintaining the toilet.
• Unpleasant odors from the gray tank can be controlled by adding
RV holding tank deodorizer to the sink or shower drains and rinse
down with water.
• Keep the knife valve locked and the drain cap tightly in place when
using the system on the road and anytime not connected to a
dumping station.
• Use a special holding tank deodorant chemical approved for RV
holding tank systems in the black and grey water holding tanks.
These chemicals aid the breakdown of waste and make the system
more pleasant to use.
• Do not put facial tissue, paper, grease, ethylene glycol-based or
other automotive antifreeze, sanitary napkins, or household toilet
cleaners in the holding tanks.
• Do not put anything solid in either tank that could block piping or
scratch and puncture the tank.
TOILET
The toilet is connected to the pressurized freshwater system. A single
lever arrangement controls the ushing and the ow of water into the
bowl. Most RV toilets are designed to function with a smaller amount of
water than household toilets. Unnecessary, frequent ushing of the toilet
will quickly deplete your freshwater supply and ll the black tank. If the
black tank becomes full, the toilet cannot be used until the tank
is drained.
To keep black tank blockage to a minimum:
• Cover the bottom of the black tank with water immediately
after dumping.
• Movement while driving will help liquefy solids in the black tank.
Adding water to the tank will also help
• Only use an RV approved biodegradable 1-ply tissue paper and
deodorizing agents specically designed for use in RV holding tank
systems. These products are available directly from your dealer and
most camping supply stores.
• Never use chlorine or caustic chemicals such as drain opener or
laundry bleach in your toilet.
• Never allow foreign objects (non-dissolving items) such as hygiene
products, paper towels, wipes, or diapers to be ushed through
the toilet.
Refer to the Owner’s manual included in the owner’s packet or in the
packaging of your toilet for operating and detailed care instructions.
Keep drain valve closed to minimize the
presence of sewer gases. Sewer gases
can be present when RV is connected to
campground sewage hookup. May lead
to illness or personal injury.
CAUTION

Teardrop Campers • nucamprv.com38
WINTERIZING/DE-WINTERIZING
Freezing climates can damage the camper’s plumbing system and
equipment. The camper must be drained, blown out, and have antifreeze
protection before storing in below-freezing temperatures in fall/ winter.
This is done through a process called winterizing.
Be sure to always use a non-alcohol-based antifreeze when winterizing
your camper.
When getting the camper ready for camping season in spring you must
cleanse the potable freshwater system to remove all the antifreeze. This
process is called de-winterizing or sanitizing.
User instructions for winterizing, de-winterizing, ushing, and sanitizing can
be found on the Nautilus plumbing control panel manufacturer’s website
at:
http://www.bandbmolders.com/index.php/p3-2/
STEPS TO WINTERIZING/DE-WINTERIZING
While the Nautilus system instructions are generalized instructions, the
following steps outline more detailed instructions for winterizing the
freshwater & wastewater plumbing systems in your camper:
1. Empty all black and gray tanks into appropriate disposal.
They must be as completely empty as possible.
2. Level your camper or tilt it in such a way that the water in the
tanks ow toward the low point and tank drain openings.
3. Turn the handles on the Nautilus Panel to Power Fill Mode.
4. Open all drains in the unit:
a. Freshwater tank drain
b. Low point drains
c. Hot water tank & FLOW drains
(Yellow Alde drain valve. Vertical position is open,
horizontal is closed)
d. Gray & black tank knife drains.
5. Open all water xtures.
a. Sinks
b. Toilet (Flush)
c. Shower
d. Exterior shower
6. When water has stopped owing from all openings, close the
drains and xtures.
7. Turn the handles to a 45degree angle as shown in the Nautilus
Panel Winterizing Instructions.
8. Connect an air hose to the city water connection. You will need
an adaptor with a pressure gauge.
There is a secondary method of
winterizing that does not use RV
antifreeze. The line is simply blown out
with a blowout plug and no antifreeze is
added. Since there is a risk involved with
this method if the system is not blown
out thoroughly, nuCamp recommends
the RV antifreeze winterizing method
as a safer option. If you wish to try the
blowout method consult your dealer for
instructions and training. Pressure in the
lines must never exceed 40 PSI when
blowing out the water system.
NOTICE

Teardrop Campers • nucamprv.com 39
9. When blowing out the system with air, DO NOT exceed 40 PSI pressure in the plumbing lines
Damage may occur to the inline water regulator and other plumbing components. The freshwater tank
overow drain is always open, so the tank does not become pressurized with either air or water. The
fresh water tank should never have more than 2 PSI pressure in it.
10. Blow air into the system and always keep one drain open, open each freshwater drain one by one until
no more water is released.
a. Freshwater tank drain
b. Low point drains
c. Hot water tank drain (Yellow Alde drain valve. Vertical - open, horizontal - closed)
11. When the water is all drained out of the lines and all openings are closed, turn off and disconnect the
air hose.
12. Turn the handles to Winterize mode as shown in on the Nautilus Panel Instructions.
13. Connect a short piece of garden hose to the Winterize inlet of the Nautilus Panel and place the other
end into a non-alcohol based approved RV antifreeze. A short hose (cut off) will help the pump prime
easier and sooner.
14. Press the pump switch to activate the water pump. The pump will run until the system is pressurized
and will kick on when xtures are opened. Note that the LED indicator light on the panel will be lit if
the pump is powered.
15. With the system pressurized and one at a time, open each water xture until antifreeze appears, then
close. Remember to turn to both cold and hot so both lines are protected:
a. Sinks
b. Toilet (Flush)
c. Shower
d. Exterior shower
16. When all xtures are protected, turn the water pump off and disconnect the hose.
17. Pour one cup of the RV antifreeze into each sink and shower drain to protect the traps.
18. Follow manufacturer instructions for winterizing the toilet.
All units with the Black Canyon upgrade package are factory equipped with an Ultraheat freshwater tank heating
pad to assist your units water system in colder weather. When turned on using the switch located in the nautilus
compartment (TAB)/galley (TAG) will maintain the freshwater temperature between 44°F and 64°F (6.6°C and
17.7°C) using a built-in sensor.
Although the tank heating pad can assist with the supply of warm water in colder weather it cannot prevent the
water tank or water lines from freezing in inclement conditions and does not make the water system on the unit 4
season capable. As such we recommend winterizing the unit before encountering any freezing weather whether
or not it has been equipped with the heating pad.
DO NOT operate the heating pad when the tanks are empty.
Teardrop Campers • nucamprv.com40
PROPANE GAS SYSTEM
LP SAFETY
Propane gas, also known as LP or liqueed petroleum, is a naturally
odorless, highly ammable fuel stored in gas cylinders (commonly called
LP tanks) used by appliances such as the stovetop, refrigerator, and Alde
System. A strong odor, almost like sulfur or rotten eggs, is added to the
gas so hazardous leaks can be smelled.
Important Safety Information:
• ALWAYS close shutoff valves on LP tanks when the propane
system is not in use. Hand tighten only to avoid damaging the
interior seals on the valve.
• DO NOT use an open ame to check for leaks. Use the dish soap
and water solution. Spray onto ttings and joints. Bubbles will
develop at the leak point.
• DO NOT restrict access to the LP tank. Always keep the valve
accessible for emergency shutoff.
• DO NOT use any LP tank other than the one supplied with your
trailer unless provided to you by a qualied dealer or
service technician.
• DO NOT block installed vents in your propane compartment. The
compartment must be ventilated for proper airow.
• DO NOT cross thread, jam, or try to force the tting onto the
hose connector.
• DO NOT pack or store extra LP tanks inside the camper, whether
full or empty. The valves have safety devices that can release gas
into the atmosphere when under high pressure. Always ventilate
your camper when using propane appliances to avoid carbon
monoxide and asphyxiation danger.
• Check the LP gas system for leaks or malfunctioning parts before
each trip to avoid mishaps.
• Always fasten LP tanks securely and properly in the bracket
intended for them.
• When using the propane gas system for the rst time, and after the
rst 5,000 miles of use, employ a qualied technician to check the
piping for leaks. The piping system is tested and checked at the
factory, but travel vibrations can loosen joints.
• Read and understand the operating manuals of all propane
powered appliances before you start using your propane
gas system.
• A propane gas alarm is equipped in your camper. See the General
Safety Section of this manual to understand how that works.
IF YOU SMELL PROPANE:
1. Extinguish any open ames, pilot
lights and all smoking materials.
2. Do not touch electrical switches.
3. Shut off the propane supply at
the container valve(s) or propane
supply connection.
4. Open doors and other ventilating
openings.
5. Leave the area until odor clears.
6. Have the propane system checked
and leakage source corrected
before using again.
Ignition of ammable vapors could lead
to a re or explosion and result in death
or serious injury.
DANGER
The propane piping system is for use with
propane only. Do not connect natural gas
to this system. Securely cap inlet when
not connected for use. After turning on
propane, except after normal cylinder
replacement, test propane piping and
connections to appliances for leakage
with soapy water or bubble solution. Do
not use products that contain ammonia
or chlorine to test for leaks. May lead to
a re or explosion, which could result in
death or serious injury.
WARNING
nucamprv.com • Teardrop Campers 41
FILLING LP TANK(S)
Important information for lling LP tanks:
• Propane appliances will not light when there is an improper mixture
of gas and air. Brand-new LP tanks often have air and moisture
trapped inside before rst-time use. Have a qualied service
technician purge your new LP tanks before lling them for the
rst time.
• Only approved DOT propane gas cylinders may be used for
the camper.
• Fill the LP tank at authorized propane fueling facilities only.
• It is illegal to ll an LP tank inside the compartment or inside your
camper. Remove the LP tank from the camper to ll them.
• Never overll the LP tanks beyond the safe level.
• Always extinguish all open ames and shut off appliances before
removing or reinstalling the LP tank.
• When the LP tank is not connected to the piping system, always
attach a dust cap to the connection tting to keep it clean.
Steps for properly removing, lling and reinstalling the LP tank(s):
1. Close valves securely on the LP tank(s). Hand tighten only. This will
shut off all appliances.
2. Position the changeover lever to the full bottle.
3. Unthread the pigtail hose attached to the empty LP tank and attach
the dust cap.
4. Remove the empty LP tank from the compartment.
5. Fill the LP tank at a qualied propane fueling station.
6. Place the lled LP tank in the compartment and securely fasten it.
7. Remove the dust cap.
8. Carefully thread and hand tighten the pigtail hose connector onto
the tank’s tting.
9. Open the valve on the LP tank very slowly to prevent a rush of liquid
propane called freeze-up. If you experience freeze up, close the
valve, wait 15 minutes and try again.
10. When you open the valve, you will hear a hissing noise. If the hiss
lasts longer than 2 seconds, close the valve and have your dealer
service the propane system. You may have a leak.
11. If there is no leak, start appliances according to manufacturer’s
instructions included in your owner’s packet.
Do not ll propane container(s) to more
than 80 percent capacity. A properly lled
container contains approximately 80
percent of its volume as liquid propane.
Overlling the propane container(s) can
result in uncontrolled propane ow,
which could lead to a re or explosion
and result in death or serious injury.
WARNING
Follow Steps 8-10 after stabilizing and
leveling your trailer. Ventilate the camper
and make use of the range hood before
using the cooktop.
Get Cookin’
All pilot lights, appliances and their
igniters shall be turned off before
refueling of motor fuel tanks and/or
propane containers. May cause ignition
of ammable vapors, which can lead to
a re or explosion and result in death or
serious injury.
DANGER
Teardrop Campers • nucamprv.com42
PROPANE REGULATOR
Your camper is equipped with a two-stage regulator that reduces pressure
from the LP tank to the piping system. The rst stage drops pressure
to 10-13 lbs. of pressure. The second stage drops pressure to 6.35 oz.
pressure (11” Water Column or ½ PSI) needed to operate appliances
properly. Pressures that are too high or too low will cause safety hazards
and affect overall appliance performance. Consult your dealer or a
qualied service professional to have the regulator adjusted with a
properly calibrated manometer. Be sure to follow the propane regulator
manufacturer’s instructions included in your owner’s packet for proper
operation, maintenance, and use.
PROPANE SYSTEM MAINTENANCE
It is possible for the propane regulator to “freeze” in certain climate
conditions due to the properties of propane and the dynamics of
pressure change inside the regulator. In case of freezing, use an
incandescent light bulb or heated blanket to warm the regulator and
then have the system purged. Consider purchasing a propane regulator
cover, available online and at most major hardware stores, to protect your
regulator and prevent freezing.
Environment, usage, and time can deteriorate parts in the propane piping
system. Inspect the piping system before each camping season. Look
for cracks, loss of exibility, and corrosion. If parts need to be replaced,
consult your nuCamp dealer for proper parts of the same type and rating.
PROPANE USAGE
Propane usage uctuates, so there is no real way to accurately measure
propane usage. This uctuation is due to varying usages of appliances.
Propane usage can be measured to some degree of accuracy by
understanding BTUs of appliances and the capacity of LP tanks. A
standard 20 lb. LP tank contains approximately 430,270 BTUs of propane
gas while a standard 30 lb. LP tank contains approximately 645,405 BTUs.
Propane General Usage Guide
APPROX. BTU/HR
11,000 - 18,700
3,700-7,200
APPLIANCE
Alde® System
Cooktop
1,300-1,600
3-Way Refrigerator
(If Equipped)
An odor like garlic can occur when the LP
bottle is almost empty. The smell will go
away when the bottle is relled. If the
odor persists after the bottle is relled,
turn off all gas valves and have your
system inspected by a nuCamp dealer or
other qualied service technician.
What’s That Smell?

nucamprv.com • Teardrop Campers 43
120V AC shore power is powerful enough
to kill you. Always use a grounded shore
power connection and never remove
the “third” ground prong from your
shore power cord. Both reverse polarity
or improper grounding in the 120V AC
supply outlet can cause serious injury or
death. Do not connect the shore power
cord if either or both are present.
WARNING
ELECTRICAL
ELECTRICAL SAFETY & INFORMATION
Two electrical systems are outtted on your camper – the primary 12V
DC and 120V AC shore power. These electrical systems are engineered
to efciently provide power to the various appliances and features in the
camper. All designs, components, and wiring methods of the electrical
systems conform to federal and RVIA installation requirements at the time
of production.
Electrical Safety and Information:
• Aftermarket changes made to the electrical system can result
in electrical and re hazards. Never add appliances, features, or
other unapproved changes to the electrical system without the
assistance of a qualied technician.
• Electricity can pose a hazard if you do not understand how the
electrical system works. Only qualied electrical technicians should
service the electrical system and make changes to it in any way.
• Install a surge protector in the supplying 120V AC outlet before
plugging in your shore power cord. This will protect your camper’s
electrical system from damage caused by power surges.
• ALWAYS disconnect electrical power at the source when you work
with the electrical system.
• Remove rings, wristbands, or other metal objects when working
with the electrical system.
• Before you connect your shore power cord to an external supply,
test the outlet with an outlet-testing device that indicates whether
reverse polarity or an open ground is present in the outlet. If the
outlet-testing device indicates either of those conditions, have the
outlet repaired. Outlet testing devices are available from your
dealer or an RV/camping supply center.
• ALWAYS fully extend the power cord. Do not coil up the cord.
Excessive heat build-up can cause the wire coating to melt, thereby
becoming exposed and leading to an electrical hazard.
120V AC SHORE POWER
When connected to an external 120V outlet or generator via the 120V
shore power cord, your camper will be supplied with power. The electrical
system will be grounded via shore power if there is no open ground in the
supplying outlet or generator. The negative terminal on your battery serves
as a ground to your electrical system when shore power is disconnected.
The 120V electrical system provides power for:
• Air Conditioner
• Microwave (If equipped)
• Refrigerator (12V DC via Converter)
• Alde
®
System (Plus LP)
• Power Center/Converter
• TV
• 120V Receptacles

Teardrop Campers • nucamprv.com44
12V DC SYSTEM
When not connected to 120V AC shore power, the 12V system uses power
from the 12V (or dual 6V) Battery(ies) onboard the camper and functions
much like the 12V system in your tow vehicle. When 120V AC shore power
is connected, current runs to the 12V power center via the converter and
provides power to the 12V appliances and features. The negative terminal
on your battery serves as a ground to your electrical system when shore
power is disconnected.
These components and appliances work off 12V power:
• Lights
• Water Pump
• Refrigerator
• Stereo System
• nuCamp Control Panel
• Vent/Fan
• 12V Outlets
• Propane/CO Alarm
BATTERY(IES)
Battery Maintenance:
• When the 120V AC shore power cord is connected, the converter
system automatically charges the trailer battery(ies) if the battery
disconnect switch is turned ON.
• When the tow vehicle is not running, the 7-way connector plug is
connected to the tow vehicle (depending on thetow vehicle make/
model) and the 120V AC shore power cord is connected, your tow
vehicle battery may charge as well. In a similar scenario when the
120V AC shore power cord is not connected, the tow vehicle battery
may discharge slowly if left connected for extended periods. Make
sure to unplug the 7-way connector plug when the camper is not
being towed or the tow vehicle isn’t running.
• Battery charging speed depends on the power being used for lights
and appliances. Only surplus power goes to charging the battery.
• On extended stays keep your trailer hooked up to a 120V AC shore
power if available. This will keep your batteries charged.
• If you have the 7-way connector plug attached to the tow vehicle
(depending on the tow vehicle, make/model), your battery will be
recharged while driving.
• Battery charge ll levels can be monitored and checked via the
nuCamp monitor panel. NOTE: If a lithium battery is equipped,
you must use the VictronConnect app to monitor the battery level.
The monitor panel will not reect the battery state of lithium
batteries.
• Always make sure the battery is secured in place while traveling.
• Battery cables must always be secured tightly to the terminals.
Loose connections can cause power loss or arcing power between
connections.
When installing a battery(ies), always
observe polarity. Connecting a battery
in reverse polarity will blow the power
converter main fuses located in the 12-
volt DC distribution center.
CAUTION

Teardrop Campers • nucamprv.com 45
• Keep the terminals and cables clean and free of corrosion. Clean periodically with a wire brush.
• Before using your camper in the summer season, have your dealer check your battery life and
perform all necessary maintenance on your system. This will avoid unforeseen maintenance
issues during your trips and heighten your enjoyment of your experience.
BATTERY DISCONNECT SWITCH
About the battery disconnect switch:
• The battery disconnect switch separates the battery(ies) from the 12V distribution center and
converter charging system.
• When 120V AC shore power is connected and the switch is turned ON, the power center is
activated, and the battery(ies) will be re-charged.
• When 120V AC shore power is connected and the switch is turned OFF, the 12V distribution
center will still receive power from the converter, but the battery(ies) is disconnected from the
system and will not be recharged.
• The battery(ies) will not be discharged or recharged if the switch is OFF (Red).
POWER DISTRIBUTION CENTER
The power distribution center was designed to use a 30 AMP main breaker with branch circuits. Should
a breaker become faulty, replace it with the same type of breaker only. Only use approved circuit
breakers and 12V fuses. In all cases refer to the manufacturer’s instructions on proper operation.
• Generally, each 12V DC circuit in the distribution center was designed for a maximum 20-amp
automotive-style fuse. One or more fuses may be specied at 30-amp. This is the only place a
30-amp fuse should be used.
• Replacement fuses must be the same type and amp rating as originally supplied by the nuCamp
factory. Replacing it with an improper size fuse could result in malfunction.
• The power converter is equipped with reverse polarity fuses. If these fuses “blow” while
connecting the battery, replace them with the same type and rating fuse as originally provided
with the equipment.
• While appliances and accessories are connected to the 120V receptacle, the wiring is protected
by circuit breakers in the power distribution center.
• In the event of a failure of a 120V circuit, rst, check your trailer circuit breakers and the breaker
for the outlet into which your trailer shoreline cord is plugged.
• If a breaker continues to trip after you have reset it several times, your circuit may be overloaded
with appliances or there may be a short in the circuit. Try lessening the load on the circuit
by shutting off appliances, such as the air conditioner and microwave, that consume high
amounts of electricity. If that does not solve the problem, consult an authorized nuCamp dealer.
CONVERTER
The converter is built into the power distribution center where the breakers and fuses are.
About the converter function:
• The converter transforms 120V AC into 12V DC and enables you to use the interior lights, fans,
pumps, and 12V appliances, whether operating on 12V battery power or 120V shore power.
• When on 12V battery power only, everything works normally except the 120V outlets and
appliances. Some appliances, if connected and equipped, will still work with a propane
gas supply.
• The converter system is designed to maintain constant output voltages, thus named DC (direct
current), regardless of the variances that occur in shore power systems which are AC (alternating
current).

Teardrop Campers • nucamprv.com46
• The converter is energized only when the trailer is hooked up to
120V AC shore power.
• The power converter is not weather-resistant. It must be protected
from direct contact with water.
GROUND FAULT CIRCUIT INTERRUPTER
The GFCI (ground fault circuit interrupter) breaker provides reliable
overload protection, short-circuit protection, and protection from ground
faults that might result from contact with a HOT load wire and the ground.
Each GFCI circuit breaker is calibrated to trip with a ground current of 5
milliamperes or more. Help protect your family from the risk of electric
shock by performing the following test each month.
Testing GFCI receptacles:
1. Push the Reset button located on the GFCI receptacle rst to assure
normal GFCI operation.
2. Plug a device, such as a night light, with an ON/ OFF, switch into the
GFCI receptacle and switch it ON.
3. Push the Test button located on the GFCI receptacle. The device
should turn off.
4. Push the Reset button, again. The device should come on again.
5. If the device remains on when the Test button is pushed, the GFCI is
not working properly or has been incorrectly installed.
6. If your GFCI is not working properly, call a qualied, certied
electrician who can assess the situation, rewire the GFCI if
necessary, or replace the unit.
RECEPTACLES
Receptacles powered by 120V AC power are on breakers connected to the
distribution panel and will function much like the receptacles in your home.
Do not connect an appliance or other device that will overload the circuit.
When an appliance such as a dehumidier, iron, toaster or other device is
drawing high power from an outlet, it may impede the function of lights
(indicated by dimming) and other components in your trailer. Always be
aware of your usage. Shut off appliances that you are not using to increase
power availability for others.
INVERTER
Do not exceed the recommended power supply load on the inverter.
See the inverter operating and maintenance instructions included in your
owner’s packet.
NUCAMP CONTROL PANEL
The nuCamp control panel is located near the main entrance door. On
it, you will nd a tank ll level indicator, a battery charge level indicator,
master switches to power lights, and the water pump. Switch buttons will
light up when activated. NOTE: If a lithium battery is equipped, you must
use the VictronConnect app to monitor the battery level. The monitor
panel will not reect the battery state of lithium batteries.”
One or more receptacles may be powered
by an inverter, if equipped. Inverter
outlets, when tested, will always indicate
an open ground. This is normal. The
input electricity of the inverter is partially
grounded by the negative DC connection
to your battery terminal. It does not need
a true earth ground to function properly.
Inverter Outlets
A GFCI does not protect you from
electrical shock. You will not be protected
from shock when you contact hot and
neutral sides of circuit connections.
Outlet covers must always be installed
while electrical current is present.
WARNING

Teardrop Campers • nucamprv.com 47
SAFETY LIGHTS
Your camper is equipped with safety lights and reectors that comply with federal and state safety
regulations. Never alter the lights or remove the reectors in any way. Replace defective or damaged
lights and reectors immediately upon discovery. Not only you but the safety of other drivers on the
road depends on you and your safety compliance. Your dealer can provide you with replacement parts.
INTERIOR LIGHTS
Interior lights are LED to conserve energy and are powered by 12V DC via the 12V battery(ies) or the
power converter when connected to 120V AC shore power. Defective light xtures must be replaced with
the same type, size, and wattage as originally installed. Contact your nuCamp dealer to acquire those
parts.
EXTERIOR LIGHTS
Units with the Black Canyon upgrade package have been equipped with under-glow lighting for off
road use and improved illumination while camping. DO NOT DRIVE ON PUBLIC ROADS WITH THE
UNDER-GLOW ON. Many states have made the act of driving on public roads with red under-glow
illegal.
ENTERTAINMENT SYSTEM
Refer to the manufacturer’s instructions for proper operation of the stereo, speakers, and TV. All
operating instructions, along with any equipped remote controls of each component are included in
the owner’s packet with your camper.
CABLE/SATELLITE CONNECTION
A cable connection inlet is provided on the exterior of your camper to allow connection to campground
cable service. The connection is located on the panel in the utilities compartment. The cable supplies a
connection to your TV for viewing purposes. Select the correct input source on the TV to watch cable TV.
SOLAR
The following outlines important general information about RV solar systems and may contain specic
information to your camper:
• A solar panel system recharges your battery and helps prolong battery life.
• Typically, the charge line from the solar controller is wired directly to the battery. This way, your
battery can always be recharged when sunshine is available.
• Solar panels are most efcient when directly facing the sun. When parking your camper, it is
best to turn it in such a way that the solar panels are turned toward direct sunlight and can most
efciently charge your battery. Parking in sunny areas may also contribute to faster battery
charging from the solar panels.
• Power from the solar panels provide a slow, steady charge to the onboard batteries if they are
connected and installed. The charge controller regulates the power coming from the solar
panel to keep the batteries from overcharging, keeps power from solar panels under a certain
voltage to protect the batteries, and prevents power from owing to the solar panel from the
battery.
• If greater solar generation is desired there is a port located in the nautilus panel compartment
for the connection of additional external solar panels when setting up camp.
Be sure to read and follow the solar controller user manual instructions and maintenance guidance.
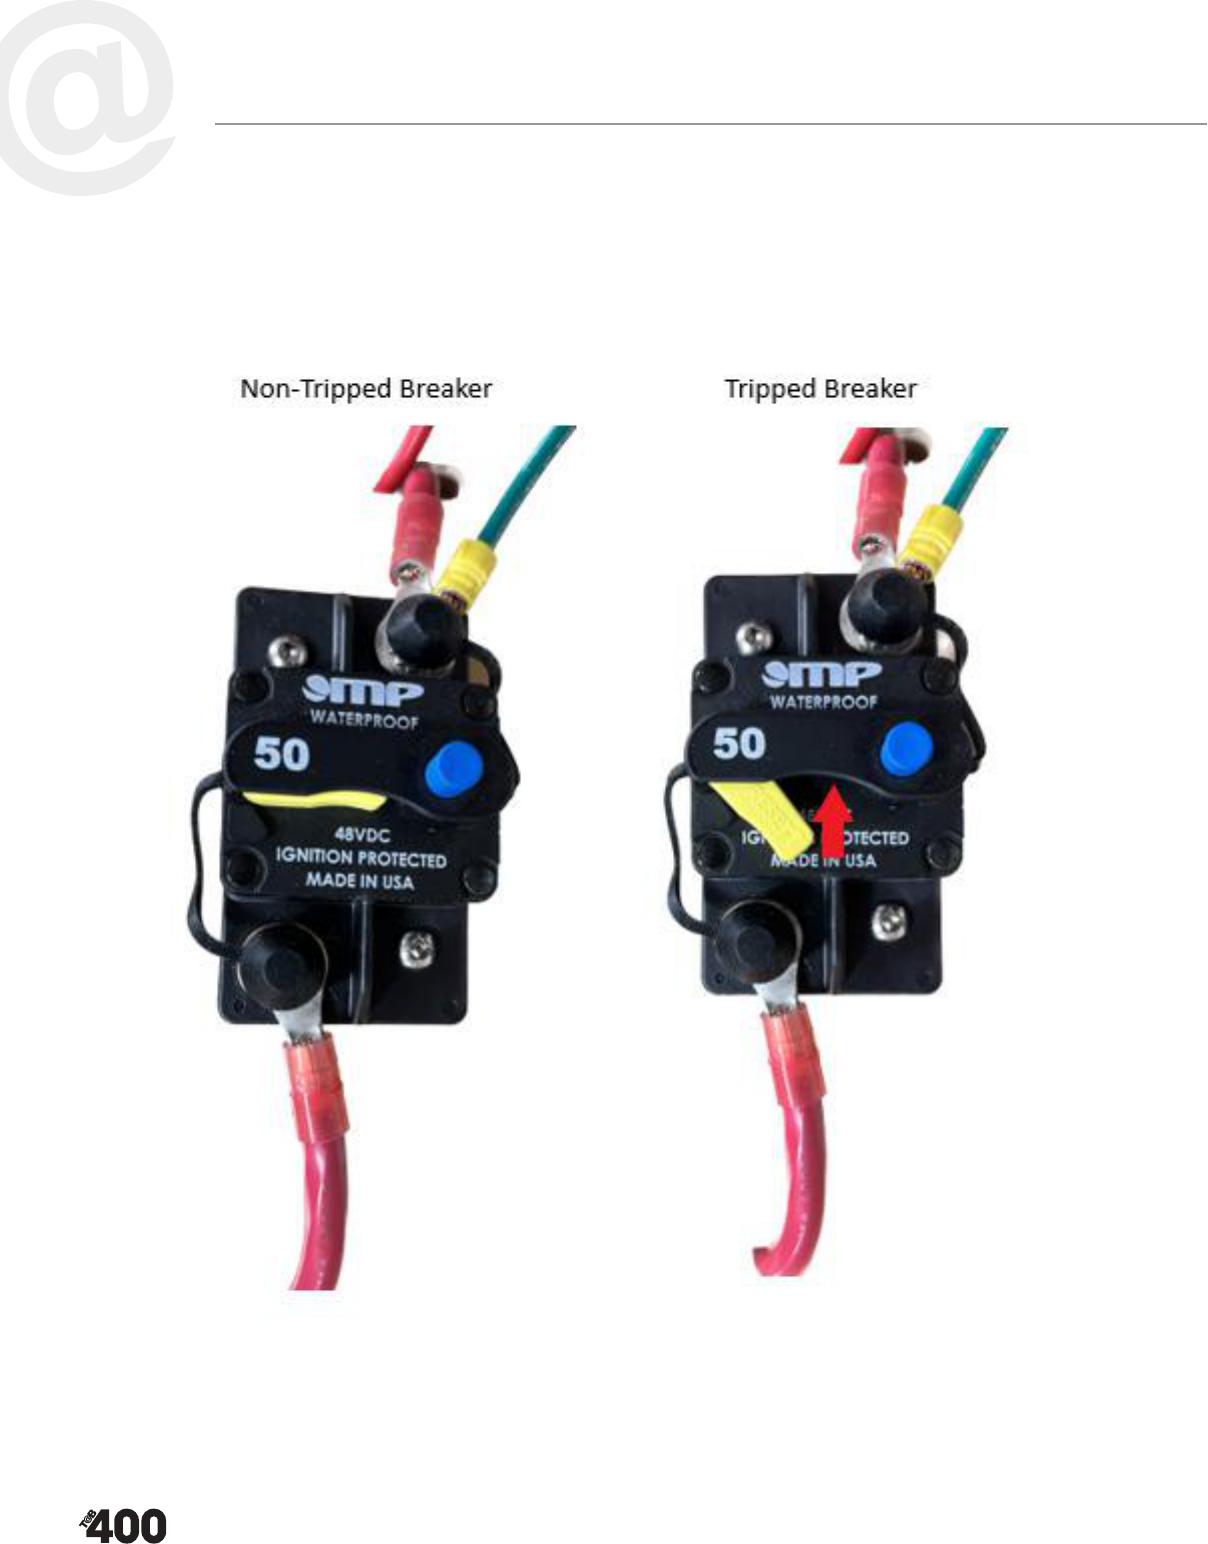
Teardrop Campers • nucamprv.com48
If you lose battery power and your battery disconnect switch is in the Green/On position, it is most likely your
Circuit Breaker.

Teardrop Campers • nucamprv.com 49
LITHIUM PACKAGE
LITHIUM UPGRADE
Campers equipped with our Lithium Package from the factory will have Battle Born lithium batteries and
Victron components in place of the standard WFCO power center.
The lithium upgrade comes equipped with:
• Battle Born Battieries (heat enabled)
• WFCO power distribution panel
• Victron Multiplus (inverter/charger)
• Victron SmartShunt
BATTLE BORN BATTERIES
These are 12V LiFePO4 (Lithium Iron Phosphate) batteries with built-in heating capability. If the heat-enable
switch is on, the heater will automatically activate when the internal temperature drops below 35°F (1.6°C) and
will shut off when the internal temperature exceeds 45°F (7.2°C).
WFCO DISTRIBUTION PANEL
This panel contains your AC breakers and DC fuse panel for the branch circuits. This will be the rst place to
check if a circuit or appliance stops working.
VICTRON MULTIPLUS
The Victron Multiplus is central to the electrical system in the lithium package. Both 12V battery power and
120V shore power come directly into the Multiplus before heading on to the WFCO distribution center and
out to the AC & DC branch circuits. The Multiplus charges the battery when connected to shore power and
does 120V AC passthrough. When shore power is unavailable, the integrated inverter can provide 120V AC to
the entirety of the camper using available battery power. (It is not recommended to run the air conditioning
off the inverter as the high-power draw will drain the battery quickly.)
VICTRON SMARTSHUNT
The Victron SmartShunt keep track of how much energy goes into the battery and how much comes out. It
can give you an accurate glimpse into your power usage and battery state-of-charge.
BLUETOOTH CAPABILITY
The Victron components are all Bluetooth enabled and can be congured or controlled using the
VictronConnect app located in both the Android and iOS app stores. The default PIN code when connecting
to each component is six zeroes: 000000
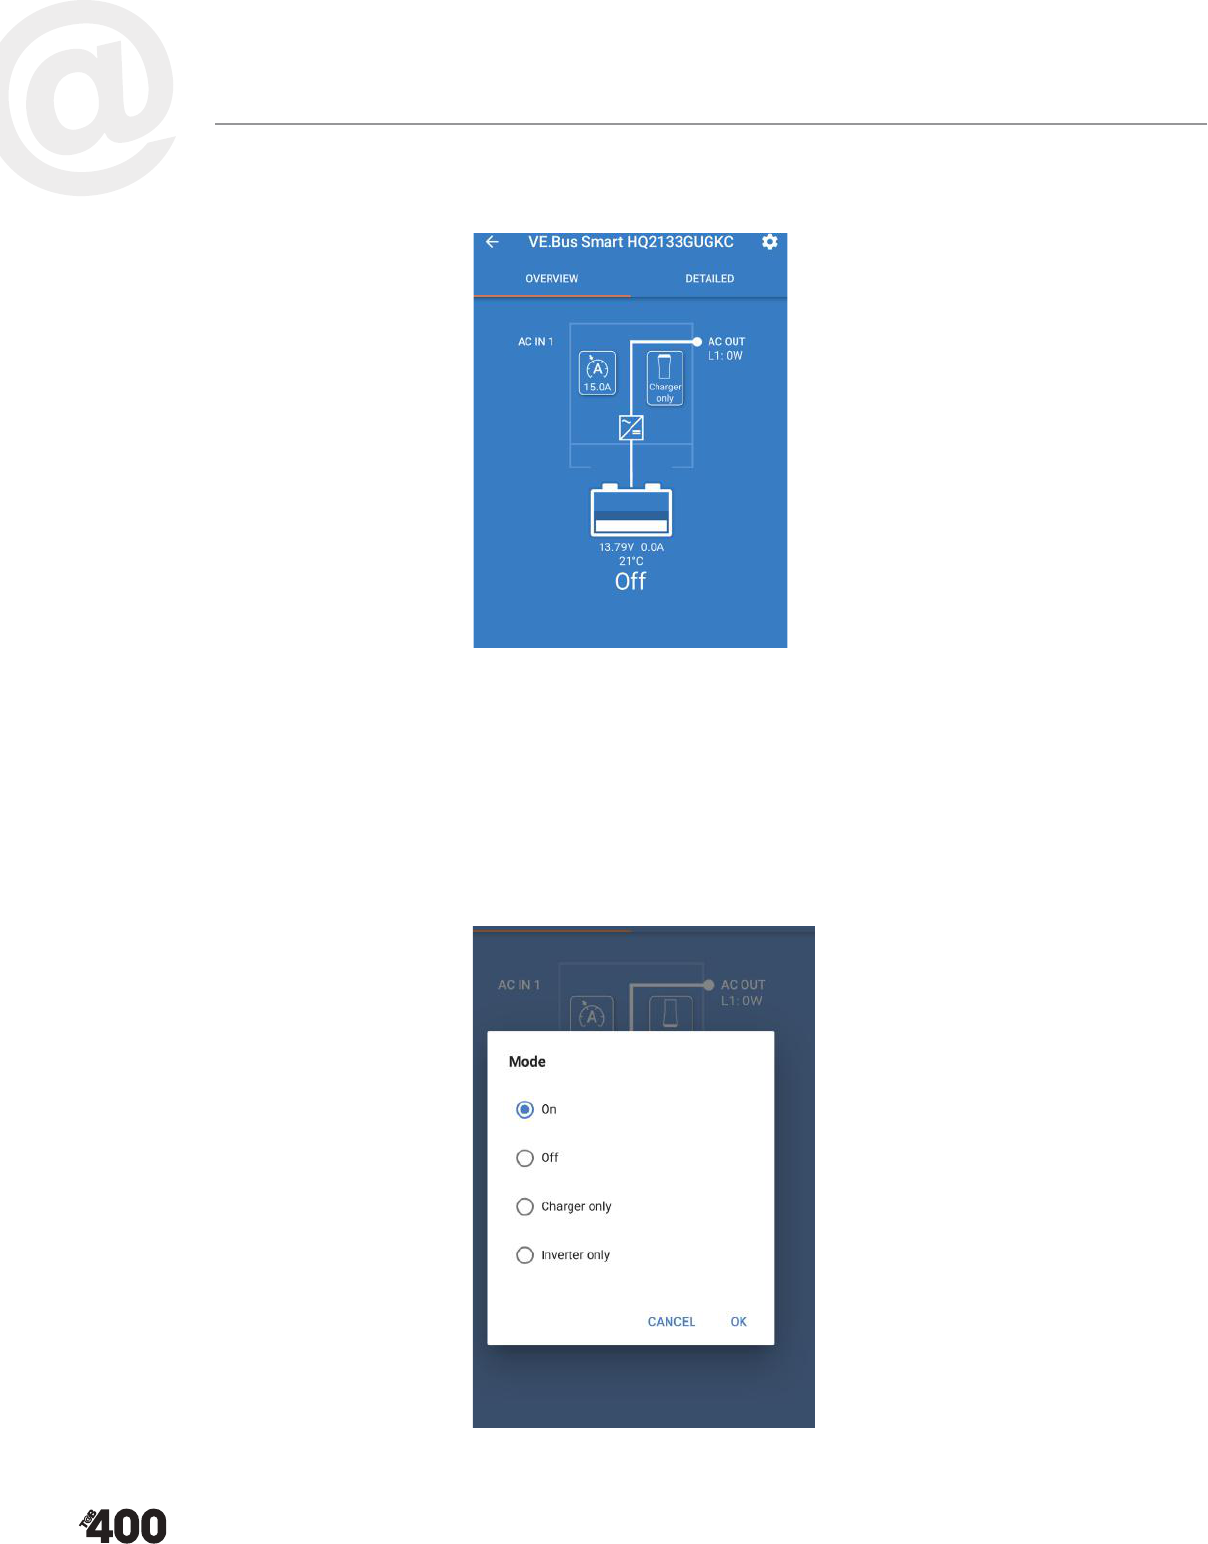
Teardrop Campers • nucamprv.com50
Using the VictronConnect app, you can change how your Multiplus functions:
The button the on left will allow you to limit how much amperage you can draw from your shore power source.
By default, it will be set to 30A as the trailer uses a 30A inlet plug. However, you may want to change this limit
temporarily if you are on a 20A or 15A outlet to prevent tripping the breaker on your power source.
The button on your right will allow you to change the Multiplus operation mode. By default, this will be set to
ON which means both the charging and inverting functions are active. However, you may want to change this
to Charger Only in some circumstances to save battery power. This will temporarily disable the inverter, which
pulls 1-2A on average while powered on.
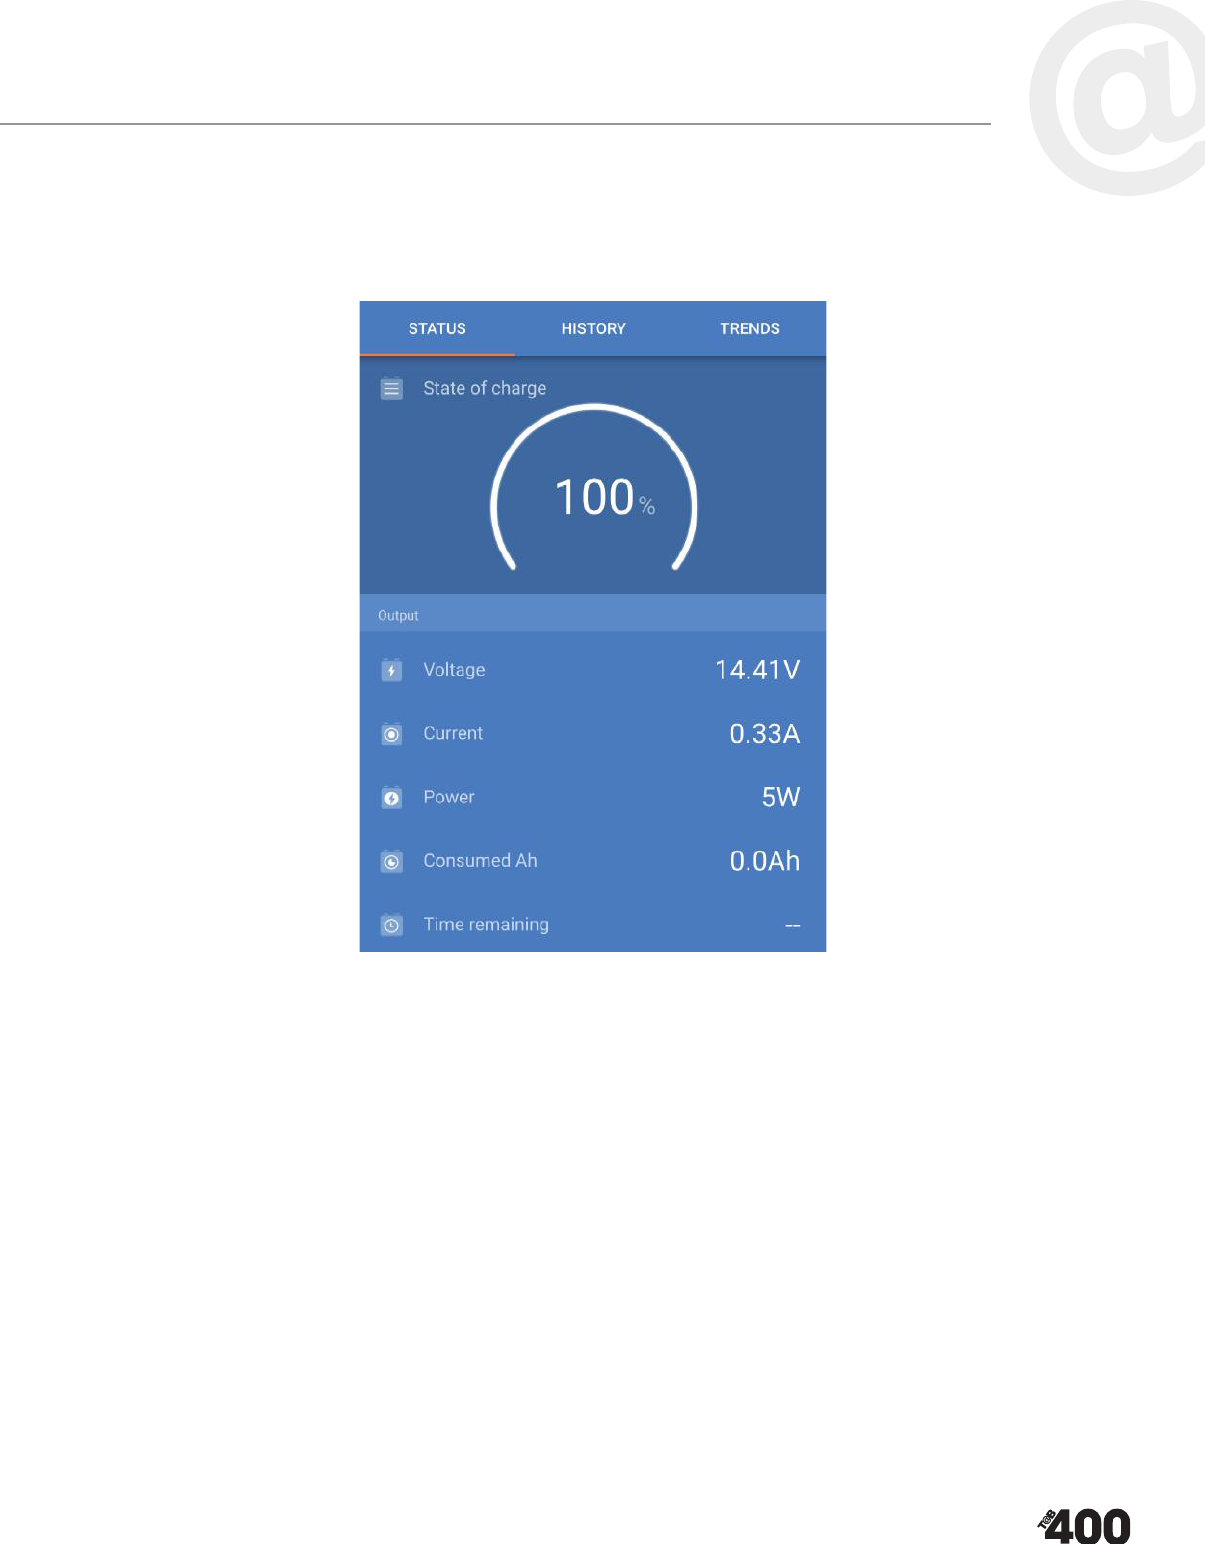
Teardrop Campers • nucamprv.com 51
You will need to use the SmartShunt through the VictronConnect app to monitor your battery level.
The nuCamp tank monitor panel will not accurately reect the state-of-charge for lithium batteries.
The SmartShunt will report useful information like the battery state-of-charge, current power usage, &
projected time remaining (based on current conditions):

Teardrop Campers • nucamprv.com52
APPLIANCES
RANGE/COOKTOP
The range is fueled by propane gas and functions very much like your
range at home. Some functions may be slightly different because of being
powered by propane gas.
Important Safety Information you must know and understand:
• Never use the range to heat your camper. This is a major re hazard
and can also cause carbon monoxide poisoning.
• Always turn on the range hood (if equipped) exhaust fan and open
vents when cooking. Gas cooking appliances need fresh air to
operate safely.
• Prevent re and damage hazards by using approved pan sizes.
Generally, the pan should cover the burner but must not be
more than one inch larger. Keep handles turned inward but not over
other burners.
• Only use cookware that is approved for use on top burners and is
suitable to be exposed to direct ame.
• When using the burners and afterward, do not touch the burner
grates until they are cooled.
• If you need to light the range with an external source, use a grill,
kitchen, or BBQ lighter as opposed to a int lighter. This will keep
your hands away from the ame.
• Keep the area around the appliance clear and free from
combustible materials, gasoline, and other ammable vapors
and materials.
• Never leave unattended food or utensils on the range.
• Do not use aerosol cans near any appliance with open ames.
Most aerosol cans are explosive when exposed to heat or may be
highly ammable.
• Do not leave plastic items on the cooktop as they may melt or
soften. This can contaminate food if it is in plastic containers.
The best practice is to discard the container and contents as a
safety precaution.
• Familiarize yourself with the safety information on propane gas.
See page 28.
• In a re emergency execute your family’s Safety Plan as outlined on
page 12. This is vital to you and your family’s safety.
Read the owner or operator manual included in your owner’s packet for
detailed safety information and operating instructions pertaining to the range.
Do not use gas cooking appliances for
comfort heating. May lead to carbon
monoxide poisoning, which can lead to
death or serious injury.
DANGER
Do not turn the burner control knobs
ON, allowing gas to escape before
lighting a match or using an electronic
igniting device.
WARNING
Gas cooking appliances need fresh air
for safe operation. Before operating:
Open vents or windows slightly or turn
on exhaust fan prior to using cooking
appliance. Gas ames consume oxygen,
which should be replaced to ensure
proper combustion. Improper use may
result in death or serious injury.
WARNING

nucamprv.com • Teardrop Campers 53
MICROWAVE OVEN (If Equipped)
Some models may be equipped with a microwave. The microwave
operates much like other household microwaves.
General Information pertaining to the microwave:
• The microwave oven will only operate on 120V shore power or an
appropriately sized generator, or if equipped with the Lithium
Package
• Even on shore power, the microwave and air conditioner may
trip circuit breakers if they are operated at the same time. Turn
the air conditioner to fan only during the time you wish to operate
the microwave.
• Secure the turntable in the microwave before traveling. This will
keep it from sliding around and causing damage.
Make sure you read the microwave’s safety and operating instructions
included in the owner’s packet.
REFRIGERATOR/FREEZER
General information about the refrigerator/freezer and its operation:
• Generally, RV refrigerators/freezers are designed to keep food
cool but are not intended to ash freeze or cool food quickly. Stock
the refrigerator with already cold or frozen food.
• Arrange items in the refrigerator for free airow between them.
• Before going on a trip, operate the refrigerator on 120V power for 8
hours or overnight to cool it sufciently and get it cold before using.
• A refrigerator thermometer kept in your refrigerator will help you
monitor temperature inside.
• The refrigerator is wired to 12V DC only. When you are connected
to shore power, the power center will convert the 120V current to
12V DC to provide power to the refrigerator.
• Movement during travel should not affect refrigerator performance
much. For best results though, ensure the trailer is pulling level to
the ground.
Make sure you read the refrigerator/freezer’s safety and operating
instructions included in the owner’s packet.
The refrigerator must be level to operate
properly. If the refrigerator is too much
off level the refrigerator may malfunction
and not cool properly
NOTICE
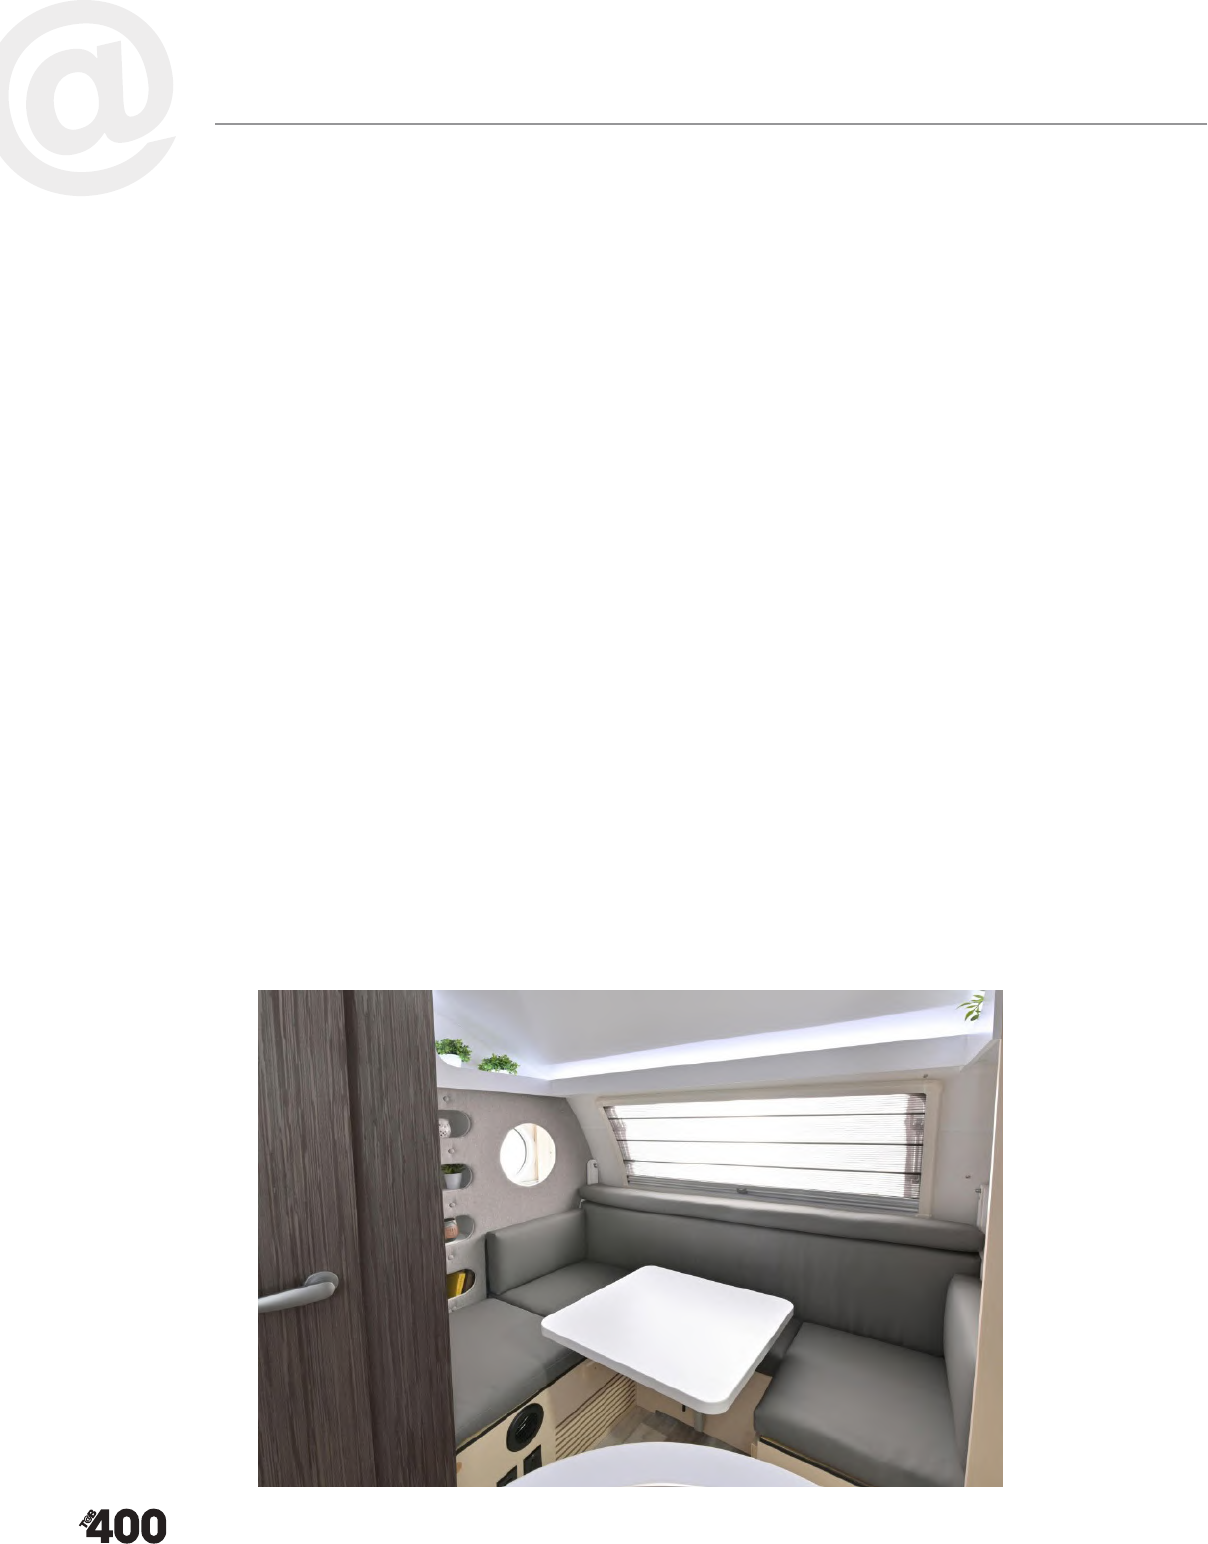
Teardrop Campers • nucamprv.com54
EQUIPMENT & HARDWARE
STORAGE TONGUE BOX
The storage tongue box on the front of the trailer is designed for multiple storage purposes. A few
things to note:
• Always keep the lid latched when traveling to avoid loss of contents.
• Do not force the lid back against the roof of the trailer to avoid
damaging the paint on the roof or damaging the gas prop.
• The space inside may be utilized as extra storage space. This area was designed to
accommodate the single LP tank and waste/sewer water disposal hose.
HARDWARE ADJUSTMENTS
During travel, everything in your camper is subject to movement and cabinets may shift slightly.
Over time this can cause misalignment of cabinetry doors. The hinges installed in your camper can
be adjusted. A set of screwdrivers in your maintenance kit will come in handy to adjust these. Other
hardware may also be adjusted. If you are uncomfortable or inexperienced in making these small
adjustments your dealer will be happy to assist you or teach you how. The use of power tools is not
recommended in making hardware and other small adjustments.
WINDOWS/ BLINDS
Windows and blinds are affected by sunlight. When blinds are up and windows are closed, heat can
build up between the window and the blind. This trapped heat can damage both windows and blinds.
When camping in direct sunlight with the blinds closed, the window must be vented to release trapped
heat. In transit, the blinds must be opened to keep heat from being trapped between the window and
the closed blind. Be sure to follow all manufacturer instructions and regulations relating to blinds and
windows maintenance and safety. During storage, keep blinds retracted to keep the pleats in good
condition. Please retract all window shades to protect shade molding and shape. Do not store or travel
with blinds extended.
BUNK CONVERSION
Step 1: Remove all cushions and snap curtain covers
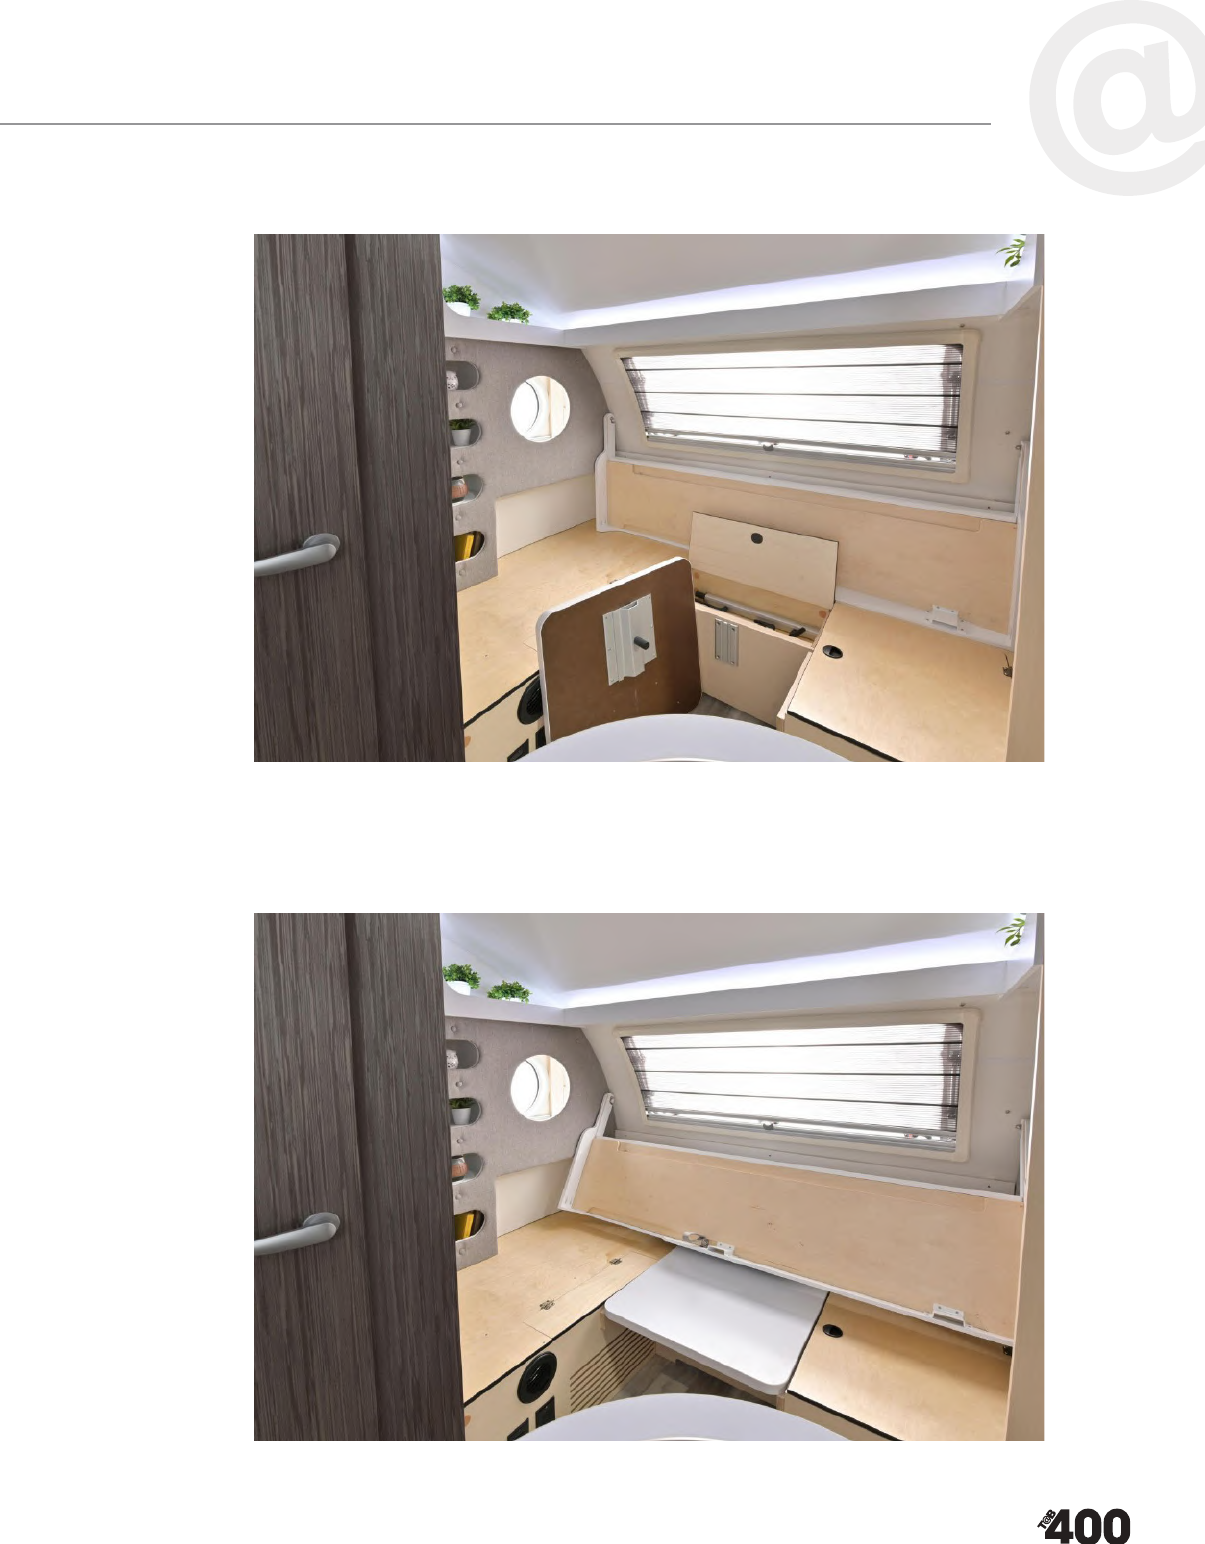
Teardrop Campers • nucamprv.com 55
Step 2: Loosen Lagun table tensioners and stow table leg in center dinette storage
Step 3: Use tabletop to bridge the gap between the dinette seats
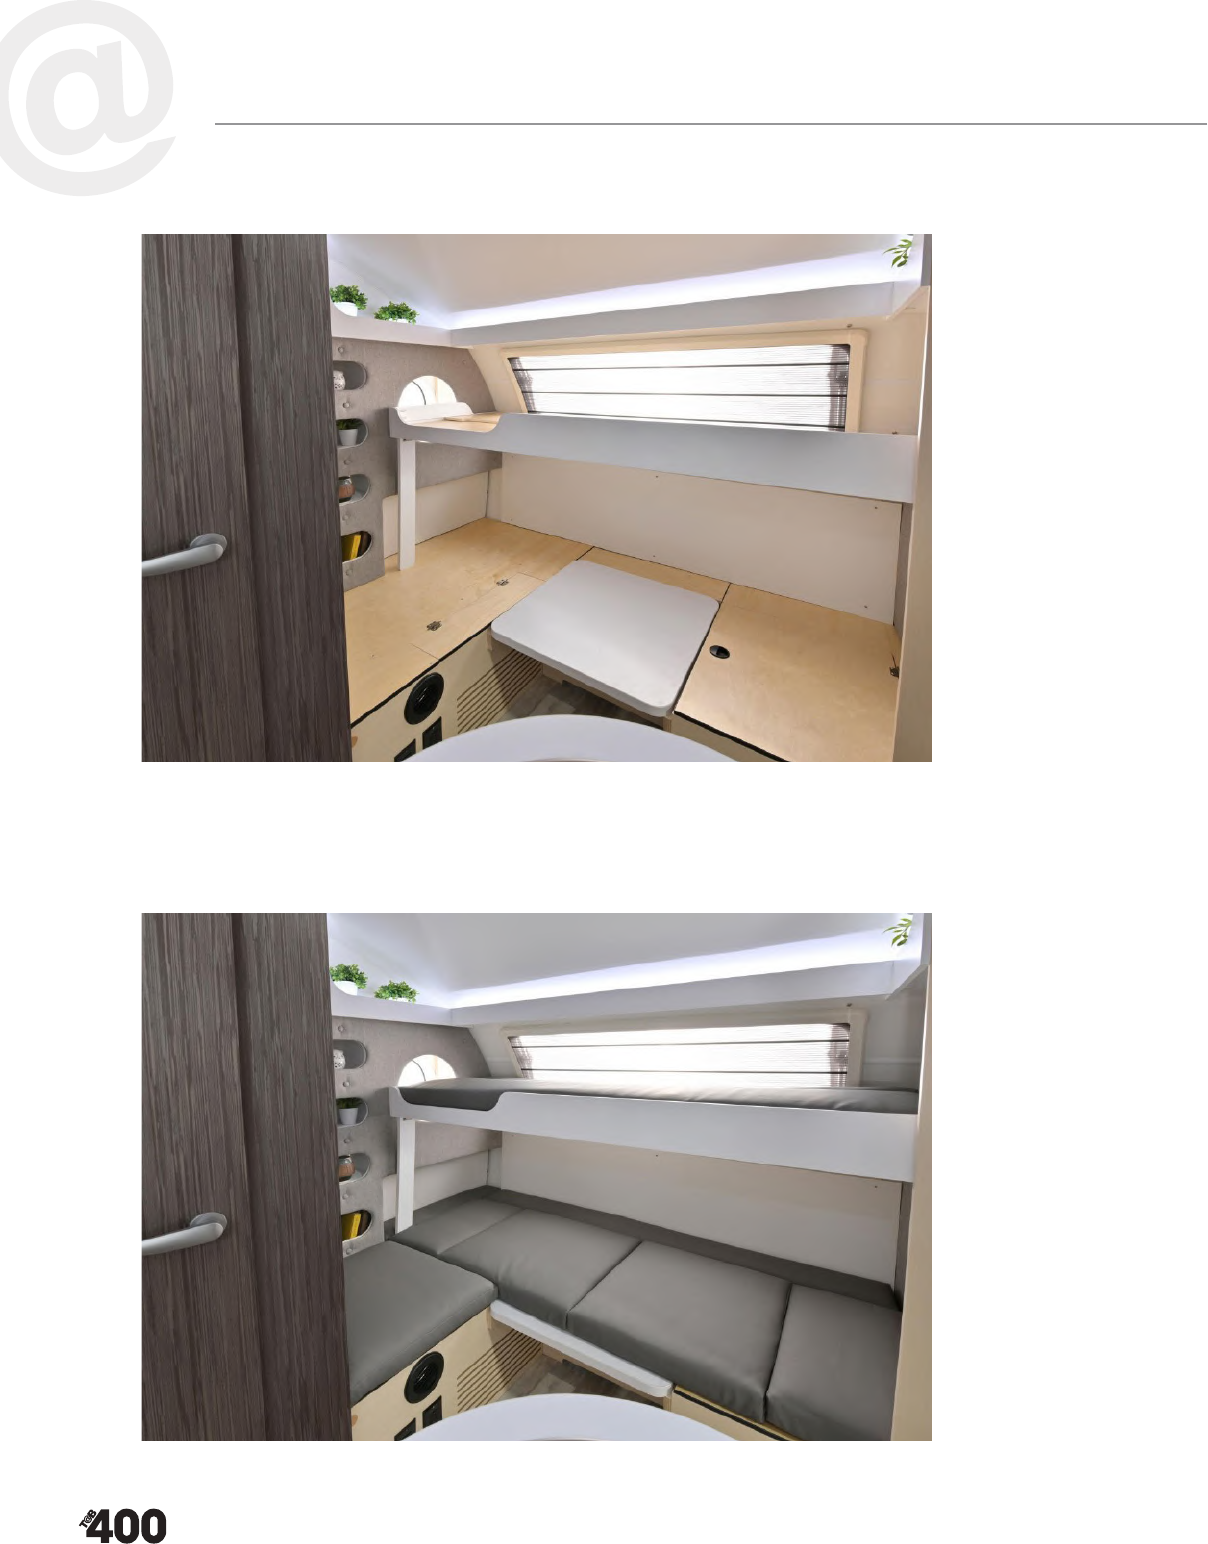
Teardrop Campers • nucamprv.com56
Step 4: Use fabric loop to pull the bunk up; the legs fold out for support
Step 5: Arrange cushions to cover the sleeping areas
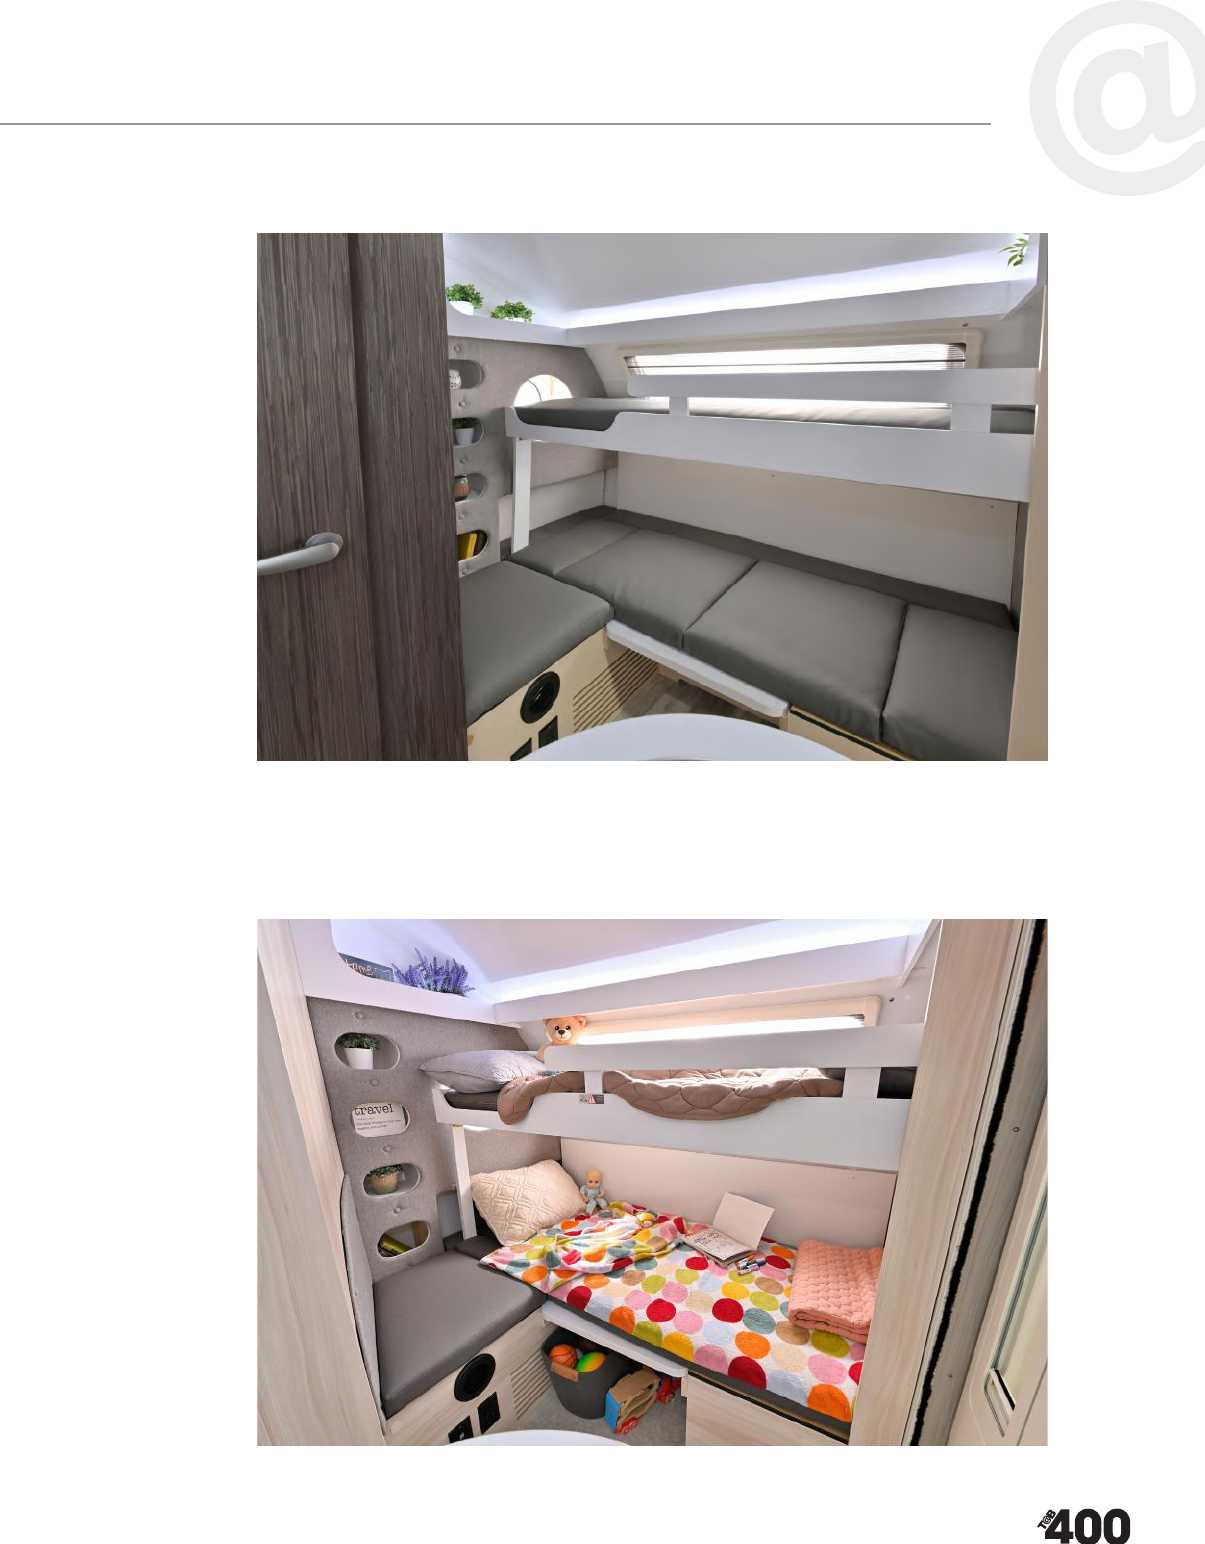
Teardrop Campers • nucamprv.com 57
Step 6: Insert bed safety rail for top bunk
Step 7: Add your sheets and other bed dressings

Teardrop Campers • nucamprv.com58
INTERIOR ENVIRONMENT
PROLONGED OCCUPANCY
All nuCamp campers are designed for short-term occupancy and recreational use. If the camper is used
as long-term living quarters, the warranty may be voided due to increased abnormal wear and tear
since it was not designed for long-term living purposes. Premature degradation of structure and interior
materials such as fabrics, drapes, curtains ooring, carpeting, and even nished surfaces can occur. This
will be perceived as misuse, neglect, or abuse according to the warranty terms and conditions. Prepare
yourself to deal with issues such as condensation and high humidity which can form mold and other
damage from moisture-related issues. To protect your new camper and avoid costly repairs, manage
moisture saturation within your camper. Practical information to do this is included in the following
sections.
AIR QUALITY
Good air quality in your camper can be maintained by:
• Having proper ventilation to carry air pollutants out of the camper and dilute emissions from
water vapor and off-gassing from interior sources.
• Avoiding harmful air pollutants such as cigarette smoke, pollen, pet dander, molds, carbon
monoxide, and household cleaners.
• Vacuuming often removes pet dander and dust.
• Not smoking inside the camper as this can damage your camper and releases formaldehyde
along with being a re hazard.
• Not using bug sprays inside the camper.
• Keeping mold under control.
• Keeping condensation to a minimum.
There are three basic EPA-recommended strategies to improve indoor air quality:
1. Control the source.
2. Improve ventilation.
3. Use air cleaners.
Read more at this link: https://www.epa.gov/indoor-air-quality-iaq/improving-indoor-air-quality.
Consider using an air purier or air cleaner to promote clean air in your camper. A few points
to note:
• Tabletop air cleaner models are generally less effective than full-size models.
• For an air cleaner to be most effective, good air circulation and efcient air collection is a
key element.
• Air cleaners generally are not designed to remove gaseous pollutants.
CONDENSATION
When the air temperature cools, it increases the water saturation in the air. Humidity is the amount
of water in the air expressed as a percent. Condensation begins when the air has reached 100%
humidity. Generally, condensation in a camper is from improper airow. Most campers are compactly
constructed, giving limited air space volume into which moisture can be assimilated. The average
person can vaporize up to 1 gallon of water through normal daily activities such as cooking, bathing,
washing, and even breathing. If water vapor is not controlled and kept to a minimum by ventilation or
the use of a dehumidier it will begin to collect on windows, inside walls and ceiling, and on cabinetry.
This can lead to mold or mildew development.

Teardrop Campers • nucamprv.com 59
To keep condensation to a minimum:
• Monitor the humidity in the camper with a hygrometer device.
• Keep relative humidity to 60% or less in warm weather and 35% or less in cold weather.
• Ventilate the camper when cooking, cleaning, or sleeping using the range hood exhaust fan and
installed ceiling vents.
• Turn on exhaust fans when showering or using a hair dryer.
• Hang wet clothes or towels outside to dry.
• Promote air circulation inside the camper with a portable fan.
• Avoid closing cabinets when they are full of stored goods unless the camper is in transit.
• In warm weather start the air conditioner earlier in the day.
• In cold weather, ventilate the cabin to keep humid air moving out.
• Use a dehumidier to control humidity.
Using a dehumidier and hygrometer device is the easiest control method to combat condensation.
Small dehumidiers and hygrometers can be purchased at electronics or building supply stores for a
fraction of the cost of repairing condensational damage. Place your dehumidier in a high airow area
rather than in a closet or enclosed space. Ideally, purchase a dehumidier that can be continuously
emptied into an appropriate drain or to the outside. This will allow you to run it continuously and not
have to empty the bucket all the time. Otherwise, you will have to empty the bucket frequently. Please
do not use condensed water from the dehumidier for sanitation or drinking purposes.
During cool, rainy weather, your camper will be more susceptible to condensation due to the higher
water saturation in the air. At night, outside air temperature decreases which, in turn, increases
humidity and allows condensation to form easier. It is important to ventilate the cabin while sleeping
to remove humidity.
MOLD
Mold can grow on virtually any substance. It can have health effects such as allergic reactions, asthma,
nasal congestion, coughing, wheezing, and other irritations. While there is no way to fully eliminate
mold growth there are some measures that can be taken to keep mold and mildew under control in
your camper:
• Keep condensation and water vapor to a minimum.
• Ventilate the camper with the installed fans.
• Repair water leaks and liquid spills right away and dry excess moisture.
• Use the air conditioner, dehumidiers, and a hygrometer to control humidity.
• Use exhaust fans when showering, cooking, washing, or cleaning.
• Clean the camper on a regular basis.
• The kitchen and bathroom are where most water is used. Keep them clean and dry.
• On surfaces where it is safe, use cleaning products that kill mold and mildew.
• Teach all occupants how to recognize signs of mold.
If you suspect mold is present, have your camper tested by a professional. In the cases where you
believe mold may have just started to form, kill it with a water/bleach or detergent solution. The water/
bleach ratio is one-gallon water to one cup (or less) of household bleach. Never mix cleaners together
such as ammonia and bleach. This is dangerous! Be sure to wear gloves and a mask to protect yourself
from irritants in the mold. Safely dispose of the rags and gloves. Ventilate or dry the area with a
portable fan to remove all moisture.

Teardrop Campers • nucamprv.com60
OUTGASSING
Like most of the RV industry, nuCamp uses innovative products to develop camper product lines to
serve the desires and needs of its customers. Carpet, linoleum, insulation, particle board, composites,
plywood, and upholstery are some common products that are used in the construction of most
campers. These innovative products may outgas (or off-gas) various chemicals and formaldehyde
that were dissolved, trapped, or absorbed in the materials. You may notice a chemical odor in high
temperatures and humidity levels or when you have newly purchased your camper. Outgassing is not a
defect or is considered abnormal. Outgassing decreases over time.
CHEMICAL SENSITIVITY
Outgassing may arouse chemical sensitivity with various symptoms such as eye, nose, or throat
irritation, nausea, headache, allergies, coughing, or wheezing. Elderly folks, children, and those
with previous lung problems are more susceptible to outgassing effects. To reduce the effects of
outgassing, ventilate and promote continuous airow throughout the camper.
FORMALDEHYDE
Most chemical outgassing concerns involve formaldehyde. This colorless, strong-smelling gas is used
in many building products such as pressed wood, particle board, berboard, paneling, plywood,and
various other products. Formaldehyde is a naturally occurring substance that is present at low levels
even in the normal fresh air. Low levels of formaldehyde are also released from smoking, cooking,
and household products, including paints, cleaning agents, and cosmetics. nuCamp campers contain
composite wood products that follow the California Air Resource Board (CARB) formaldehyde emission
standards as outlined by California Code of Regulations § 93120.2(a) Phase 2 (P2).
Reactions to formaldehyde vary. Most people are unaffected but a select few are quite sensitive and
may have one or more of these symptoms:
• Watery eyes • Skin irritation
• Burning sensations–eyes/nose/throat • Nausea
• Coughing • In extreme cases, cancer
• Wheezing
To reduce the chances of formaldehyde presence, ventilate and promote continuous airow throughout
the camper. More information on formaldehyde can be found at this link: https://www.epa.gov/
formaldehyde/facts-about-formaldehyde.
PETS
Many happy campers love to take their beloved pets with them on excursions. The presence of a pet
may affect the air quality in your camper, dependent on its size, breed, and type. Pets may release pet
dander, hair, and allergens from saliva, urine, and feces. Pet dander is the normal culprit for triggering
reactions in those who have known pet allergies and occurs mostly in furred or feathered pets. Because
of the smaller amount of air space in campers, air quality is affected more than in a normal house. You
can limit the impact and presence of pet dander by observing the following:
• Brush furred pets daily, followed by vacuuming the area where you brushed.
• Bathe your pet regularly.
• Vacuum frequently. A vacuum with various attachments will help you reach those tight corners.
• Clean hard surfaces with microber cloths.
• If pets are allowed on furniture, clean it frequently.
• Have your pet sleep in a separate area on its own bed.
• Employ the use of an air purier.
• Have your pet routinely checked by a licensed veterinarian to ensure good health.

nucamprv.com • Teardrop Campers 61
MAINTENANCE
CLEANING CARE
Frequent maintenance and cleaning of your camper will contribute to the
dependability, reliability, aesthetics, and value of your unit.
Interior Cleaning:
Cabinetry & Finished Wood Products. Remove dust with a damp, clean
cloth. Apply a quality furniture polish and buff with a soft dry cloth. DO
NOT use ammonia-based products or silicone oils. Avoid extended
periods of direct sunlight, high temperatures, or high humidity exposures
to nished wood products. Warping and nish degradation result from
these exposures.
Laminated Tops. Use a soft cloth, mild dishwashing liquid, and warm
water. Dry with a soft linen cloth. DO NOT use steel wool, scouring pads,
or abrasive cleaners.
Walls & Paneling. Most surfaces can be cleaned with a soft sponge or
cloth with mild liquid detergent in warm water. DO NOT use abrasive
cleaners that scratch and mar the surface. Large amounts of water may
saturate the material.
Floors. Periodically vacuum or sweep vinyl ooring to remove dirt. Once
the debris is removed, use a damp mop with water and a mild cleaner. DO
NOT soak the ooring.
Shower Walls & Base. For routine cleaning use a mild dish soap and
water to clean the walls and base of the shower. DO NOT use harsh
detergents, abrasive cleaners, steel wool or razor blades as they will
scratch or mar the surfaces.
Stainless Steel Sink. Use a glass cleaner or cleaner made specically
for stainless steel. DO NOT use steel wool, scouring pads, or abrasive
cleaners. Wipe with a damp soft cloth or sponge in warm water mixed with
mild dish soap. Blot dry the surface with a towel to prevent water spots.
Vinyl Components. Do not dry clean. This can cause shrinking and
cracking. It should be cleaned by a qualied professional. If a spill occurs,
do not rub it in, but rather blot it up.
Curtains, Blinds, Shades. Dust frequently with a soft brush-tipped vacuum
or dust wand. Have them professionally cleaned once a year.
Cleaning Agents. Check with the component manufacturer or ask your
dealer for brand recommendations. If you are unsure if a detergent will
work, test it in a small inconspicuous area before using it open areas.
Component Manufacturer. The best cleaning instructions for any surface
are obtained from the component manufacturer. If you are unsure about a
cleaning product, consult the manufacturer about whether it is safe to use
on that item or surface.
Never use liquids such as lacquer thinner,
nail polish remover, gasoline or other
ammable compounds to clean your
camper. Do not use abrasive materials
to clean nished wood, plastic, vinyl,
metals, glass, rubber or laminated
surfaces. Damage will occur and your
warranty may be voided.
CAUTION

Teardrop Campers • nucamprv.com62
Exterior Cleaning:
Road Debris. The exterior of your camper is comprised of many different
materials including berglass, metal, rubber, plastics, aluminum, glass, and
sealant. Road debris from traveling may accumulate on these materials and
result in corrosion, staining, or chemical spotting. Frequent washings of the
exterior will help protect it from damage.
SaltWater. Saltwater is highly corrosive. When towing in snowy areas in
winter, especially where salt is used on roads, spray off the camper after
every trip to remove corrosive salt. When traveling by oceans, avoid
parking near salt water spray. The air near ocean shores is often laden with
salt water. Wash your camper more frequently to reduce corrosion and
wear.
Sunlight. Avoid washing the camper in direct sunlight. A shaded area is the
best environment to wash your camper.
Water Drainage. It may be helpful to jack up the front of the camper
slightly when spraying the camper so water trapped on the roof can drain
off the rear.
Washing Frequency. Wash your camper at least once a month. The roof
should be cleaned every other month or as debris accumulation demands.
Cleaning Agents. A cleaning solution of mild liquid detergent and water
with a pH range of 3 to 11 and free of strong solvents, alcohol, or other
ammable liquid is ideal for most components. Check with the component
manufacturer or ask your dealer for recommendations on brands. If you are
unsure if a detergent will work, test it in a small inconspicuous area before
using it in open areas.
Washing. Spray the camper thoroughly from top to bottom with water.
Then, using a sponge or car washing mitt, handwash the camper from top
to bottom. Once done, rinse thoroughly and wipe dry with a soft linen
cloth. Never use abrasive cleaners.
Graphics. Clean with the rest of the trailer. Test detergent solutions on
inconspicuous areas before using them on large areas.
High-Pressure Spray. Use extreme caution when using any type of
pressure sprayer around attachments, doors, windows, and appliance
vents. Make sure to keep the washing nozzle about 16 inches or more away
from the RV and hold the nozzle at right angles when washing around
doors, vents, and window areas. Be very careful when cleaning graphics.
Never direct the spray nozzle toward the edges of the graphics. DO NOT
use automatic car washes.
There are some types of washing
equipment that can apply heat and high
pressure to your RV. Excessive heat can
cause distortion and excessive pressure
can possibly ood the RV’s interior.
Avoid using hot water with high pressure
washing. Damage will occur and your
warranty may be voided.
CAUTION

Teardrop Campers • nucamprv.com 63
Waxing. Wax the camper exterior twice a year. The use of automotive waxes or cleaners/polishes that
are for use on berglass or boats are acceptable. Ask for recommendations from your dealer if you are
unsure what to use. Exterior streaking, corrosion, staining, or chemical spotting can be reduced with
frequent waxing. Always wash and dry the camper before waxing it.
STORAGE PREPARATION
Unless you live in the sunny south, you will need to prepare your camper each fall to face the cold
winter months. It is very important that you follow the instructions in this section to properly care for
your camper. The best practice for storing your camper is to store it indoors in a warm controlled
climate (above 40°) and lifted off the ground on jack stands to relieve pressure on tires. Indoor storage
also lessens the amount of work needing to be done for storage preparation. Two different ways of
storing your camper are outlined below.
Outdoor Storage:
1. Winterize the plumbing system. This is crucial in temperatures below 32°F.
2. Clean your RV as outlined in the cleaning care instructions.
3. Turn off electrical switches and all 12V DC/120V/propane gas appliances.
4. Shut off the propane gas cylinder (LP tank) main valve.
5. Cover the external outlets, vents, and windows of your RV to prevent moisture, mice or rodents
from entering.
6. Check the interior of the RV for leaks or any formed condensation that can cause damage to
interior components. To help reduce condensation from the interior, occasionally air out the
camper during storage.
7. Disconnect the 120V AC power.
8. Charge batteries to full capacity to avoid freezing and cracking in the case. In storage, a battery
will gradually lose charge after 30-45 days. Check the battery once a month and if the charge is
at 80% or less, recharge it.
9. Check the tire pressure monthly and keep tires fully inated.
10. If possible, lift the trailer onto jack stands to relieve pressure on tires.
11. Cover tires with appropriate tire covers.
12. During the storage period, keep the roof of the camper free of snow and ice to prevent damage
to the unit’s structure.
13. For best results when storing outdoors, cover your entire camper with an RV cover to protect it
from the elements.
14. If stored covered or in shade remove the 30A solar controller fuse (located in passionger side
rear most compartment with the battery disconnect switch) to prevent the solar controller from
draining the battery
Indoor Storage:
1. Clean your RV as outlined in the cleaning care instructions.
2. Turn off electrical switches and all 12V DC/120V/propane gas appliances.
3. Shut off the propane gas cylinder (LP tank) main valve.
4. Disconnect the 120V AC power.
5. Charge batteries to full capacity. Check the battery once a month. If the charge is at 80% or less,
recharge it.
6. Remove the 30A solar controller fuse (located in passenger side rear most compartment with the
battery disconnect switch) to prevent the solar controller from draining the battery.
7. Check tire pressure monthly and keep tires fully inated.

Teardrop Campers • nucamprv.com64
8. If possible, lift the trailer onto jack stands to relieve pressure on tires.
CAMPING SEASON PREPARATION
Preparation for the camping season (or at any given time):
1. Open vents and windows and air out the camper. Turn on ventilating fans.
2. Check water, gas and any other pipelines or tubes for insects such as spiders and mud dauber
wasps that frequently build nests and clog tubes. This can be especially dangerous in gas
pipelines as gas can become trapped and carbon monoxide may result and cause death.
3. Clean the camper thoroughly. Inspect the trailer for caulking failure, water damage, and rodent
or insect intrusion.
4. De-winterize and sanitize the freshwater system in your camper.
5. Pressurize the water system and check for leaks by operating every faucet and water outlet and
observing ttings and connections for leaks.
6. Inspect the electrical system. Check power cords, converter, outlets, and wiring for damage.
7. Check battery terminals for corrosion, turn on battery switch, and check battery charge levels.
8. Reinstall the 30A fuse for the solar controller if previously removed for storage (located in
passenger side rearmost compartment with the battery disconnect switch.)
9. Check circuit breakers and fuses in the converter box for function.
10. Test all the lights and other accessories for proper function.
11. Check the propane piping for leaks. If no leaks are found, slowly turn on LP tank valves.
12. Turn on appliances one by one and test with propane and/ electricity for proper function.
13. Put a new battery into the smoke alarm. Ensure all safety alarms are working properly.
14. Follow manufacturer instructions for each component’s operation.
15. If any issues are found in your trailer and you cannot perform the maintenance yourself, consult
your authorized nuCamp dealer for assistance.

ITEM
Maintenance Schedule
PROCEDURE
Appliances
Battery
Bearings
Brakes
Cabinets
Carpeting
Chassis
Electrical System
Exterior Lighting
Exterior Protection
Exterior Roof
Exterior Wall
Doors
Frame
Hitch Coupler
Hitch Jack
Interior Surfaces
Lug Nut Torque
Propane System
Safety Chains
Safety Equipment
Sealants
Tires
Upholstery
Water System
Weight Distribution
Wheel Bearing
Drains
Window
Wood Surfaces
Annual Inspection
Check for obstruction on exterior vents
Check battery condition
Repack wheel bearings
Check and adjust
Apply furniture polish
Vacuum
Lubricate & clean
Check proper operation and for damage
Verify proper operation of all lighting
Apply automotive/marine wax
Wash with mild car wash type soap
Wash with mild car wash type soap
Check seals, lubricate hinges
Inspect and touch-up paint as needed
Check proper operation and for damage
Check proper operation and for damage
Clean
Check lug nut torque prior to trip
Check for leaks and damage
Verify attachment and free of damage
Verify operation of all safety detectors
Inspect caulking seals and reseal if needed
Check tire condition/inflation pressure
Clean
Check for leaks and proper operation
Verify proper weight distribution
Inspect and add grease as required
Verify drains are free of obstruction
Lubricate with graphite-based lubricant
Clean
Complete annual inspection by dealer
See appropriate sections for
specific procedure instructions

DATE
Maintenance Record
SERVICE CENTERDESCRIPTION

Teardrop Campers • nucamprv.com 67
TROUBLESHOOTING
This section is a collection of tried-and-true answers to the most popular troubleshooting questions
posed to the nuCamp Customer Service team. These are not nal answers to any issues you might
have since individual product manufacturers are the nal authority in determining the cause of issues.
They are simply suggestions for steps you may take to resolve your issue easily. If you cannot nd what
troubleshooting information you need in this section, contact your nearest dealer or other qualied
service technician to perform an inspection and troubleshooting. Troubleshooting performed by
unqualied individuals may not be covered under warranty.
ALDE
®
SYSTEM
1. Red overheat failure
a. You have airpockets in your system. Open the bleeder valves located on the Alde
®
. After
sufciently bleeding the Alde
®
, disconnect the 12v power supply line going into the Alde
®
control center and allow it to sit for at least 5 minutes.
2. Insufcient hot water
a. Adjust your mixing valve (located underneath the bed near the Alde
®
boiler) by turning the
valve towards the “+” symbol, allowing more hot water to enter the mixing valve.
3. Control panel will not turn on
a. Check your 3.15amp glass fuse found underneath the service hatch on your Alde
®
System,
located in the green fuse housing. Replace.
4. Gas failure
a. Most likely has a low 12V battery. There is not enough power to deliver the propane from the
tank to the Alde
®
System.
b. If you have a charged battery, the problem would most likely be an empty tank.
5. Alde
®
System not heating on shore power
a. The Alde
®
System is designed to not only run-on propane gas/12V but also 110-120V. When
you are plugged into a household 15-amp outlet, make sure to have the Alde KW setting on
1KW. When running the Alde on 20 or 30-amp, change the KW setting to 2KW.
b. Make sure the black power cord is plugged into the 110V outlet beside the Alde
®
boiler.
PLUMBING SYSTEM
1. Water leaks when connected to city water or a running pump
a. This is most likely the relief valve for the Alde
®
Hot Water tank or Flow. When there is too
much pressure, these valves will open. It can also be caused by the trailer sitting for long
extended periods of time. To resolve, open and close both relief valves to reseal.
i. If this did not resolve the issue, please contact your nearest nuCamp Dealer to have the
unit looked at on-site.
2. Water pump stopped working
a. Check the lter located on the inlet side of your water pump for debris. This can happen on
brand-new units. It is caused by metal shaving buildup during construction.
b. Check for any open drain valves or relief valves that would hinder the pump from priming.
3. Water is leaking inside my unit
a. Contact your local nuCamp dealer and have the unit looked at on-site.

Teardrop Campers • nucamprv.com68
ELECTRICAL SYSTEM
1. No 12V power
a. Check your battery circuit breaker to make sure it is not tripped.
b. Check your battery connections to make sure all leads are tight and properly connected.
c. Check your battery fuse located in the 55-amp converter.
i. If the problem is not found in these locations, call your local dealer or service center to
have the problem diagnosed.
2. No power with a 30-amp connection
a. Check your main breaker inside the converter and make sure your 30-amp connection is
properly connected.
b. Inspect the main power line coming in from the 30-amp connection for any cuts in the line or
loose connections to the backend of the converter.
3. Flickering running lights/brake lights
a. This is most likely a loose connection. Contact your local dealer to have the unit inspected.
4. Battery charging failure during transport
a. Check your battery circuit breaker.
b. Make sure your battery disconnect switch is on the ‘ON’/green position.
c. Check your battery terminal connections.
d. Make sure you have a charge line installed on your TV.
5. Failure of any AC components
a. Check 110V breakers located inside the converter.
6. Failure of any DC components
a. Check fuses inside the converter.
PROPANE GAS SYSTEM
1. Liquid “gas” at my appliance
a. LP tank(s) are overlled. A qualied propane gas service technician must inspect the LP
tank(s) and correct the ll volume to below 80%.
b. Temperature is too cold.
c. LP tank is not upright.
2. Appliances do not light or stay lit
a. Excess air or moisture is trapped in your system. Your dealer or another qualied service
technician must purge the system.
3. Regulator indicates “green” but there is no gas in the system
a. Is frost present on the regulator? It may be frozen.
4. Frozen or frosted regulator
a. Humidity in the air has become high enough to condensate and regulator temperature has
caused it to be frozen. Use an incandescent light bulb or heated blanket to warm up the
regulator. DO NOT use a hair dryer or any kind of open ame.
b. LP tanks are overlled. A qualied propane gas service technician must inspect the LP tank(s)
and correct the ll volume to below 80%.

Teardrop Campers • nucamprv.com 69
nuCamp agrees to warrant the integrity of
the camper/trailer for up to two (2) years
from the date of purchase (Warranty
Period). This does not include equipment
or parts with separate, stand-alone
warranties. This warranty covers the
nuCamp Cirrus 920 manufactured after
December, 2024.
In addition to our 1-Year Limited Warranty, nuCamp agrees to warrant the
structural integrity of the camper/trailer (roof, floors, front walls, rear walls,
sidewalls, and hatch door, where applicable) for up to three (3) years from the date
of purchase (Warranty Period). This does not include electrical systems, plumbing,
or any system components or other items excluded under the warranty provided.
3rd-party components parts may be warranted by their respective manufacturers.
This warranty covers nuCamp campers/trailers manufactured on or after April 30, 2018.
TRANSFERABLE

Teardrop Campers • nucamprv.com70
SERVICE & WARRANTY
WARRANTY COVERAGE
nuCamp warrants that it will repair or replace defects in material or workmanship of a new nuCamp camper purchased from an
authorized nuCamp dealer in the United States or Canada for a period of one year from the date the trailer is rst delivered to
the original retail purchaser. In order to obtain coverage under this Limited Warranty, you must notify an authorized nuCamp
dealership or nuCamp of the warrantable defect no later than ten (10) days following expiration of this Limited Warranty. nuCamp’s
obligation to repair or replace defective materials or workmanship is the sole obligation of nuCamp under this Limited Warranty.
nuCamp reserves the right to use new or remanufactured parts of similar quality to complete any warranty work.
LIMITATION OF IMPLIED WARRANTIES
IMPLIED WARRANTIES ARISING UNDER APPLICABLE LAW, IF ANY, INCLUDING BUT NOT LIMITED TO IMPLIED
WARRANTIES OF MERCHANTABILITY OR FITNESS FOR A PARTICULAR PURPOSE, ARE HEREBY LIMITED IN DURATION
TO THE TERM OF THIS LIMITED WARRANTY. ALL OTHER WARRANTIES, EXPRESS OR IMPLIED, ARE HEREBY
DISCLAIMED BY NUCAMP. SOME STATES DO NOT ALLOW LIMITATIONS ON HOW LONG AN IMPLIED WARRANTY LASTS,
SO THE ABOVE LIMITATIONS MAY NOT APPLY TO YOU.
DISCLAIMER OF INCIDENTAL AND CONSEQUENTIAL DAMAGES
nuCamp hereby disclaims any and all incidental and consequential damages arising out of or relating to the trailer, including
expenses such as transportation to and from vehicle dealerships and nuCamp repair facilities, loss of time, loss of pay, loss
of use, inconvenience, commercial loss (including lost prots), towing charges, bus fares, vehicle rental, service call charges,
gasoline expenses, incidental charges such as telephone calls and facsimile transmissions, and expenses for lodging. This
disclaimer is independent of any failure of the essential purpose of any warranties provided with a trailer and shall survive any
determination that a warranty failed of its essential purpose. Some states do not allow the exclusion or limitation of incidental or
consequential damages, so the above limitation or exclusion may not apply to you.
REPAIR REMEDY
If within the one (1) year Limited Warranty period a defect in material or workmanship is found to exist that is not excluded from
coverage, nuCamp’s sole and exclusive obligation shall be to repair the defect. Please note that any performance of repairs
after the coverage period expires or any performance of repairs to those portions of your RV excluded from coverage shall be
considered “goodwill” repairs, which shall not alter the express terms of this Limited Warranty.
WARRANTY CLAIM PROCEDURE
Upon discovery of a defect, please contact your dealer within ve business days or visit the warranty section of the nuCamp
website (nucamprv.com). Please be prepared to provide the VIN number of the trailer along with your name and best mode of
contact (along with hours, if necessary).
OBTAINING WARRANTY SERVICE
If you have not registered your warranty, you will be asked to provide your bill of sale, so that the purchase date can be veried. In
order to obtain warranty service under this Limited Warranty, the owner must do all of the following:
1. Owner and dealer representative must complete and return the Customer Performance Checkout within 10 days from
delivery of the trailer;
2. Notify nuCamp or one of its authorized, independent dealers, of any claimed defect within the warranty period or 10
days thereafter;
3. Provide notication of a defect within 10 days of discovery of that defect;
4. Promptly return the trailer to an authorized nuCamp dealer or nuCamp for repairs.
If you believe a defect covered by this Limited Warranty still exists after an attempted repair by an authorized nuCamp dealer, you
must contact nuCamp specifying:
1. The complete serial number of the trailer;
2. The date of original purchase and the date of original delivery;
3. The name of the selling dealer;
4. The nature of the problem and the steps or service which have been performed.
nuCamp LIMITED WARRANTY

Teardrop Campers • nucamprv.com 71
OBTAINING WARRANTY SERVICE (Continued)
nuCamp may direct you to an authorized nuCamp dealer or may request that you bring your trailer to the nuCamp factory in
Sugarcreek, Ohio for repairs.
nuCamp does not control the scheduling of repairs at its authorized nuCamp dealers, and repairs at the nuCamp factory may
not be immediately available. Therefore, you may encounter delays in scheduling repairs and/or completion of repairs. All costs
associated with transporting the trailer for any warranty service shall be the sole responsibility of the owner
WHAT IS NOT COVERED BY THIS LIMITED WARRANTY
This Limited Warranty does not provide coverage for any of the following:
1. Use of the trailer other than for temporary recreation purposes, including but not limited to use of the trailer for residential,
disaster relief, commercial, or rental purposes.
2. Tires, batteries, stereo, television, range/stove, furnace, refrigerator, A/C, toilet, water heater, microwave, generator, and
other materials, parts and components warranted by persons or entities other than nuCamp. Please refer to the
warranties of component manufacturers for terms and conditions of coverage.
3. Normal deterioration due to wear or exposure, including but not limited to rust, corrosion, oxidation, and
cosmetic blemishes;
4. Normal maintenance and service items, including but not limited to light bulbs, fuses, lubricants, sealants and seals,
door adjustments, and awning tension;
5. After-market equipment or accessories installed on the trailer after completion of manufacture by nuCamp, or any
defects or damage caused by such items;
6. Trailers not purchased through an authorized dealer of nuCamp trailers, and trailers purchased directly or indirectly
through auction, salvage, repossession, or other non-customary sale means;
7. Defects or damage caused by, in whole or in part, or in any way related to:
a. Accidents, misuse (including off-road use), or negligence.
b. Failure to comply with the instructions set forth in any owner’s manual provided with the trailer.
c. Alteration or modication of the trailer except such alterations or modications approved in writing by nuCamp.
d. Acts of God or other environmental conditions, such as lightning, hail, salt, or other chemicals in the atmosphere.
e. De-icing agents or other chemicals applied to the trailer.
f. Failure to properly maintain or service the trailer, including but not limited to the maintenance of lubricants,
sealants, and seals.
g. Condensation and the results of condensation including water damage and the growth of mold or mildew. Mold
and mildew are natural growths given certain environmental conditions and are not covered by the terms of this
Limited Warranty.
h. Use of the trailer other than for temporary recreation purposes, including but not limited to use of the trailer for
residential, disaster relief, commercial, or rental purposes.
i. The addition of weight to the trailer that causes the trailer’s total weight to exceed applicable trailer weight ratings,
or addition of weight causing improper distribution of the weight of the trailer.
j. Selection, use, and operation of any hitch assembly.
k. Failure to seek and obtain repairs in a timely manner.
l. Failure to use reasonable efforts to mitigate damage caused by defects.
m. Failure to properly ventilate the trailer.
n. Improper electric power supply or improper vehicle hookup to other facilities.
EXCLUDED FROM COVERAGE
• Equipment or parts with separate, stand-alone warranties (axles, fans, tires, converters and any appliances).
- Arterra (WFCO Converters): 574-294-8997 or warranty@artisproducts.com
- Dometic Products: 1-800-544-4881 or visit www.edometic.com
- Dexter Axle: 574-295-7888 or visit www.dexteraxle.com/warrantyclaim
- Indel Webasto – Fridge: 1-800-422-9711 or sergio.rosen@iwmarine.com
- Battle Born Batteries: 1-855-292-2831 or info@battlebornbatteries.com
- Truma/Alde: 1-855-558-7862 or visit www.truma.net
- ASA Electronics: 877-305-0445 for immediate Customer Service Support or 877-845-8750 for technical assistance.
• Misuse, abuse, collision, improper repairs, overloading, neglect or lack of maintenance which results in damage.
• Alteration or installation of equipment that results in damage. This includes, but is not limited to electrical, gas, plumbing or
structural issues.
• Normal wear, fading or deterioration of fabrics, ooring, graphics or metal components including weathering, discoloration,
surface corrosion of unpainted surfaces or minor blemishes due to normal use.
• Any product used outside of the intended scope of its customary purpose.

Teardrop Campers • nucamprv.com72
• Any unregistered product not normally used in the US or Canada.
• Any product used as a rental unit.
• Any promises made by any person beyond what is stated in this document.
• Condensation on any window or other parts or any results of condensation.
nuCamp shall not be liable for incidental or consequential damages, such as expenses for transportation, lodging, damage to
personal property, loss of personal property, loss of use of your product, inconvenience or loss of income. Some states do not
allow exclusion or limitation of incidental or consequential damages, so the above limitation may not apply specically to you.
DEALER REPRESENTATIONS EXCLUDED
The entire Limited Warranty provided by nuCamp is set forth herein. nuCamp will not be responsible for any additional
representations or warranties made by any person or entity other than nuCamp, and nuCamp’s obligations are solely as set forth
in the terms and conditions of this Limited Warranty
STATUTE OF LIMITATION
No action may be brought against nuCamp for breach of this Limited Warranty, any applicable implied warranty, or for any other
claim arising out of or relating to a nuCamp trailer, more than thirty (30) days after: (1) expiration of the one year (12) month
Limited Warranty period; or (2) expiration of the ten (10) day notice period that follows expiration of the Limited Warranty period, if
such notice is given.
THIS WARRANTY GIVES YOU SPECIFIC LEGAL RIGHTS. YOU MAY ALSO HAVE OTHER RIGHTS WHICH VARY FROM
STATE TO STATE.
CHANGES IN DESIGN
nuCamp reserves the right to make changes in design or parts and improvements upon its products from time-to-time, without
imposing upon itself any obligation to install additional features in your trailer.
LEGAL PROCEDURES
In addition to the provisions of this warranty, the retail purchaser has available the legal remedies provided by the Magnuson-
Moss Warranty Act and any applicable State statutes. Implied warranties, including any warranty of merchantability or tness of a
product for a particular purpose, are limited in duration to the term of this written warranty. Some states do not allow limitation on
how long such a warranty lasts, so the above limitation may not apply. You may have rights, outside of what this warranty states,
which is on a state-by-state basis.
REPLACEMENT PARTS
While most parts of your camper are replaceable, some may not be. This is due to availability of
product or supply and demand of the markets and manufacturers outside of nuCamp. Should you
need a replacement part, your dealer will be able to get it for you. All OEM (Original Equipment
Manufacturer) part replacements must be acquired from your dealer since nuCamp does not support
direct part sales. If OEM parts are unavailable, your dealer will try to offer an alternative solution or
substitute according to their abilities.
AFTERMARKET ALTERATIONS
Many owners in the nuCamp family love to personalize and make their camper unique through various
accessories, additions, and aftermarket alterations. nuCamp encourages and enjoys seeing their
customers fully enjoy their experience with their products.
Important information to know and understand BEFORE you install aftermarket parts and personalize
your camper:
1. Important safety items can be damaged by installation of aftermarket parts. Even driving
fasteners into a component, depending on where it is, can damage functionality of items that
contribute to safety.

Teardrop Campers • nucamprv.com 73
2. ALWAYS consult your dealer to discuss the eligibility of installing the aftermarket part and make
sure your plan is safe
3. Make sure water sealing is not compromised by the aftermarket part, component, accessory, or
other equipment you are installing and will not impede function of previously installed
components by nuCamp.
4. Any parts and components of the camper affected by and along with the aftermarket part,
component, accessory, or other equipment installed may lose warranty coverage as outlined i
the nuCamp warranty terms and conditions. It is the sole responsibility of the owner, supplier, or
installer of the product.
DEALER SERVICE CENTER
Always call ahead for a service appointment unless you have a true emergency. Monday and Friday are
usually the busiest days for dealer service departments, as well as just before a holiday. Allow ample
time to schedule your camper for service.
When you call to schedule your appointment, have the following information available:
1. VIN (Vehicle Identication Number) contains 17 letters and digits
2. Brand, model, and oorplan of unit (ex. nuCamp TAB 320 S)
3. Date of purchase
4. Description of problem
5. Photos of damage
6. Service Record from page 62 (or repair history)
7. Service dates that t your schedule
For safety reasons, most insurance policies prohibit non-employee personnel to be in the work area.
If it is necessary for you to wait until the repairs are completed, most dealers provide you with a safe,
comfortable customer lounge.
nuCamp does not offer warranty coverage on equipment or accessories installed at any dealership,
other place of business, or by any other party than nuCamp.
NUCAMP SERVICE CENTER
Service will be performed by appointment only. When you require service or repair for your trailer from
the nuCamp Service Center, contact the service manager for an appointment.
Have the following information available:
1. VIN (Vehicle Identication Number) containing 17 letters and digits
2. Type of unit (ex. TAB 320 S)
3. Date of purchase
4. Description of problem
5. Photos of damage
6. Service Record from page 62 (or repair history)
7. Service dates that t your schedule

Teardrop Campers • nucamprv.com74
CONTACTING US
As a general policy, nuCamp prefers customers bring questions to their dealer rst and foremost.
nuCamp strives to provide excellence in customer service for the nuCamp Family. It may be tempting
to take advantage of the convenience; however, your dealer is equipped to answer all your questions
and offers vast experience in the eld. nuCamp desires that you only contact the nuCamp Customer
Service, Warranty and Repair Departments for necessary issues such as warranty service, repairs and for
cases where your dealer is unable to provide the information you need.
E-mail: help@nucamprv.com Mailing Address: P.O. Box 395
warranty@nucamprv.com Sugarcreek, OH 44681
service@nucamprv.com
Physical Address: 661 Belden Parkway
Phone: 330-852-4811 Sugarcreek, OH 44681
Fax: 330-556-4415
Website: nucamprv.com

Teardrop Campers • nucamprv.com 75
REPORTING SAFETY DEFECTS
If you believe that your vehicle has a defect that could cause a crash or could cause injury or death, you
should immediately inform the National Highway Trafc Safety Administration (NHTSA) in addition to
notifying nuCamp.
Customer Experience: 330-852-4811 ext: 834
help@nucamprv.com
If NHTSA receives similar complaints, it may open an investigation, and if it nds that a safety defect
exists in a group of vehicles, it may order a recall and remedy campaign. However, NHTSA cannot
become involved in individual problems between you, your dealer, or nuCamp.
To contact NHTSA, you may call the Vehicle Safety Hotline
Toll-free at 1-888-327-4236 (TTY: 1-800-424-9153);
Go to http://www.safercar.gov;
Or write to: Administrator, NHTSA
400 Seventh Street, SW
Washington, DC 20590
You can also obtain other information about motor vehicle safety from http://www.safercar.gov.
In the U.S:
If you nd that your vehicle has a safety defect that could cause an injury, accident, or death,
immediately inform the National Highway Trafc Safety Administration (NHTSA) and Customer Service.
If the NHTSA receives multiple complaints of similar defects, they may open an investigation and a
recall and remedy solution may be launched. The NHTSA will not become involved in your individual
case. Individual cases will be negotiated between you, your dealer, and nuCamp.
NHTSA Contact Information:
Website: www.safercar.gov Toll-free: 1-888-327-4236
Address: NHTSA Headquarters TTY: 1-800-424-9153
Attn: Administrator
1200 New Jersey Avenue, SE
Washington DC 20590
In Canada:
If you nd that your vehicle has a safety defect that could cause an injury, accident, or death,
immediately inform Transport Canada and nuCamp Customer Service.
Transport Canada Contact Information:
Website: www.tc.gc.ca Toll-free: 1-800-333-0510
Address: Transport Canada International: 1-819-420-4300
Defect Investigations & Recalls Division
330 Sparks Street
Ottawa ON K1A 0N5
Canada

Teardrop Campers • nucamprv.com76
GLOSSARY
BALL HEIGHT: Height to the top of the tongue coupler when the unit is leveled and on a level surface.
Calculated to the nearest whole inch, the very top of the ball hitch on your towing vehicle should be at
this height as well to tow your trailer on a level.
BALL SIZE: The exact diameter size in inches of the hitch ball needed to tow the trailer.
BASEMENT HEIGHT: On truck campers, this is the height of the basement from the bottom point of
the truck camper where it rests on the truck bed to the outer surface of the outer oor.
BASEMENT LENGTH: On truck campers, this is the length of the basement from the exterior point of
the front wall to the front of the bumper protrusion exterior where the protrusion would cover up the
truck’s rear lights. if there is no bumper protrusion, this measurement is from the exterior point of the
front wall to the exterior point of the back wall.
BASEMENT WIDTH: On truck campers, this is the width of the basement that would be sliding into the
truck bed between the wheel wells.
BLACK WATER TANK CAPACITY: The amount of water in gallons held by the black water tank,
measured to the nearest whole gallon. Some models may have cassette toilets installed in which the
cassette pod is considered the black tank since it serves the same purpose.
CABIN HEIGHT: Measured from the level ground to the highest point of the roof, not taking trim or
roof components into account. To the nearest whole inch, rounded up.
CABIN LENGTH: Measured front to back of exterior walls or rounded roof as the length of the actual
cabin to the nearest whole inch, rounded up.
CABIN WIDTH: Measured sidewall to sidewall outside the unit as the width of the actual cabin to the
nearest whole inch rounded up.
CAB-OVER HEIGHT: In truck campers, measured from the inside to inside of the cabover oor to
the ceiling.
CAB-OVER LENGTH: In truck campers, measured from the interior of the front roof to the edge of the
interior of the front wall.
CAB-OVER WIDTH: In truck campers, measured from wall to wall of the cabover area.
DEPARTURE ANGLE: Also called a rear ramp angle, it is the maximum ramp angle from which the
trailer/vehicle can descend to a level surface without damage. To the nearest whole degree, rounded
down.
DRY COG: Center of Gravity on a truck camper. This is the point measured from the exterior front wall
to the point where the camper is balanced- the center when the unit has weights dened as dry.
DRY TONGUE WEIGHT: The actual weight pressing down on the hitch ball by a trailer containing all
standard equipment without fuel, uids, cargo, passengers, or optional equipment. The spare tire,
battery(ies), and empty propane bottle(s) are considered standard equipment.
DRY WEIGHT: Dry Weight is the actual weight of the camper containing all standard equipment without
fuel, uids, cargo, passengers, or optional equipment. The spare tire (on trailers), battery(ies), and
empty propane bottle(s) are considered standard equipment.

Teardrop Campers • nucamprv.com 77
FLOOR PLAN: The Camper’s cabinetry layout and design name.
FLOOR WIDTH: On truck campers, the width of the oor from side to side of the lowest inner wall is the
available oor space width, not considering the oor bumper protrusion in the rear of the camper oor.
On trailer campers, the oor width is the same as the interior width.
FRESHWATER TANK CAPACITY: The amount of water in gallons held by the freshwater tank, measured
to the nearest whole gallon.
GREY WATER TANK CAPACITY: The amount of water in gallons held by the grey water tank, measured
to the nearest whole gallon.
GAWR: Gross Axle Weight Rating is how much weight each axle can hold safely.
GTWR/GVWR: Gross Vehicle Weight Rating (GVWR) is the maximum number of pounds that the Gross
Trailer/Vehicle Weight should never exceed.
INTERIOR HEIGHT: Measured from the interior of the oor to the highest interior point of the roof in
the camper, regardless of protruding components.
INTERIOR LENGTH: Measured front wall to rear wall of interior inhabitable space, regardless of
protruding components.
INTERIOR WIDTH: Measured from wall to wall inside the unit as the width of interior living space;
regardless of protruding components.
MODEL: The brand name of the trailer/camper.
OVERALL HEIGHT: Measured from the level ground to the top of the trailer, accounting for all
protrusions: rounded up to the nearest whole inch as the minimum height required to t into
an opening.
OVERALL LENGTH: Measured from the tip of the camper equipped with standard equipment, to
the rear of the camper, accounting for all protrusions; rounded up to the nearest whole inch as the
minimum length required to t into a space.
OVERALL WIDTH: Measured from side to side of a camper equipped with standard equipment, as the
minimum clearance needed to t into an opening’s width; rounded up to the nearest whole inch.
PAYLOAD CAPACITY: The maximum weight that persons plus cargo should never exceed. Payload is
derived by subtracting Curb Weight from GTWR/GVWR.
PRIMARY BED AREA: Main bed sleeping area size in inches; to the whole inch, rounded down.
REFRIGERATOR CAPACITY: This is the amount of space total each equipped refrigerator/freezer has,
to store items. This is typically measured in cubic feet (cu. ft.).
RIDE HEIGHT: Measured from the base of the tire to the lowest point (typically the axle); or the lowest
part of those parts designed to contact the ground; rounded down to the nearest whole inch.
SECOND BED AREA: Secondary bed sleeping area size in inches; rounded down to the nearest
whole inch.

Teardrop Campers • nucamprv.com78
STORAGE SPACE: The amount of storage space in cabinetry and storage compartments that can be
secured during transport: measured to the nearest tenth of a cubic foot.
TIRE SIZE: The size and specication of the tire by industry standard.
TRIM PACKAGE: The specic standard trim and accessories option selected for the model.
USABLE Freshwater TANK CAPACITY: The amount of water that can be drawn out of the freshwater
tank, measured to the nearest whole gallon.
WET COG: Center of Gravity on a truck camper; this is the point measured from the exterior front wall
to the point where the camper is balanced- the center when the unit has weights dened as wet.
WET TONGUE WEIGHT: The actual weight pressing down on the hitch ball by a trailer containing
all standard equipment with fuel and uids, but before adding passengers or cargo, passengers, or
optional equipment. The spare tire, battery(ies), full propane bottle(s), and a full freshwater tank are
considered standard wet-weight equipment.
WET WEIGHT: The actual weight of a camper containing all standard equipment with fuel and uids,
but before adding passengers or cargo, passengers, or optional equipment. The spare tire installed,
battery(ies), full propane bottle(s) and a full freshwater tank are considered standard wet weight
equipment. (Note: nuCamp denes wet weight as different from the Curb weight. nuCamp’s wet
weight takes a full freshwater tank into consideration, while federal regulation denes water in tanks as
cargo and curb weight is “the weight of a trailer/motor vehicle with standard equipment, including the
maximum capacity of fuel, oil, and coolant.”)

1-844-823-9112 • nucamprv.com •
©nuCamp. Rights reserved. Information deemed accurate as possible at time of creation. nuCamp reserves the right
to make renements during the model year without notice. All weights, capacities, dimensions are approximate. It is
the owner’s responsibility to select proper tow vehicle/equipment for proper and safe operation. TAB400-MAN-003
